Laurent Ethernet module - network relay. Ethernet controller for remote control of equipment Control of devices via ethernet
As practice has shown, household satellite tuners used by cable operators often have to be restarted due to periodic loss of sound or image. This is caused by various factors: an inhomogeneous signal level from the convector, overheating of the receiver or drying out of electrolytes. You can keep the staff on duty for quick switching, but when it is economically unprofitable, the described device will help. In principle, the application of the developed device is not limited only to this field of activity.
Briefly:
Appointment. Allows through the local network (or the Internet) to control the switching on and off of loads connected to controlled relays.
Device. In principle, the device consists of three modules: an Ethernet module, a microcontroller module, and a load control module.
The Ethernet module is assembled on a Microchip ENC28J60 microcircuit and it is more expedient to take it ready-made, for example, here: http://www.aliexpress.com/wholesale?SearchText=enc28j60. I used the Atmega32 microcircuit as a microcontroller. The control module contains transistor keys that turn on the corresponding relays. Each relay turns on or off power to the consumer in need of it.
Operating principle. The principle of operation of the device is easy to understand from the schematic diagram:
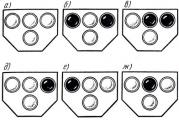
For interactive use of the system, a web interface is provided, by entering which, the operator enables or disables the corresponding port (see figure). The design and firmware provide for the use of 20 output ports: PA0… PA7, PC0… PC7, PD4… PD7. However, if desired, the number of outputs can be increased to 80 pieces - for this it is necessary to use decoders (for example, K155ID3) and rewrite the web panel javascript so that the MK outputs generate control words (0x0 ... 0xF). This approach will somewhat complicate the device circuit and it will become necessary to reboot the tuners "in turn". It is much more appropriate to use several described devices under different IP addresses.

Microcontroller firmware... To flash the Atmega32 I used a 4 wire programmer for the COM port and software. I was stitching it on an old PC under Windows control XP. I have not tried it on modern operating systems, due to the lack of COM. firmware.

You also need to install the fuses as in the picture.

Firmware source codes with comments can be downloaded. The source folder contains a working Makefile. To compile the project, I used the free one. To do this, open command line, go to the folder with the project and type "make". As a result of the compiler's work, several intermediate linking files and a HEX firmware file will appear in the folder.

To clear the result of the compiler's work - in the same place, on the command line, we write "make clean".
If you are going to cut the sources, then pay attention to two functions:
Fill_tcp_data_p (buf, plen, PSTR ("string to be sent to the packet")); char stroka = "string to be passed to the packet"; fill_tcp_data (buf, plen, stroka);
We use the first function where it is clearly necessary to pass a string (static text). The second is used with string variables.
From file ip_arp_udp_tcp.c:
Uint16_t fill_tcp_data_p (uint8_t * buf, uint16_t pos, const prog_char * progmem_s) (char c; // fill in tcp data at position pos // // with no options the data starts after the checksum + 2 more bytes (urgent ptr) while ((c = pgm_read_byte (progmem_s ++))) (buf = c; pos ++;) return (pos);) ... uint16_t fill_tcp_data (uint8_t * buf, uint16_t pos, const char * s) (return (fill_tcp_data_len (buf, pos , (uint8_t *) s, strlen (s)));)
Collected copies:

Demonstration of work:
The microcontroller firmware provides for changing the IP address (192.168.1.99 by default) and the javascript domain. So, go to the address: 192.168.1.99/?i=91 will change the device address to 192.168.1.91 after rebooting (use it very carefully and only if absolutely necessary, so as not to lose the device !!! :)). The script domain changes like this: 192.168.1.99/?d=mydomain.com, i.e. your script will be loaded from the address: mydomain.com/eth/script.js... Please note that the eth directory on the server should contain.

Open script.js and change the port descriptions to suit your needs:
Var name = "Port Control:"; // title // below the port names (can be replaced with something meaningful) var title = ["PA0", "PA1", "PA2", "PA3", "PA4", "PA5", "PA6", " PA7 "," PC0 "," PC1 "," PC2 "," PC3 "," PC4 "," PC5 "," PC6 "," PC7 "," PD4 "," PD5 "," PD6 "," PD7 " ];
For example, I have it like this:
Var name = "" Rainbow ", 75 degrees"; // title // below the name of the ports (you can replace it with something meaningful) var title = ["Russian illusion", "24 techno", "Manor", "Healthy TV", "Retro", "Drive", "Phoenix + cinema "," Children "," Hunting and Fishing "," Europa Plus "," Sony Entertainment "," Sony Sci-Fi "," Multimania "," National Geographic "," НСТ "," not used "," not used "," not used "," not used "," WWW-SERVER "];
For the power supply, you can use Charger for mobile phone(output voltage about 7 volts). In standby mode, the current consumption is about 120 mA. When one relay is turned on, the current consumption increases to 180 mA. It should be borne in mind that if it becomes necessary to activate all relays at the same time (disconnect all receivers), then the power supply must already have the appropriate power (at least 1.5 A).
The presented article is just a demonstration of the device. In the commercial version, the direction of this development has been significantly expanded - up to 150 ports, three temperature sensors, etc., it all depends on the order. (Another example for 40 ports :)
Structurally, the device can be placed in the case of some out-of-date switch in a 19 ″ telecommunication rack. Since there was no such switch at hand, I ordered in the "Mobile Service" just such a box from the fiber-optic input-distribution system (it costs 290 tons without VAT):

Hello, dear readers and guests of the "Notes of an Electrician" website.
In my previous publications, I introduced you to the touchscreen, controlled, both manually and from the remote control.
But today I would like to draw your attention to the Sonoff Basic version of the relay (switch) with the ability to control directly from a mobile phone via Wi-Fi or the Internet.
The Sonoff Basic relay is a small-sized device (88x38x23 mm) that can be easily placed behind the ceiling space, in a building niche, or in the bowl of a chandelier or lamp.

Its cost at the time of publication of the article is a little less than 300 rubles. As you understand, this is quite acceptable money, moreover, for such a modern device. I got it on the well-known Aliexpress trading platform (the link will be at the end of the article).

The kit included two protective covers with mounting screws, but, unfortunately, there were no instructions.
The Sonoff relay has the following technical characteristics, some of which are displayed directly on its housing:
- maximum controlled load current 10 (A)
- supply voltage from 90 (V) to 250 (V)
- standard wireless 802.11 b / g / n
- WPA-PSK / WPA2-PSK security protocol
- operating temperature from 0 ° С to 40 ° С
- weight about 50 g

Sonoff Basic relay capabilities:
- Wi-Fi load control
- load control over the Internet
- load control by a set timer, both with direct and countdown
- load control from multiple mobile phones

These are the capabilities of the Sonoff relay. It can be safely applied in systems smart home and for other various needs and requirements.

First, I will tell you how to connect Sonoff, and then we will check all of its declared control methods in practice.
So let's go.
Installing and connecting the Sonoff relay
For the Sonoff relay to work, it needs a supply voltage of 220 (V), which means it can be easily installed in a place convenient for you, for example, in a chandelier bowl or directly under a stretch ceiling, as well as directly in junction box if there is enough space.


For fixing the relay to the surface, it has two mounting holes.

The Sonoff relay connection diagram is very simple.
On the terminals (L) and (N) from the side (Input-Input), respectively, the phase and zero of the supply voltage 220 (V) are connected. Naturally, when connecting, do not forget about.


Please note that the wires to be connected must have a cross-section of no more than 1.5 sq. Mm. But I still tried to connect conductors with a cross section of 2.5 sq.mm. As a result, a rigid (single-wire) wire can still be connected without problems, but a flexible (multi-wire) wire is already inserted into the terminal with great difficulty, so it did not even have to be flattened and deformed a lot.

For example, I used a PVS brand power cable, which just has a cross-section of 2.5 sq. Mm. There is a plug at the other end of the cable, which I will later plug into any outlet with a voltage of 220 (V).

On the terminals (L) and (N) from the side (Output-Output), respectively, the phase and zero of the load are connected.

For the convenience of connecting the load, I connected a socket to the relay output.

By the way, terminal covers not only have a protective function, but also play the role of clamps for supply wires or cables.


This is how everything turns out beautifully and neatly. The Sonoff relay is connected.

As a load, I connected led lamp, about in one of my articles.

Here is a simple example of a Sonoff relay wiring diagram for a group of luminaires.

By the way, it is not necessary to use only a lamp or a group of lamps as a load. You can safely connect any other load to the output terminals that does not exceed rated current 10 (A). And if you still need to control a load with a current value higher than 10 (A), then it can be connected to a contactor, and with the help of a relay, you can already control the coil of this contactor.

In this regard, it can be added that when using a contactor, it is possible to control at least a single-phase load, at least three-phase, at least with an alternating current, at least a constant one.
It will look something like this.

Thus, the scope of the Sonoff relay is very wide and varied. It can be controlled by at least one light bulb, at least by a powerful single-phase electric heater, at least three-phase electric motor etc. It all depends only on your needs and requirements.
And now we will consider all the possibilities of controlling the Sonoff relay in more detail.
I will not open the relay and watch its device, there is already plenty of information on this on the Internet - look at the corresponding resources on electronics. And judging by the reviews, the performance of the relay is quite decent. By the way, who is interested to know, the relay is assembled on the basis of the famous Chinese microcontroller ESP8266.
Load control via phone over Wi-Fi
Before talking about controlling the relay via Wi-Fi, I will say that it can be controlled manually. For this, there is a small recessed black button on its body. So, with one short press of it, the relay turns on, and when it is pressed again, respectively, it turns off. Moreover, for this it is not necessary that the relay be connected to a Wi-Fi network - it will also be controlled in Offline mode.


But in addition to this, the button also carries other functionality, which I will discuss below.
To implement the ability to control the load via Wi-Fi and the Internet, you must install on the phone mobile app eWeLink. This application can be found for both Android and iOS devices. To facilitate the search for the application, you can use the necessary QR codes on the package.

For devices with Android app eWeLink can be downloaded for free from Google play and install it on your phone without any problems. The program interface supports Russian.

For iOS devices this application available in App Store... I have not tried to download and install this application on an iPhone or iPAD, so whoever tried this application on iOS devices, please write off in the comments about the results.

After installing the eWeLink application, you will need to register immediately, indicating the country and your email address. In this case, the phone must be connected to the Internet.

After that, a verification code will be sent to the mail (valid for 30 minutes), which must be entered in the corresponding line "Email code". On the same page, you must enter a password to enter your future account (at least 8 characters).

By the way, letters reach the mail services Mail.ru and Mail.yandex.ru (Yandex-mail) without any problems. But as far as I am aware, letters with a verification code do not always reach the Gmail.ru (Google-mail) mail service, so take this into account.
Then it is necessary to pair the relay and the router by holding (for 5 seconds) the same button on the switch body, after which the green LED on the relay will blink. We put a tick on the first connection mode and click "Next".

Now you need to select our Wi-Fi network from the list and enter the password for it. In order not to enter the password each time, you can check the "Remember password" checkbox. Click "Next", after which the search for our device and its registration will begin (in time it took me no more than 2-3 minutes).

After successful pairing, the relay automatically transmits data to the Chinese cloud (Amazon AWS or Coolkit), which makes it possible to control it over the Internet. But I will return to this a bit later.
As you can see, our relay is now displayed in the list of all devices (so far it is the only one in the list, but others will appear very soon).

When the relay is online, the green LED on its housing is always lit. As soon as the LED starts blinking, then the connection with the router or the Internet is lost. It is just by this indicator that it is convenient to determine whether the relay is in the network (Online) or not (Offline).
While I was testing this device, I did not notice any problems with losing the network. The device is always online and responds stably to control commands.

Now you can try to turn on the relay through the phone. To do this, click on "Relay 1". There and then a red inscription appeared stating that it was necessary to update the eWeLink application, although in Google Play update not displayed.

We go into the device settings (three dots in the right corner) and see that the application has the current version 1.5.2, and a newer version 1.5.5 is available. Click on the "Download" icon and the application update begins. After the update, the red inscription disappears, and in the settings we can see a new one current version 1.5.5.

Remember !!! The main condition for the operation of the relay is the availability of Internet access.
If all of a sudden the Internet access is lost, then a green LED will start blinking on the relay case, and in the application on its tab the Offline mode will be displayed, i.e. not available for control.
So, to turn on our "Relay 1", you need to enter it and click on the round virtual button in the center of the screen. Moreover, the relay can be controlled from the general list of all devices by clicking on the corresponding small button (on the left). In general, as you like it.
When the relay is off, the button has White color with a gray background filled around it. When the relay is on, the button changes its color to green, and the background around it turns blue.


In addition to banal control principles, you can set the time for switching on or off the relay by timer by setting the appropriate date and time for its control.
Moreover, it was surprising that the relay is triggered by a set timer even when it is offline (Offline), which means that everything preset programs timers are stored directly in the memory of the relay.

Click on the "Add timer" button and go to the timer settings page. Each timer is configurable to either turn on the relay or turn it off. There are two options for setting the timer:
- single (one-time triggering by given date and time)
- repeated (periodic operations at a specified date and time, including indicating specific days of the week)

In addition to the countdown timer, there is a countdown timer. Very useful functionality for specific purposes. It is configured similarly to a direct timer, only with the possibility of a single actuation.

In addition to forward and backward timers, there is a cyclic timer in the "Settings" tab (three dots in the right corner).

In this tab, you can configure various options for the relay actuation cycles. I will not talk about this in detail, tk. everything is simple and intuitive here.
The total number of configured timers, including the cyclic timer, can be no more than 8. And be careful, because when the time of different timers overlaps each other, none of them may work !!!
Also, in the settings, you can specify in which position the relay will remain if the 220 (V) power is suddenly disconnected from it. There are three options here. By setting the appropriate checkboxes, you can choose that when the 220 (V) power reappears, the relay can either turn on, or turn off, or stay in original state.
By the way, this is a very handy feature. Just remember the nuance that, when the 220 (V) power supply disappears and reappears, for some reason it always turns on, even when it is in the off state. Imagine that you are not at home, the mains voltage “blinked” a little and the controller turned on the chandelier on its own. Here, such an incident will not happen, tk. in this case, everything can be customized to suit your needs.

In addition to the above, all devices connected to you in the eWeLink application can be grouped together and combined in various scenarios.

Is it possible to control the relay from several phones at once?
Can! Naturally, in this case, the eWeLink application must be installed on each phone.
There are two options here. The first option is to enter the eWeLink application under the same name and password with different phones and control the relay.

True, if you enter the application on one phone, and then at the same time enter the application under the same username and password, but on another phone, then an error will occur on the first phone and the application is automatically exited. In this case, the second phone remains in the application and you can use it to control devices.


At the same time, I would like to note that when the relay is controlled from one phone, its status is displayed almost instantly on all phones that are connected to it.
Load management over the Internet
In addition to controlling the relay via a phone via a Wi-Fi network, it can also be controlled via the Internet from anywhere in your location, i.e. absolutely from anywhere in the world where there is Internet access.
So, to control the circuit breaker via the Internet, you need to enter the same eWeLink application under your name and password that you specified during registration. And then everything is by analogy. The same application, the same settings, the same control buttons, etc., the only difference is that you are not at home in the range of your Wi-Fi networks, and at a distance of hundreds and thousands of kilometers from home.
A little about the cloud.
However, you will not be able to control the relay without the Internet. management is not through local area network, but via the Internet, i.e. the same Chinese cloud that I mentioned above. And it doesn't matter whether the control is via Wi-Fi or the Internet, the control always goes through the cloud, and access to the cloud requires Internet access.
In this regard, various craftsmen have already figured out how to untie this device from the Chinese cloud or make control only through the local home network... Who cares, then this information can be found on certain resources.
By the way, if you need a similar device, but with additional function radio control from the remote control, you can order the Sonoff relay RF version.

If you want to control the load where there is no Internet at all, then you can use the Sonoff G1 relay (GSM / GPRS with SIM card support). Also, this manufacturer has available relays with temperature and humidity sensors Sonoff ТН10 / ТН16 and two-channel (for controlling two independent loads) Sonoff Dual relays.

In general, the manufacturer Sonoff has many various devices, I will tell you about some of the most interesting and significant ones on the pages of my site, so subscribe to the newsletter so as not to miss interesting issues.
You can buy Sonoff relay here:
- Sonoff Basic: https://goo.gl/jXyNm3
- Sonoff RF (radio controlled): https://goo.gl/TRPqN6
- Sonoff G1 (GSM / GPRS with SIM card support): https://goo.gl/EkpTdp
- Sonoff TH10 / TH16 (temperature and humidity sensor): https://goo.gl/MWAL5p
- Sonoff Dual (two-channel): https://goo.gl/a7rV56
And already by tradition, a video based on the materials of the article, where you can more clearly see the configuration and control of the Sonoff relay:
Unique solution. Control from an IR remote control or phone via the Internet. Output control via WEB page... Thermostat mode when connecting digital temperature sensors. Program for WINDOWS, LINUX, ANDROID. Control via computer, phone, tablet
Price RUB 4700
Parameters for payment system to generate checks:
VAT rate:Calculation subject:
Calculation method:
Price RUB 4700
Description
DOWNLOAD FILES
XControl is a software and hardware complex with which you can control electrical circuits, as well as control a variety of sensors through a computer, phone or tablet. The system consists of the main hardware unit and three programs - X-Control, which provides the ability to view simultaneously behind several hardware units, the XControl-Configer program, with which the basic settings of the unit are set, as well as the XControl program for the Android platform.
Initially, the X control system was aimed at industrial use, but it is also successfully used in the home. The possibilities of using the X-control system are very wide - from simple control / monitoring of electrical appliances, temperature sensors and sensors for opening windows / doors, to a large system in which several objects need to be monitored, even if they are located in different countries, since each module is controlled through local area network or internet.
Parameters of the main module Xcontrol:
Supply voltage 8-25 V.
Number of connected DS18B20 sensors - 10 pcs. Static electricity protection.
Possibility to control each contact output via RC5 coded.
The connection to the network is made via the Ethernet (RJ45) connector. View / control device via browser or XControl program.
The device is configured through USB port computer using the XControl-Configer software. Re-flashing the device also via USB.
The ability to control the device using XMLHTTPRequest, which is especially useful for programmers who want to control the device from their program or website / server.
Remote control
XMLHTTPRequest
The program has 3 tabs:
Devices. All added devices and their settings are displayed here, you can add an unlimited number.
Labels. For each service, you can create a shortcut, which will then be displayed in a convenient graphical form, and also has many settings. Pictures originally placed in the program folder are taken from various web resources and are used only as an example.
Magazine. To record actions.
Charts. You can create graphs for temperature sensors and analog inputs, which is especially useful when you need to display a scale of temperature changes over a set period of time.
Magazine. It records actions.
Settings. Autorun settings, Email etc.
The software can be downloaded from the manufacturer's website.
DESCRIPTION FROM THE MANUFACTURER:
XControl. Controlled by computer, phone, tablet or web browser
Updated 06.24.14. Now available for Linux!
Send a request for [email protected]= The rights to post information are limited on this site. All secrets on request by mail.
XControl is a hardware and software complex with which you can control electrical circuits, as well as control a variety of sensors through a computer, phone or tablet. The system consists of a main hardware unit and two programs - XControl Dispatcher, which provides the ability to view simultaneously behind several hardware units, XControl-Configer programs. XControl Dispatcher is available for Windows, Linux and Android.
Initially, the system is aimed at industrial use, but it is also successfully used at home. The possibilities of using this system are very wide - from simple control / monitoring of electrical appliances, temperature sensors and sensors for opening windows / doors, to a large system in which several objects need to be monitored, even if they are located in different countries, since each module is controlled via a local network or the internet.
The current versions of the bundle are:
- XControl Manager Program (Windows, Linux and Android) - 2.2.2
- XControl Configurator - 1.1.5
- Firmware - 1.7.3
- Documentation - 1.6.3
Updates
- 24.06.14
:
- XControl Dispatcher is now available for Linux.
- The XControl Manager program has fixed a bug due to which, in some cases, a memory leak occurred (This is when the amount of occupied random access memory the program was constantly increasing).
- 26.03.14 : Program settings are now stored in text form.
- 16.03.14
:
- The XControl dispatcher program has added the ability automatic switching on contact outputs at a specified time, recording of changes in values to a file, as well as a window for the status of communication with devices. Fixed a lot of bugs in the Android version.
- Minor fixes in the firmware.
- 07.12.13
:
- The XControl dispatcher program has added the ability to display a graph and send a notification by email. The settings of this program are now stored not in the registry, but in a file, so you can use the settings file on another computer. For shortcuts, a rather useful function has been added - a delay in the level change, so that events will not occur when the state is "flickering". Also, added the ability to launch the command line on event.
- Minor fixes in the firmware.
- 31.10.13 : Fixed a bug in the firmware, due to which an unknown exit state was sometimes displayed in the dispatcher program.
- 31.10.13
:
- Added the ability to connect expansion modules, which makes it possible to increase the number of contact outputs to 23.
- Added the ability to automatically control outputs based on the voltage of an analog input (similar to a thermostat).
- The style file is now open in XControl and can be freely edited (for example, change the font size).
- There are many more fixes.
- 14.09.13 : Fixed problem with receiving commands from the remote control, which appeared in the previous firmware.
- 08.09.13
: Made a lot of fixes in programs and firmware:
- The names from the sensors are excluded.
- Added the ability to invert inputs.
- Extending the capabilities of XMLHTTPRequest.
- Added the ability to set the number of services, since they are often not needed in such an amount.
- Checking of incoming data has been done. Now the program does not crash in case of network problems.
- Added the ability to flash the device directly through the configurator.
- Many more minor fixes.
- 28.08.13 : Added the ability to automatically turn off the channel after a specified time.
Main hardware module
Send a request for [email protected]= The rights to post information are limited on this site. All secrets on request by mail.
Main module parameters:
- Supply voltage 8-25 V.
- Consumption current - from 0.3A to 4A, depending on the number and characteristics of the connected sensors or actuators (for example, relays).
- The number of contact outputs is 23.7 from them on the main device and 16 more can be added using expansion modules. The maximum current of each is 500mA. It is possible to automatically turn off the channel after a set time.
- The number of contact inputs is 4. They have static protection.
- The number of analog inputs is 2. They have static protection. Measurement limits - from 0 to 2.56V. Also, it is possible to perform 4 mathematical operations on each input, therefore, the measurement limits are not limited.
- Number of connected sensors DS18B20- 10 pieces. Static electricity protection.
- Possibility of operation of the output as a thermostat (with adjustable hysteresis), combining it with one of the temperature sensors, as well as automatic control of the output depending on the value of the analog input.
- Connection to the network is made through the connector Ethernet(RJ45). View / control device via browser or program XControl.
- The device is configured via the USB port of the computer, using the program XControl-Configer... Re-flashing the device also via USB.
- The ability to set a password to restrict access to the device.
- The ability to control the device using XMLHTTPRequest, which is especially useful for programmers who want to control the device from their own program or website / server.
Remote control
Using the remote control, you can change the state of each output, except for those that are in thermostat mode. Anyone with RC5 encoding can be used as a remote control.
Expander of contact outputs
The device has 7 contact outputs. If this is not enough for your purposes, you can connect 1 or 2 expansion modules. Each module has 8 low-current outputs and 7 high-power ones.
Send a request for [email protected]= The rights to post information are limited on this site. All secrets on request by mail.
They are connected to the device as follows:
Send a request for [email protected]= The rights to post information are limited on this site. All secrets on request by mail.
XMLHTTPRequest
If you know how to program and want to write your own application to work with the device, then there is a convenient XMLHTTPRequest function for you.
For an XMLHTTPRequest request, you need to open a link at the following address: address / password / cgi / parameters. Parameters can be as follows: "t" - get temperature, i - get inputs, o - get / set outputs. Read more in the documentation.
XControl Program (for Windows)
This program is the highlight of this entire hardware-software complex. It allows you to interrogate several devices at the same time, manage them and display their status in a convenient and beautiful graphical form.
The program has 3 tabs:
- Devices... All added devices and their settings are displayed here, you can add an unlimited number.
- Shortcuts... For each service, you can create a shortcut, which will then be displayed in a convenient graphical form, and also has many settings. Pictures originally placed in the program folder are taken from various web resources and are used only as an example..
- Magazine... To record actions.
- Charts... You can create graphs for temperature sensors and analog inputs, which is especially useful when you need to display a scale of temperature changes over a set period of time.
- Magazine... It records actions.
- Settings... Autoplay settings, email, etc.
Send a request for [email protected]= The rights to post information are limited on this site. All secrets on request by mail.
Send a request for [email protected]= The rights to post information are limited on this site. All secrets on request by mail.
Send a request for [email protected]= The rights to post information are limited on this site. All secrets on request by mail.
Send a request for [email protected]= The rights to post information are limited on this site. All secrets on request by mail.
XControl program (for Andoid)
At the moment, the program works in beta mode, but is fully usable for most users. The most stable work was noticed on Andoid version 4.1, on 4.0 there were not big problems with windows, on older firmware tests were not even carried out.
In fact, the program is not much different from the version for Windows, the main difference is the optimization of the program for a small screen.
Send a request for [email protected]= The rights to post information are limited on this site. All secrets on request by mail.
Send a request for [email protected]= The rights to post information are limited on this site. All secrets on request by mail.
Send a request for [email protected]= The rights to post information are limited on this site. All secrets on request by mail.
In the program for Android, in comparison with the program for Windows, only tray, autorun and transfer of the log to Excel are excluded. Some functions are just slightly modified, mostly shortcuts.
DOWNLOAD FILES = send a request to [email protected]= The rights to post information are limited on this site. All secrets on request by mail.
MP709
USB relay, internet controlled
1320 RUB
The proposed block in assembled form allows you to implement the principle: buy - connect. The block will allow the radio amateur to get a power load switch connected to a personal computer via a USB port. The device will be useful for use in everyday life, at home, in the country. With its help, you can turn on lights, water valves and other loads via the Internet. If desired, the product can be placed in the enclosure, which is included in the delivery set. However, the user must independently modify it (make holes and cutouts).
Specifications MP709| Parameter | Meaning |
| Upit. constant, V | +4,75...5,25 |
| Upit. No. constant, V | +5 |
| Ipotr. Max. at Usup. nom., mA | ...50 |
| Supported operating systems | Win XP / Vista / Win 7 |
| Output load capacity | 10 A / ~ 220 V |
| Number of channels | 1 |
| Number of MP709 controlled from one PC using the MP709.exe program | ...32 |
| Overall dimensions, LxWxH, mm | 48 x 16 x 19 |
| Recommended case, not included | |
| Operating temperature, ° С | 0...+55 |
| Operating relative humidity,% | ...55 |
| Production | Contract Manufacturing in Russia |
| Warranty period | 12 months from the date of purchase |
| Weight, g | 100 |
The central part of the device is an ATtiny45 microcontroller operating at a frequency of 16.5 MHz. The control is carried out using a personal computer via a USB port.
Attention: the device does not contain protective fuses, be careful during installation.
To work with the device, download the MP709.exe program above. The program can work in 2 modes: local and remote.
In local mode the left window displays the connected MP709 devices. The right mouse button renames the device or displays information about it. For convenience, rename each device according to the task being performed, for example "RELE_1". The maximum number of connected devices is 32. In the same window, you can change the state of the load. On the right are the menu items for the analysis of external influences on the load.
Checking the box "state file" allows you to control loads through the file "MP709.local.set", file format is text, command format =, for example RELE_1 = ON, RELE_1 = OFF.
Checking the "FTP" box allows you to manage loads through the "MP709.remote.set" file stored on the FTP server (generated in remote mode).
Placing a check mark in the "schedule" field allows you to manage loads according to the schedule schedule file - "MP709.local.shd". File format (case is important!):
DD.MM.YYYY D HH: MM: SS =
Where DD.MM.YYYY - day, month, year, D - day of the week (value from 1 to 7, where 1 - Sunday, 2 - Monday, etc.), HH: MM: SS - hours, minutes, seconds, NAME - relay name, ON - enable, OFF - disable. It is allowed to use "*" in the fields of date, day of the week and time, for example:
**. **. ***** 6 20: **: ** RELE_1 = ON
means: every Saturday at 20: 00-22: 59: 59 RELE_1 is switched on.
Remotely the left window displays a list of MP709 devices. In the left window, you can change the state of the load, and in the right window, the date, time and state of devices are displayed. In this mode, the file "MP709.remote.set" is formed, which is transferred to the FTP server, then the file "MP709.remote.state" is read, which is read from the FTP server and displayed in the right window. By pressing the "update" button, "MP709.remote.set" transmission and "MP709.remote.state" reception are performed.
The "Settings-Autostart" menu item allows you to configure the program's autostart when you log on to the system.
The menu item "Settings-Minimize on startup" minimize the program to the tray.
The menu item "Settings-System messages" allows you to configure the display of system messages.
The menu item "Settings-Log actions" configures the maintenance and display of the protocol of the operations performed.
The "Settings-Delay" menu item adjusts the delay between repetitions of file analysis operations and access to the FTP server.
The "Update" menu item becomes available if there is new version software and allows you to download latest version MP709.exe.
It is also possible to manage the load using the command line:
MP709.exe = ...
For example:
MP709.exe RELE_1 = ON RELE_2 = OFF
To manage loads via the Internet, you must register on any public server that supports FTP access to files, for example http://narod.yandex.ru/ and create a personal page. After that, you need to edit the MP709.ini file by entering your registration data into it, for example:
HOSTNAME = ftp.narod.ru
USERNAME = mp709
HOSTDIRNAME =
PASSWORD = password
Only then will it be possible to remotely control the loads.
If you want to run the program in local mode on several computers, then specify different file names in the REMOTE_STATE_FILE parameter, for example
Computer 1:
REMOTE_STATE_FILE = MP709.PC1
Computer 2:
REMOTE_STATE_FILE = MP709.PC2
And in the REMOTE_LIST_FILES parameter list them separated by “;”, for example:
REMOTE_LIST_FILES = MP709.PC1; MP709.PC2;
Don't forget to save the ini file and restart the program.
 MP709 Frequently Asked Questions
I can't download the program on my PC. What could be?
- A program that runs on the PC of the MP710 accesses the registry directly operating system
and therefore some antiviruses prohibit its work on a PC. To ensure its operation, please create a folder on your PC (for example, "Trust"), and in the "Exclusions" antivirus settings, tell it "Trust its contents always". Place and unpack the downloaded program archive into it. Run the program also from this folder. In order to download the program from the site, please, disable your antivirus(after the download is complete, you can turn it on again).
How can you control the MP709 from your program written in Delphi, for example?
At running program via files MP709.local.set and MP709.local.shd (see description).
Or a command line like "MP709.exe RELE_0 = ON RELE_1 = ON" (see description).
How can I find out the current state of the device through the command line? (ON or OFF)
After starting the program (from the command line too) a file is generated current states devices MP709.local.state, and it must be analyzed to find out the current state.
How to make sure that when launched through the command line and controlling the relay, the MP709.EXE program window does not pop up every time, but as an option it always hangs minimized in the tray?
To prevent the program window from popping up when you call it through the command line, just check the "Minimize on startup" checkbox.
If you want the program to always hang in the tray, then manage it through the MP709.local.set file.
Does it work software on Linux?
- Works if the user writes himself control program... Add. info for MP709, MP709_Example.rar, mp709_adriver.tar.rar
I bought your device MP709 and now I can’t configure it to work via FTP. What files need to be changed and what programs need to be installed?
The first thing to check is the availability of an FTP connection to the server using, for example, Total Commander.
- To manage loads via the Internet using the MP709, please do the following:
- Disable your antivirus.
- Disable firewall.
- Register on any public server that supports FTP access to files, for example http://narod.yandex.ru/
- Create a personal page.
- Specify your registration data in the MP709.ini file, for example:
HOSTNAME = ftp.narod.ru
USERNAME = my_mp709
HOSTDIRNAME =
PASSWORD = password
- Now remote control of loads using the MP709 is possible.
- Connect to the server via FTP using, for example, Total Commander.
- Which USB hub can I use to connect multiple MP709s on one PC?
- Any HUB with external power supply is suitable for connecting several MP709s.
- Which program can be used to control multiple MP709s on one PC?
- To control several MP709s (up to 32 pcs.) On one PC, you can use the MP709.exe program.
I connected the MP709 according to the instructions, connected an incandescent lamp to the relay. In this case, the relay works several on and off (4 times it works), then the program writes a port error and the relay is not in the list of devices, i.e. disappears as a device. What is the reason?
- This effect can occur due to strong electromagnetic interference. Please connect the MP709 via a USB hub.