Photoshop Replace white color. As in photoshop change the color of the object
Everyone knows that in order to change a photo or picture, you should "go" straight in Photoshop. This graphic editor is able to work wonders, because in his arsenal - a huge number of all kinds of tools. All of them are aimed at that for each user.
By the way, in this application, you can not only add brightness, contrast, etc., in it can generally change the color, say, from the yellow machine to make the red. And it is done very simply, and does not require any skills or certain knowledge at all. Intrigued? In this case, I think the topic as in Photoshop to change the color of the object will be interesting for you.
Replace color
You can "lie" above the color in photoshop in several ways, and in this material I will talk about the two most popular. In the first way, the "Replace color" tool is used, and here, how it is implemented in practice:
Color Tone / Saturation
I bring to your attention another way to replace color. After opening the image in the layers palette, click on a small icon at the bottom as a half-circled circle, then select "Color Tone / Saturation". Next, select the color that will be replaced. Next, using cursor pipettes, click on this color. Now move the slider in the "Tone" field until you receive the desired shade, do not forget to adjust the brightness and saturation. 
Now activate the layer mask. The black tassel goes to those areas where the color replacement is not required. Save the changes and enjoy the result.
Adobe's brilliant developers probably did not suspect that the "Photoshop" tool will become among other functions by one of the leaders in the frequency of use.
Repainting brush
Tassel with the title "Color Replacement" / Color Replacement You will find in the "Brush" tool group (in the photohop CS3 and younger version). This tool is good with its simplicity (to repaint objects, you can do without time-consuming allocation), but at the same time not quite predict.
In fact, this color substitute with the cursor in the shape of a mug with a cross runs as an ordinary brush, painting the area first with the preservation of texture and structural features of the image, but with some reservations.
First, in contrast to the normal brush, in its settings, in addition to size and rigidity, it is possible to set intervals (when driving), the angle of inclination and the form of the imprint, as well as adjust the pressure pen (when using graphic tablets).
In the process of the painting, the program continuously analyzes the paint within the print imprint, replacing it specified as the main color according to the selected mode.
By default, the "chromaticity" mode, which changes the color and saturation, and the brightness remains the same, and the new shade, of course, will not exactly match the selected color.
In the "Brightness" mode, the starting tone is saved, but the brightness changes.
In the "Color Tone" mode, the color will change tonally to the declared paint, and the original brightness and saturation will be saved.
By choosing the "Color" option, we will change and saturated by saving the brightness of the original paint.
In the "saturation" mode, brightness is saved, but the tone of the original color and its saturation changes.
To the right of the mode window on the settings panel at the top there are three sample sampling options.
By selecting the first ("continuously"), we prescribe the program incessantly scanning color in the print area of \u200b\u200bthe brush while we hold the button, painting the object.
If you specify "once", a color sample will be used as a sample, selected when the first click. This option is suitable for homogeneously painted areas.
In the third version ("sample background"), only related background color areas are repainted.
The "restriction" parameter determines the expansion of the substituted color, as approves the hint when hovering the mouse.
The "All pixels" option provides for the replacement of all pixels in the "cursor-sight" brush. By selecting "adjacent pixels" (default), we will crate within the print brushes only those that are adjacent to the color pixels directly under the cross. In the "edge of the edges" mode, all sample pixels will be repainted, but with an emphasis on the edges.
In principle, picking up the corresponding size of the brush can be confidently repainted in the boundary zones of the object, even climbing inadvertently in another color, unless the "admission" parameter is correctly selected correctly, which determines the error when choosing relative colors, as the hint says. With an increase in the admission, the spectrum of replaced tones is expanding, and vice versa.
Thus, it can be concluded that the brush "color replacement" in "Photoshop" - the tool is quite flexible, and, despite its "straightness", in skillful hands it can have a lot of "settled".
All commands that can drastically change the color without destructive for image consequences are in the "Correction" list in the "Image" menu. These are features such as "Color Balance", "Color Tone / Saturation", "Color Correction" and "Replace Color".
In the "Color Tone" mode - the object "Chameleon"
Another undeservedly rarely mentioned and infrequently used method of color reincarnation lies in the modest color of the color tone. By selecting the Corrective Layer "Color" and specifying the desired paint, the overlay mode on this layer is then changed to "color tone". The object, of course, does not repaint exactly in a specified color, but the shade will change. If you double-click the pouring layer thumbnails, the colors palette will open, and you can sort out the options, watching the effect of chameleon on the canvas.
The superior is erased by a soft black brush on the mask of the correction layer than it is good.
With the Pestro painted objects, of course, it will be more, so it is better to repaint more or less homogeneous objects.
You can instead of correcting create a new layer, change the overlay mode to the "color tone" and by selecting the desired color, paint the brush object by refating then the flaws of the eraser.

A little about the color balance
By selecting "Color Balance", we can pre-repaint the selected object using the Blue-Red Color Steam Engines, "Purple - Green" and "Yellow - Blue". The tone balance is regulated in the shadows, lights and in middle tones.

Color tone and saturation
Tone correction and saturation adjustment functions are very often used for tasks such as color replacement in "Photoshop".
The algorithm for changing the color in the dialog box called the "Color Tone / Saturation" command is based on adjusting the color tone, saturation and brightness parameters. Here we can move the total color gamut of the pattern or the selected fragment (object) and adjust the colors separately in different parts of the color range by selecting the necessary tone.

In the list of ranges below (under the "style"), where the default is "all", there are six more color ranges that can be processed at the same time, but with separate parameters.
Given the power of the instrument in terms of color correction, repaint the selected object here will not be difficult.
Selective color correction
This feature allows you to change colors on the model not HSB (tint, saturation, brightness), and CMYK, driving the number of blue, purple, yellow and black in the selected color. Having selecting the object to be reproached in the image, select the necessary color group in the "colors" window and adjust its composition using the slider.
Sometimes instead of the Color Correction Command (Selective Color) in the "Correction" menu, it is better to use the same correction layer (layers\u003e a new adjusting layer or button on the layer panel at the bottom). In this case, the possibility of correction of the effect on the mask of the corrective layer with the removal of the black brush is all extra.

Replacement of white and black
By changing the color with the help of corrective functions, you could notice that the white color is not amenable to repainting in this way. The replacement of white in the "Photoshop" is solved very simply: if this area is pre-allocated, and then, removing, repaint.
However, this cardinal solution is destructive. It is justified only when the initial pattern itself is important, and its color. And if you just need to give white color to another shade, try to translate the picture to CMYK mode and use the "Custom Color Correction" function, and then return to the RGB color space.
Depending on the homogeneity of the color, you can apply any tool from the extensive arsenal of "Photoshop tools" to highlight "fast selection", "background eraser", "magic eraser", etc.), but the optimal option is most often "color range" in the menu. Selection. " And how the new color on the place of remote white is taken on, directly depends on the quality of the selection.
By the way, if you need a replacement in "Photoshop", all the arguments regarding the repainting of white color are fair and for this case.
Replace color
This command from the "Correction" list in the "Image" menu (or the corresponding correction layer) is easier to use than "color tone / saturation", moreover, its results are more predictable.

In the dialog box, pick up the paint to be changed using pipettes. The engines "color tone", "saturation" and "brightness" we achieve the desired effect. To control the allocation, it is better to choose a checkbox "selected area" (the image will be shown in the form of a mask). Slider "Sparkling" serves to correct the dispersion abroad of the selected area.
This color replacement method is most effective for contrasting and not very motley images.
Recycling in Lab mode
One of the most operational and relatively simple ways to repaint objects is to replace the color in the "Photoshop" using the color mode LAB, although it is desirable to have at least some idea of \u200b\u200bthe color space of LAB to effectively use this method.
So, the coordinate L sets the brightness value (lightness), determined in the range from 0 (the most dark) to 100 (the lightest), and the color parameters are set by the coordinates A (color in the range from green to red) and B (color in the range from blue Before yellow).
Thus, in the LAB, the brightness value is separated from chromatic color parameters, due to which the ability to affect separately on brightness, contrast and color of the image. It is this circumstance that can sometimes speed up image processing, for example, if necessary, replace color.
True, for repainting the motion of multicolored objects and objects with complex contours (hair, fur) this option is not suitable. Suppose you need to change the color of the passenger car. In Lab, the color replacement in the "Photoshop" assumes, first of all, the translation of the image into this mode.

We translate the picture to LAB mode (Image\u003e Mode\u003e Lab), then select the desired color from the libraries by turning to them double-clicking in the main color on the toolbar, and remember the values \u200b\u200bof the channels L, A and B.
In the Pipette Tools Group, select "Color Standard" and put the label (test point) in the representative region of the replaceable color of the car, thereby providing the "Info" panel.
Now add the correction layer "curves" and for each channel we find the position of the curve in accordance with the fixed values, which refers to the "Info" palette.
Curves Channels A and B must intersect the graph of the graph, and the curve of the brightness channel L is to preserve the angle of inclination.
Now you open the "Style Layer, Overlay Settings" by double clicking on the image layer. We transfer attention to its lower part ("overlay, if"). Here, by manipulating the engines for each parameter (L, A and B), separate the auto from the background or other objects.
Repaint everything
Sendments listed above the methods of color replacement, you can repaint almost any object. Depending on its complexity, one or another method may be preferable. For example, the replacement of the hair color in the "Photoshop" is easy to perform with the corrective functions "Color Tone / Saturation" and "Color Balance", but here the main task is to highlight the object with such a complex (usually) contour.
Most often, a quick mask is used to highlight (a button with a dotted ring at the bottom then be selected, using the special features of the "Specify the Edge" command in the "Select" menu.
The selected area is usually copied to a new layer (Ctrl + J), then applied to it marked above coloring tools.
And such simple tasks, like replacing the color of the eyes in the "Photoshop", where standard allocation tools are used, are generally solved in two accounts. Eye can be highlighted by selecting the "Lasso" or "oval area" item (for pupils), then, as in the previous case, replace the color by applying the correction "Color Tone / Saturation".
Brush "Color Replacement" will also cope well with such a task.
With color everything is still
Most user requests associated with repainting objects in the Photoshop program, as a rule, do not specify the specific version of the editor, and if they indicate, the replacement of the color in the "Photoshop CS6" interests much more often than others.
It may be due to a more significant update of the program with respect to the previous version than that happened before. The changes have affected the backgrounds and autosave functions, allocation, trimming tools, Magic Wand and Eyedropper, brush parameters, some filters, fill functions, edit layers, interface colors and many other things.
There are new features of working with RAW files in the new version of Camera Raw7, gradient fill, artistic image stylization, video editing, search for the desired layer in multilayer documents, as well as the new color correction of Color Lookup, etc.
Nevertheless, corrective functions in the "Correction" list in the "Image" menu have not undergone special changes in the process of upgrading the program, therefore the repainting of objects, for example, in CS2, and the color replacement in the "CS6 Photoshop" is practically no different. For those owners of early versions, which believe that new modifications have become more opportunities to replace colors.
Replacing flower
Team REPLACE COLOR Creates a temporary mask around the specified colors, and then replaces them with other colors. The principle of operation of the team is largely similar to the team Color Range (Color Range). Let's look at the action of this command on the example. Open the graphic file (Fig. 3.29).
Fig. 3.29. Source image
Select Team Image (image) | Adjustments (correction) | REPLACE COLOR. In arising from the execution of the command window, set the switch SELECTION (selection)To see in the preview window of the mask. Check the box PREVIEW (preview)To see how color setting will be reflected in the image. Tool Pipette Click on the dark place of the background. Part of the background stated. If you click not a background, but a flower, it will not be done not to replace the background color, but replacing the color of the flower - rice. 3.30.

Fig. 3.30. An example of replacing the color of the object
Choose middle pipette Add to Sample (Adding Shades) And click on the next area of \u200b\u200bthe background, several times until almost the entire background will become white. Increase the value of the slider Fuzziness (scatter). If after that there were still unsecined sites, click on them with a plus icon. Changing the position of the polzunkov HUE (Color Tone), SATURATION (saturation) and Lightness (brightness) You can change the background color in a wide range of colors.
34709 ,The image editing of images in Photoshop often the need to change the color of some object or its part, and to do it so that it is accurate to save its texture, shadow, transition effects and other attributes. For quite understandable reasons, simple brush repaintances are not applicable here, such a way for examples only when working with monophonic objects.
When replacing the color of textured or inhomogeneous objects of objects without using additional tools, do not do. So, how to replace the color of the object in Photoshop.
Replacement color with changing the layer blending mode
The easiest way to replace the color in Photoshop is to use the overlay mode. We will now not disassemble how exactly the interaction of colors works when using different modes, it is better to immediately begin the case. In our example, we will change the color of the inner circle of hand drawn gear. Now he has a blue color, we want him to become red and at the same time retained all his gradients and effects.
Open images in Photoshop, create a new layer and change its overlay mode.

Select the desired color in the palette and start to draw a conventional brush right on top of the object. Isn't it too easy?

Yes, if the area has black, white or gray (any gradations), the near-editable object. In all other cases, the repainted area will need to first allocate a lasso, a magic wand or applying a mask.
Replacement color by color correction
This method is more suitable for replacing the color of objects having a more or less homogeneous tone, for example, clothes, flower, car body, etc. Open the image in Photoshop and select in the menu Picture -> Correction -> .

In the window that opens, take the pipette and click it on the color, which is supposed to be replaced, after which it will immediately appear at the top of the window.

Then click on the square with the color (result) at the bottom of the dialog box and in the palette opened, select the desired color.

Changes can be viewed in real time. To more accurately determine the repainted object, you can use the variation and pipette option. «+» and «-» allowing you to add and remove adjacent areas.
Replacement color with a special brush
In the latest versions of Photoshop there is a special brush that allows you to replace the selected color, including neutral, any other. It is in the same group of tools as the usual brush. The essence of her work is to replace the color of adjacent pixels, the error of which the user itself determines. So when tolerance 1 percent Only one particular color will be replaced, which will fall into the focus brush.

For admission 30 percent The brush will replace the color of not only those pixels that will be in its focus, but also contiguous, having a similar color shade. For 100% All colors will be replaced. The main difficulty when working with a brush "Replacing the color" In the fact that to select the admission to the user has an experienced way. As in our opinion, 14-17 percent For a start, it is enough, if necessary, this threshold can always be raised.
1 voteHello, dear readers. Replacing colors in the picture is quite interesting and tightening. Personally, I can spend quite a long time for this entertainment. There are several tools that will help in this work and each of them is suitable for their occasion.
Today I will tell you how to change the color of the picture in Photoshop and how to use in each specific case. You will like it, I assure.

It should be noted that I have been using Photoshop CC, but we will not do anything specific, so you can safely start reading even if you have a simpler version of this program. Not online service, of course, it is weak and non-functional, but in cases with CS3, 5 or 6 discrepancies you will not notice.
Let's proceed?
Simple color correction
The equipment for high-quality shooting is quite expensive, and not trouble, if you do not possess. You can get good snapshots using editors' software such as photoshop. To be honest, I use this opportunity for almost every photo that I post on my blog. I like the colors of the bore, rather than typically lay out on the Internet.
By the way, if you are interested in - read the article already published in Start-Luck. I will take a pre-prepared picture in order to proceed with the story of a simple color correction and go to work.

I open the tab in the "Image" top menu, and then the category "Correction". Do not regret the time to understand what "brightness / contrast", "juiciness", "color tone / saturation", and other options that will find in this tab.
You will not spoil anything, you will not break and always be able to return to the original option, simply refusing to save changes when closing the picture. Just see how those or other instruments behave. As they say, what you reach, always remembered better than when you explain everything on your fingers.

For example, open the "color tone" and twitch for various sliders, you will immediately see how it changes the colors of the picture and you can build a logical chain between your actions and result. Do not forget to check the box opposite "View".

Color balance changes color stronger, setting is thinner and interesting.

If you want to work with a certain element, it's enough, I have already told a simple and understandable language about how to do more than 8 tools and ways. I will not repeat, it is not difficult to find a publication, just go through the link just above.
Now I am absolceing the easiest way - the "magic wand". Just clicking on the object and the desired fragment is highlighted. Using the setup tolerance, I'm on setting the scatter on color.
As you know, there are many shades of white, blue and any other color. The higher the tolerance number, the more shades from the spectrum will determine the program and allocate with the help of a stick.


Change the direction of the curve and the color becomes another.

By the way, if you want to work with the background, that is, by the site that is beyond the selection framework, then you need to select it first, and then in the "Highlight" tab of the top menu, select the "Inversion" position.

Running ants are removed using the Ctrl + D key combination.
Replacement in contrast
Very detailed about this method I talked in the article « » . Now we quickly run the basic functions. I will give a small instruction that will be enough.
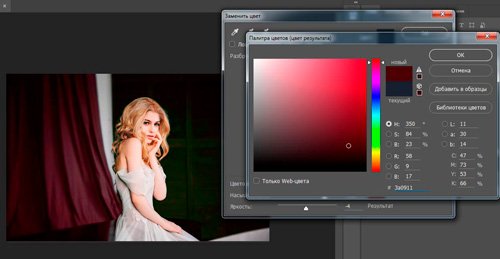
This tool is ideal for replacing the bright, highlighting colors in the picture. For example, a yellow apple on a white background, a red car in a green forest or like now, a bright girl in a dark room.

Returning to the "Correction" section and I choose a "replacement color" tool here. With the "Pipette" tool, which appear automatically, choose a shade that will have to change. In this case, click on the curtain. Then move the "Spots" slider so that the girl becomes almost black, and all other objects had the outline ( how to draw a black background I wrote a whole article).

Please note the curtain and wall should still have the outline, just put the scatter 200 will not be released. Otherwise, the program will not take into account shades and paint everything ugly, one color. Now I climb on the grochka with the color at the bottom of the window, the "result" is written below it.

I click on the spectrum and various shades until I finally get the ideal result.
Ready. Not repainting the photo We got a great result. Just a few seconds. Now let's take a little about the shortcomings. As I said above, use this way convenient if the image is contrast. To repaint a concrete girl's dress in another shade, it will have to be allocated. I can offer another interesting, in which much attention is paid to complex objects, such as hair.
I myself exercise the instrument "Magnetic Lasso".

Now I carry a dress to a new layer by pressing Ctrl + J simultaneously. ? Read the publication with a detailed story about them, which I recently prepared for beginners.
We return to the "replacement of the color" section "Correction". In this case, the shade will have to be changed using the slider "color tone", "saturation", "brightness". If I click on the piercing "result, it turns out extremely disgusting and implausible.

In my opinion, the shade of the lady's dresses is still far from the ideal, and therefore I want to blur him a little. I open the "Filter" tab and choose all the favorite "Blur in Gauss."

The robe has become less clear, but the shade was somewhat aligned.

As I said, it is best that this method works if there are contrasts, so I am satisfied with that, and I will tell you about the last tool today.
Quick tool for complex cases and cardinal changes
I like the brush "replacement of color" more than other tools for solving a similar problem. You can find about it in the article « » in which I turn the most ordinary girl in a red-haired smourf woman with blue skin.
It is not difficult to find a brush, for this you need to right-click on a conventional brush. An additional menu will open in which you can select the desired tool.

I choose color. Everything is as usual. The window on the right. In this case, black, and then paint the part of the girl's hair. Note, all shades are saved.

You can put green.

In order to change the size of the brush, use the keys.

I can also offer a learning video on this topic.
Well, if you want to more professionally understand the program and understand how it works, this or that function in the Photoshop program works, then I propose a very useful course " Photoshop for beginners in video format ».

Maximum useful information about tools. That's basically it. Do not forget to subscribe to the newsletter to be aware of the most recent, useful and simple information.
To new meetings and good luck.


