Where is the screen button. How to take a screenshot on a computer: all possible ways
- So, our picture is taken, but where is it, where is it saved? It's simple - the picture is copied to the Windows clipboard (a temporary folder in which any objects can be stored). You can get it from there different ways, basically it is a combination of burning keys Ctrl + V.
Thus, you can insert a photo of the display into social network, a graphics editor or other program that supports work with the clipboard. But since we're talking about the No Programs method, let's use Paint. In Windows 10, it can be launched via search.
- Next, press Ctrl + V and our screenshot gets into the program, in which it can be edited and saved anywhere.
Using the PrintScreen button, you can take a picture not only full screen, but also a separate active window. The Alt + PrntScrn combination is already used for this.
Windows scissors
Another tool we'll talk about is standard function Windows called "Scissors". The program copes with the basic tasks associated with creating screenshots.
- First, we launch the tool we need using the OS search.
- We select the mode of operation (arbitrary shape, rectangle, window or full screen).
- In our case, a screenshot of the window will be taken. Hover the mouse pointer over it and see a red frame highlighting the desired object. Next, click.
- Screenshot in the editor. Here we can apply navigation elements to the drawing, add captions, etc. And, of course, save the result to the computer.
If necessary, a delay can be set in the scissors.
Screenshot software
Apps created by third-party developers to take screenshots are powerful, in some cases professional. Functional. Below you will find a list of such programs, and after each review, we will express our opinion on who is suitable for this or that utility.
LightShot
This program is especially popular among users. Let's figure out why.
- You can and should download the screenshot on its official website. Moreover, not only computers and laptops are supported under windows managementbut also machines based on macOS.
- Run the downloaded installer of the program to create screenshots.
- Select Russian and press [k] OK.
- Accept LightShot license by checking the box you want.
- We are waiting for the installation to complete.
- At the last stage of the installation, it is important to uncheck the boxes for downloading additional software and only then click [k] Finish.
As a result, a screenshot icon will appear on the taskbar.
We make a right click on the program icon and go to the settings.
The [k] General tab allows you to set automatic copying of the link to the clipboard, disable notifications, display the cursor on the screenshot, or select the program language.
Tab [k] Hotkeys, as you understand, allows you to set a combination of buttons for fast work with the program.
The section of formats allows you to select, in fact, the format of the resulting image and the degree of its compression.
Important! The higher the quality score, the better the picture will be. It is not recommended to use values \u200b\u200bbelow 70%.
When the button is pressed, an area selection tool appears. Drag the rectangle to capture the desired fragment. As a result, toolbars will appear on the screen that will help you arrange the screenshot and export it anywhere.
An important advantage of LightShot is the presence own server, to which pictures are uploaded. In the future, this helps to share them with the opponent.
Joxi
Another program with which you can easily take a screenshot on your computer.
- You can download the application on its official website.
- Launch setup file... Which was loaded a step earlier.
- Choosing a language and moving on.
- Disable additional software that Yandex.
- We answer affirmatively to the program license.
- You can also change the installation path if necessary. We skip this step and press [k] Next.
- It remains only to click on [k] Install.
- The installation process doesn't take long. We are waiting for its completion.
- At this point, with the installation of Joxi, we download and proceed to work with the program.
So, now let's figure out how to take a screenshot of our computer screen using Joxi. Initially, you need to run the program and enter your Email for registration.
To get started, all that remains is to press the marked button.
You will have a set of four tiles, 3 of which are responsible for the screenshot mode, and the fourth opens the settings.
In the [k] Storage tab, we see the option to export screenshots.
[k] Settings are responsible for the image quality and a number of other parameters, including:
- autostart of the program;
- using a proxy;
- saving copies of screenshots;
- display the export process;
- display a message about the end of the download;
- etc.
You can see all the settings items in the screenshot below.
Tab [k] Hotkeys allows you to set your own shortcuts for working with the program.
As soon as we select the Joxi mode of operation, a selection tool will appear, with which we need to mark the area that should be photographed.
After taking a snapshot, a toolbar will appear, with which you can mark and export a screenshot.
The following export options are supported:
The export menu is in front of you:
The program is very similar to the same LightShot, however, unlike it, you have to register here.
Ashampoo® Snap
This program, along with Snagit, is professional solution to take screenshots from the PC screen. It is written below where to download the utility, how to install it and how to use it.
- Initially, we download the program on its official website.
- Run the downloaded installer.
- We press the button [k] Accept and continue.
- If necessary, select the installation directory and press [k] Next.
- Click on the desired design style.
- And we are waiting for the installation of the program to complete.
- As a result, we will only have to click on the button marked below.
Installation is complete, we are going to work with the screenshoter.
- Since the program is paid, when you first start it, select [k] Continue familiarization.
- After reading the hint, you can close it.
- The icon of our program will appear in the system tray. If you click on it, you will see an extensive context menu... It contains a variety of capture methods, including:
- desktop capture;
- capture 3D games;
- capture of a window / object;
- scrolling capture;
- capture of the area.
There are also a number of additional tools, such as, for example: eyedropper, video capture, timer, text recognition, etc.
- We select the mode for working with screenshots and select the area that should fall into the picture.
There is a precision aiming tool in the corner of the screen. Thanks to him, you can hit exactly the pixel.
- When the button is released, a screenshot of the computer display will open in a special editor. Here you can add a lot of effects, add navigation elements to the picture and save the image anywhere, including FTP and clipboard.
In order to bind a specific button or a combination of them to the screenshoter, go to the corresponding settings item.
An excellent program, the functionality of which is not enough except for a perfectionist. But we also have something for him, read on.
Snagit
This application, although not in the first place on our list, however, is the pinnacle of tools for taking screenshots on PCs or laptops. It is obvious the best solution for professionals, which, oddly enough, will suit anyone.
Download Snagit- Once the Snagit file is downloaded, launch it.
- In the window that opens, click the link marked in the screenshot.
- Configure the program the way you need it and click [k] Continue.
- Click on the large button labeled [k] Install.
- We are waiting for the completion of the installation.
- Finally, click on the button marked below.
So, our screenshot is installed, it's time to figure out how to work with it. Immediately after installation, a small window will open in which there are 3 main tabs. We recommend choosing the central [k] Image.
There are also a number of additional and very useful functions, we will consider them in more detail:
- program operation mode (screenshot of the entire screen, windows, areas and much more);
- effect (shadow, frame, folded page, etc.);
- export (outputting the result to print, to a file, to the network, to the clipboard, etc.);
- activation of preview;
- automatic copying of a picture to the clipboard;
- write cursor;
- starting the editor.
There is also a main menu, made in the form of links and drop-down lists.
- When the operating mode is selected, you can do the Screenshot itself. To do this, stretch the selection area, guided by the magnifying glass.
- Once the screenshot is taken, the Snagit editor will open in all its glory. There are tools for all occasions, the set of functions is simply amazing.
- To export the picture, press the big green button in the upper right corner. As you can see, all imaginable and inconceivable ways of saving the result are supported.
Snagit is great and undoubtedly best appthat only can be found for screenshots on your PC.
Yandex.Disk
Download Yandex.Disk- When the file is downloaded, you can proceed with the installation. To do this, double-click the LMB.
- All files necessary for work will be downloaded from the network, after which an automatic installation will follow.
- Uncheck both boxes from the items marked with [k] 1 and click [k] Done.
- When you take a screenshot of your PC or laptop screen, the window we have chosen will be highlighted with cute black and white stripes.
- When the area is selected, the editor will open, in which the result can be processed further, and then exported.
For those people on whose computers Yandex.Disk is already installed, the possibilities of this program for working with screenshots will be a pleasant surprise.
Movavi Screen Recorder
For a change, consider another application that can capture screen content.
Download Movavi Screen Recorder- So, after the distribution has been downloaded, start the installation process.
- Select the language, if it is not Russian, then click on the marked button.
- We begin the installation process by clicking on the button labeled [k] Next.
- We accept the program license.
- Uncheck the boxes opposite the additional software installation items and press [k] Next.
- We skip setting the installation path and click on the marked button.
- We are waiting for the completion of the installation process.
- The program has been installed successfully. It remains only to press the [k] Done button.
Something like this looks like the screenshot itself and the selection window. This approach, in our opinion, is less convenient than stretching a rectangular area.
This program, in our opinion, is the worst in the entire list. We only turned it on so that you can feel the contrast.
Monosnap
This program is little known in wide circles, but in fact it is a rather interesting tool, which we will also talk about.
Download Monosnap- Let's start installing the program and at the first stage just click [k] Next.
- If necessary, specify the installation path, then click [k] Next.
- Finally, we move on to the installation itself.
- Installation of the application for creating screenshots on a PC is quick.
- We complete the process by clicking on the indicated button.
- If the installation is successful, you will see a corresponding notification on the desktop.
- We hold down the specified combination of buttons and take a screenshot. In our case, this is an area, which means we stretch the selection using the enlargement tool.
- When the button is released, a simple editor will start, which, although far from Snagit, can still handle the main tasks.
You can find the hotkeys of the program in its settings.
An ordinary application, about which, by and large, there is not much to say.
Carambis ScreenShooter
Here is another program that plays the role of a photographer on your computer. You can download its latest Russian version for free a little below.
Download Carambis ScreenShooter- Installation begins with unpacking. We are waiting for the completion of the process.
- Then select the language and click [k] OK.
- The first step of installation involves just pressing the button marked below.
- Now you need to accept the license.
- Don't forget to ditch your antivirus, unless you really need it.
- Finally, click on the button labeled [k] Install.
- It remains to wait for the installation to complete.
- Set the checkboxes as you need it and press [k] Finish.
In order to access the functionality of the program, you just need to click on its icon in the system tray. Here you will find options for exporting a screen photo.
This is how the selection area and the editor itself look. As you can see, everything is very simple and beautiful.
The simplest editor that is suitable for people who do not want to bother with complex programs with a lot of settings.
Picpick
This application for creating screenshots on a PC is simple and at the same time has good functionality. However, now you yourself will understand everything.
Download PicPick- The beginning of the installation is a simple click on the [k] Next button.
- We accept the license terms by clicking [k] I Agree.
- We start the installation by clicking on [k] Install.
- The installation itself will not take much time.
- We end the process by clicking on the designated item.
All PicPick functionality is available after clicking on the program icon in the system tray. In this case, we are showing ways to capture a PC screen.
Taking pictures is the same as everywhere else. It even has a magnifying glass for more precise targeting.
And here is the program editor. As you can imagine, it is quite functional.
The program can please many users, there is even a ruler that can measure pixels. However, why all this when there is Snagit?
FastStone Capture
The last one on our list is a program that is in no way inferior in functionality to Snagit itself. Let's figure out how to install and operate it.
Download FastStone Capture- Set this application not necessary. Once the archive is downloaded, unpack it and open the program folder.
- For the screenshoter to work, you need to run the file indicated in the picture below.
Since the program is paid, we choose a trial period.
This is how the toolbar looks like.
And these are all the ways to export FastStone.
The main menu of the application looks like this. Here you will also find its settings.
And this is how the object that will be photographed stands out.
For convenience, we are shown hints all the time.
This is the program editor. There are a lot of the most different functions and tools.

Increasingly, when working at a computer, and on the Internet in particular, we need to make screenshots of pages.
Most likely, you already needed to do this in some game, or send some report in the form of a screenshot of the screen to confirm your words.
Well, or it happens that the interlocutor does not quite understand what they want from him and need to literally on the fingers, or rather, on the skin, highlight some element on the page and indicate the action.
For these purposes, this article is to solve your problem, which haunts and helps.
If you can't make a screen using the Print Screen key
Let's first take a look at how a screenshot of a page with the Print Screen key is generally taken, namely without any additional programs.
Stage 1: put the screen in the buffer
For this, if you have big keyboard (with a numeric keypad), you just need to press the PrtScr key.
In this case, a screenshot of the entire screen will be taken and fit into.

If you want to "take a picture" only of the active window (if several windows are open in Windows), then you need to press the Alt + PrtScr key combination. That is, hold down Alt and, as it were, add PrtScr to make everything work.

If the Alt + PrtScr key combination does not work for you, then find the Fn key (near Alt) and combine Fn + PrtScr.
This often happens on a laptop, where the keyboard is small and does not have a number pad on the right.

You can at this time be on any site, or just in word program or another program, or play a game and press a combination of these keys to take a screenshot.
At the same time, we want to note that you will not see any information that the keys worked. In order to understand that the screen has been made, you need to go to stage 2.
Stage 2: insert the taken snapshot into a graphics editor
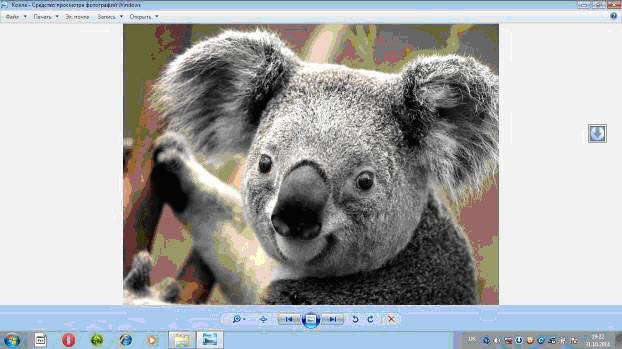
After we have completed the first stage, we run the standard Paint program that is available on any Windows OS:

And then just in the program window press the key combination "Ctrl + V"


The screenshot will be inserted into the program from the clipboard. Now you just need to select "Save" in the top menu, or press the key combination "Ctrl + S" and select a location on your computer to save in any of the available formats: jpg, png, gif.
You can stretch or squeeze it if you want.
Taking a snapshot of a page in Windows 7 with scissors
If you have an operating room windows system 7, then you can do without the keys described in the previous section, and without all kinds of inserts.
You just need to run a standard and very handy program called Snipping Tool.
You can find it in the Start menu. If it is not visible there, then use the search, just as we searched for Paint.

Immediately upon starting the program, the cursor will change to a cross. By holding down the right mouse button, you can select the desired area of \u200b\u200bthe screen, release the button and a screen will be automatically made.
This mode is called "Rectangle". It is the default. But you can select other options in the menu from the drop-down list: "free form", "window", "full screen".

After the screenshot is taken, save it to your computer using the "Ctrl + S" keyboard shortcut.
Lightshot Screenshot Software
Download software by button (for Windows):
Download Lightshot free
or go to the official website https://app.prntscr.com/ru/... There is also a version for Mac.

A screenshot (English screen - a screen, shot - a snapshot) is a screenshot of the monitor screen. Using function and programs operating system, as well as additional tools, the user can take a screenshot of the entire monitor screen or a separate part of it. Screenshots are placed as illustrations in software installation instructions and attached to the manual, placed in textbooks and manuals.
PC users use screenshots:
The ability to transfer a picture quickly from a computer online helps both in business correspondence, and with friendly communication. It is helpful for a novice PC user to learn how to take a screenshot of the screen and where it is saved. We offer you an instruction illustrated with the same screenshots obtained from the monitor.
Screenshot without programs in Windows
Taking a monitor snapshot is a function of the computer operating system. No additional software is required. It is enough to press the PrintScreen key. IN different models on the keyboard, the key can be named PrtSc, PrtScr, PrnScr, or PrtSc / SysRq. Pressing it instantly copies what is displayed on the monitor.


Photo: classic layout of the PrintScreen button 
Photo: PrtSc button options
Like all copied material, the snapshot is stored on the clipboard. To save it on your computer as a file, you can use any graphics editor.
The easiest way to save a photo is through Paint, one of the standard Office utilities. To do this, follow these steps:
- press the PrintScreen key;
- open Paint (path: Start - All Programs - Accessories - Paint);

- press the "Insert" button in the upper left corner: the picture will appear in the field;
- to save the file, you need to click the button in the upper left corner;

- in the menu, click "Save As". In the field that appears on the right, you can select the format from the list: PNG, JPEG, BMP, GIF;
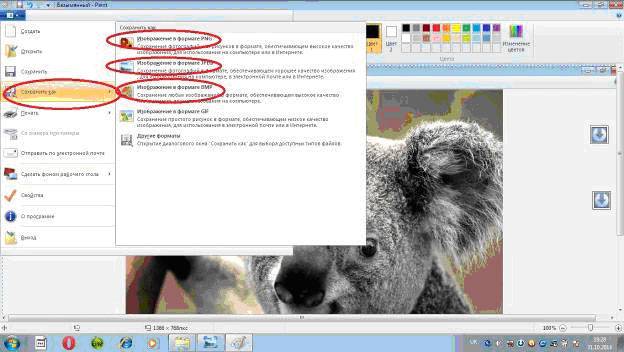
- when the format is selected, the "Save As" window appears; in the second line, you can select the location where the file will be stored;
- having selected a disk or folder on the disk, click "Save" at the bottom of the window on the right.
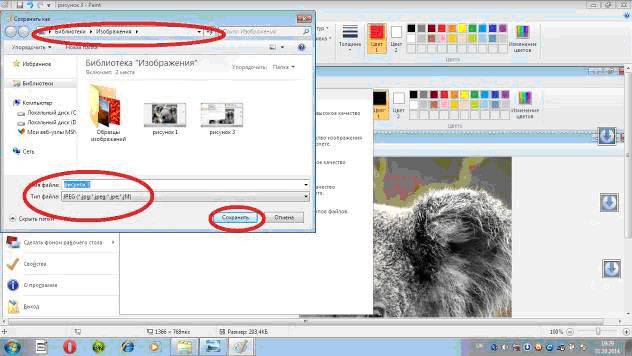
By default, the file is saved on drive C, in the Pictures folder on Windows 7 or My Pictures in Windows XP.
The screenshot can also be sent immediately via e-mail, print. And also it can be pasted into Word.
To do this, you need to do:

In this case, the screenshot is saved along with word file... The resulting image can immediately illustrate the text. You can work with it as with any picture inserted into Word: change the quality, size, position, compress, crop, copy ...
Full screen screen
Utilities software give the opportunity to take a screenshot of the entire screen. With the help of "Scissors", you can select the entire field and, save the picture or select the fragment of interest. To get an image from your laptop, just click keyboard shortcut Fn + PrtScn... The picture immediately opens in Paint - it remains to save it or select another task: print, send by e-mail. Most of the above image editors allow you to take a screenshot of the entire screen immediately after launching them and pressing the PrintScreen key.
Video: Screen Capture in Windows 7
Image from a separate part of the monitor
Scissors and Fn + Alt + PrtScn on any of the laptops to save the image of the active window - this is the most quick way get a snapshot of the desired fragment. A screenshot of the active program is also performed by the key combination Alt + Print Screen.
Scissors is a very simple graphics editor.
To open it, you need to follow these steps:
- press the Start button;
- select "All programs";
- find and open "Standard";
- open "Scissors".
The image you are interested in should be on the monitor before opening the "Scissors": when they are in operation, you will not be able to perform actions outside the program. It is better to save the file in JPEG - editing pictures of this format, you get more options.
Let's consider the work of an image editor. Program Picpick not the most difficult, but has a sufficient number of functions for working with images, including the function of creating screenshots. If you open PicPick and press PrintScreen, the image of what is on the monitor at that moment immediately appears in the working area.

By default, in the same way as in Paint - the image is saved in the "Documents" folder. If you have previously worked in Paint, then understand how to take a screenshot of a separate part of the screen in Picpick, not difficult.
You need to do the following:

Working in PicPick, you get the opportunity not only to save the resulting screenshot in the selected format, but also immediately insert it into the desired program: Excel, Word, Power Point.
Arbitrary area
You can select an arbitrary area of \u200b\u200bthe screen by selecting "Custom area" from the list of tasks. The cursor moves like a pencil, highlighting the outlines of the area you want. The shape of the selected area depends solely on your vision of the future screen and your confident control of the mouse.

Selecting an arbitrary area of \u200b\u200bthe PC screen, copy the desired fragment. But when you use such a screenshot as a picture in Word or Power Point, you still get it in the shape of a rectangle. A white background is formed around the picture you selected with the cursor.
Screenshot program
An example of working with Paint can be considered a classic way of taking a screenshot. However, in Windows 7 in the "Standard" section there are still very simple program "Scissors", with which you can select and "cut" any part of what we see on a working monitor. The figure shows how a screen of the "Scissors" process is made through Paint.

The compact "Scissors" window does not interfere with the view. The cursor covers the entire screen or highlights the desired part of it. Minimum editing tools. You can select PNG, GIF, JPEG format for saving. If you need only a fragment of the picture of a working monitor in your work, you can resort to processing the image obtained in Paint, that is, cropping it. This is cumbersome and archaic. The task is simplified by the aforementioned "Scissors".
There are many additional programs with more advanced capabilities: graphic viewers, converters, image editors. Depending on your goals, choose the most suitable one: simple - for quick obtaining information, or voluminous - for editing, transforming photos like Photoshop. A simple editor has the necessary functions to get a screenshot of the entire screen or a separate part, to create labels, draw, add labels.

More complex programs have the functions of correction, deformation, transformation, image conversion, video clips, presentations:

You can use an online editor like Pixtick. It has the necessary set of functions for receiving screenshots, processing them. Some programs for digital cameras, photo and video converters also have a capture function. In addition to this, they have dozens of other functions, which makes the work longer if the user has not yet acquired the necessary skills.
We do without a print screen
The PrintScreen key may not function because the keyboard is defective or clogged. If the print screen does not work, this will limit your options a little.
To get a screen without the PrintScreen key, you can use one of the following methods:
- apply "Scissors" - this is possible if you have Windows 7 or the most a new version OS;
- use an additional image editor: PicPick, EasyCapture, DuckCapture, Clip2Net or others;
- perform a screen using additional equipment - a digital camera, which is the least convenient, therefore acceptable only as a last resort.
It is still better to install one of the above image editors on your computer, since standard utilities operating systems can fail and do not always have a sufficient set of tools and functions.
>Need to take a screenshot on your computer?
I will help you:
I will show you 2 proven ways to take a screenshot on a computer or laptop, as well as how to save and send it.
I was motivated to write this article by people who, in 2019, still use phones and cameras to capture what is happening on the screen.
First, it turns out ugly blurred image... Secondly, it takes a long time and takes a lot of effort.
Let's get started:
At any windows versions there are standard programs installed by default with which you can take a screenshot.
I'll cover the most popular tools:
Print screen key + Paint program
First, find the Print screen button (the following versions are possible: PrtScr, PrtSc or Print Scrn). Most often it is located in the vicinity of the F12 key.
The next step is to open the window you want to take a snapshot of: site page, VK correspondence, money transfer check, ... In general, what you need to record at the moment.
I'll show you how to take a screenshot using the desktop example:
Press the “Print Screen” key if you want to take a photo of the entire screen. “Alt + Print Screen”, if you need a screenshot of only the active window, the program in which you are working in this moment... - It makes sense to use it if it is not open in full screen.
The screen will be saved to the clipboard. At the same time, you will not hear sound effects or animations, so do not rush to be afraid that this function does not work for you.
Once the screenshot is in the clipboard, you cannot copy any information before you save it. Otherwise, loss will occur.
To see the resulting screen, you need to insert it into a program that can display graphics. For example, Paint, Photoshop - you can not only display, but also make changes. Word, PowerPoint - View Only.
I will use the easy to use graphic editor Paint. Simply put, an image editing program.
I paste the screenshot into the editor using the “Ctrl + V” key combination or the “Paste” button in the upper left corner.
The combination of keys, their simultaneous pressing “Ctrl + V”, works absolutely in any program. If you can't do it, use the familiar insert using a computer mouse.

If you need only some specific part of the image, then use the tools - "Select" and then "Crop" - in the picture above are highlighted in red rectangles.


Do not forget to click the left mouse button “Save”.
Scissors program
The easiest way to find the scissors program is to use Windows search:
- Click on the magnifying glass next to the Start button
- Enter the word "Scissors"
- Right-click or Enter / Enter to launch the application

Alternative way: go to "Start" → folder "Accessories - Windows":

Click “Create” and select the area you want to take a snapshot of. The default mode is “Rectangular”.

Mode functions:
- Freeform - the outline of the screenshot is drawn by hand using the mouse
- Rectangle - selects a rectangular area
- Window - takes a picture by clicking on the desired window. It is convenient when several programs are open at once not in full screen. With a mouse click, you can choose to capture only one of them.
- Entire screen - takes a photo of everything you see in the monitor in front of you
Suppose you need to make a screen of VK correspondence:
- Go to the dialogue and find the messages you need
- In the "Scissors" program, click "Create"
- Select the area you want to capture
Then you will get:

By the way, with the help of the Pen and Marker tools, you can write and mark on the screenshot. And to erase the mistakes made with “Rubber band”.
F1 - open help. Useful for those who want to get acquainted with the work in "Scissors" in more detail.
- Click "File" in the scissors program, in the upper left corner
- "Save as…"
- Choose where to save the file
- Change name if necessary
The first and the second item can be replaced by the key combination “CTRL + S”.
In my case: Place - desktop, File name - Unnamed.jpg, which ideally should be changed to something more understandable. Otherwise, after a while you will not be able to find the required picture: the screenshots will have almost the same name, except for the number at the end.
If you try to close the Scissors program without saving the image, a dialog box appears prompting you to do so.

This can also be regarded as another option for saving.
How to take a screenshot without programs?
In order to get a screenshot without using programs, you must simultaneously press the "Win + Print Screen" keys.

Then the screenshot, without sound and visual effects, will be automatically saved in PNG format at the address: "This computer" → "Pictures" → "Screenshots".
You can go to this folder in order to edit, copy or send a picture.
Do not forget to come up with a unique name for each photo, otherwise you will get this disgrace:
How do I send a screenshot in a message?
There are two ways to send a screenshot:
Second, press the "Print screen" button or select the desired area for the picture using the "Scissors" program. Then, in the message sending field, apply the key combination “CTRL + V” or the right mouse button, and then “Paste”.
Conclusion
Each of the 3 methods described in this article has its pros and cons:
"Print Screen" + Paint - works in 100% of cases, but the longest and most labor-intensive.
“Scissors” are very easy to use. Indispensable when the “PrtSc” button does not work, is broken or not at all. But they do not always work, for example, when you need a screen of a window that closes on click.
“Win + Print Screen” is a quick way to take many screenshots of the entire screen without changing titles or editing.
Choose a snapshot method based on your specific needs. Remember, there is no best, there is the most convenient one in the current situation.
If you have any problems or questions - feel free to ask them in the comments!
Record navigationOften, computer and Internet users are faced with the need to take a snapshot of what is happening on the computer screen, in other words, take a picture of the screen or part of it. Such a picture is scientifically called a screenshot (from the English word screenshot).
A screenshot is a screenshot, that is, an image (photograph) of what a person sees on a computer monitor.
Here are some examples of when and why you might need it:
- You are faced with some kind of computer problem or question and decided to ask a friend for help by e-mail. Explaining everything that happens on your computer in words is too long and not always appropriate. But to photograph and demonstrate the "problem" moment - just right. It is both fast and convenient!
- You write instructions for working with a certain computer program... It will be just wonderful if you add illustrations to it (like in this article, for example).
- You are a student and want your work in a computer discipline (essay, coursework, diploma) to be highly appreciated. In this case, illustrations will be a big plus.
- You love playing computer games and would like to capture interesting moments.
How to take a screenshot in Windows. Print Screen button
If you need to take screenshots from time to time, that is, not a lot and not often, then the easiest way is to use the Print Screen button (also called "Prt Scr") on the computer keyboard.
As a rule, after clicking on it, nothing happens - no clicks, no flashes. But the photographed screen will already be "fixed" in the computer's memory.
Then you should open some image manipulation program (Paint, Photoshop or other similar) or microsoft program Word and paste the photographed screen inside.

I'll show you how this is done in the Paint program, since this standard programand it is on almost every computer.
Finally, open Paint (Paint.net).
Click on the "Paste" button or on the "Edit" item and select "Paste".

That's all - the screenshot is inserted! Now it remains to save it on your computer (File - Save As ...).

In the event that you want to insert this image into the program Microsoft Word, place the blinking cursor in the desired place on the sheet, right-click and select "Paste".

Let's summarize. If you want to do full screenshot, need to:
- press the Print Screen button on the keyboard
- open Paint, Photoshop or Microsoft Word
- insert a snapshot into it
- save on computer
In the event that you need to do snapshot of only one window, which is open at the moment, press the combination of Alt and Print Screen keys, paste into the desired program and save.

This method is universal, that is, it is suitable for any version of Windows.
Screenshot via "Scissors"
If you have Windows Vista, Windows 7 or 8 installed on your computer, there are more convenient way "Photographing" the screen. This is a small program called the Snipping Tool. Let's talk about it in more detail.
Click on the "Start" button in the lower left corner of the screen.
A list will open. Select from it the item "All programs" ("Programs").
A rather long list will appear. Select "Standard".
Finally, open the Snipping Tool.
If you do not have such a program, it means that it is simply not “built-in” into your system. In this case, take pictures using the previous method.
![]()
Most likely, a small window will appear, and the rest of the screen will seem to be "clouded".

The cursor will be in the form of a plus sign. With this plus sign, you need to select the desired part of the screen or the entire screen, that is, press the left mouse button and, without releasing it, drag over this part. As soon as you release the left mouse button, the selected part will be “cut out” and “added” to a special small program.

In it you can make some edits and save the resulting screenshot to your computer (File - Save As ...).
Screenshot software
In the event that you need to take screenshots often, it is better to use special programs to create and edit screenshots. There are a lot of such programs. There are great paid options like SnagIt or FastStone Capture. But there are also great free versions.
I have tried many of them. I'll tell you about those that I especially liked and which I use myself.
Screenshot Maker is very user-friendly, quick program with many functions. You can “photograph” the entire screen or a part of it, change the resulting image, save it in different formats and with different quality settings.

Download this program ( free version) can be from the official website or by clicking on the link.
Hot Key Screenshot is perfect for those who love computer games. It will quickly create a screenshot using the assigned key and save it to your computer in a special pic folder (located in the program folder). No installation required.


