WinNTSetup is an alternative installer for Windows. WinNTSetup Portable - To create a boot flash drive WinNTSetup does not see the installation file
Now I will write a small instruction as for myself and for other people who encounter such a problem as me, namely - " reinstall Windows When CD-ROM and USB do not work?»
Introduction
One of the employees to me ultrabook samsung np530u3c
The initial reason was that her laptop turns off for a very long time, which was confirmed, about 15 minutes was loading + another 10 minutes accelerated the desktop.
When copying, some files caused an error, which clearly indicated that the disk began to damage, while copying errors managed to save part of the information after which the disk just died. (that I was very surprised, so this is the fact that the ultrabook was not cheap at one time, and they shoved a plated disk plate into it, and not SSD)
Bought in the store SSD Kingston V300 for 240 gigs and here it began dancing with a tambourine.
When connecting an external DVD-ROM and CD-ROM in Bius, nothing shown, like flash drives, that is, none of USB ports do not work on ultrabook.
1 option
Non-standard installation of Windows (it is also a worker who helped me)
For this method, we need the WinNTSetup program - download from my Yandex disk (or from the site http://www.msfn.org/board/topic/149612-winntsetup-v3874/)
So we go to the steps:
1 part
2 part
WinNTSetup user manual
After we have prepared a disk to install Windows on it, launch the previously downloaded WinNTSetup program

I hope this article was useful to someone, well, and how the video is supplied with.
WinNTSetup video instruction how to use
In this article, you learned the answer to the track. Questions: - WinNTSetup How to use, WinNTSetup on USB flash drive, WinNTSetup Instructions, WinNTSetup Installation, WinNTSetup Installing Windows, Installation with using WinNTSetup.Installing Windows using WinNTSetup, installing Windows 7 WinNTSetup
WinNTSetup. Allows you to produce a "clean" installation of an additional operating system while in the Windows interface. With this program, the OS installation is possible not only on the internal or external SSD / HDD, but also on the USB flash drive, as well as virtual hDD. Simple words WinNTSetup - Windows installation program.
Key features of the program.
The ability to install Windows to a logical or virtual hard disk even in cases where the user has no CD / DVD disk or flash drive to write an OS image. The program is able to create an additional boot module from which the data is taken to start Windows.
Integration into the system of the package of necessary drivers is carried out by pressing one button.
You can pre-set the settings that will be applied by the system during its installation. For example, disabling the sleep mode, paging file, the functions of automatically creating recovery points, etc.
Briefly about working with WinNTSetup. The entire process of preparation for installing Windows using this tool can be divided into 3 stages.
To begin with, the user will have to create a section where Windows bootloader is recorded, and be sure to make it active. With this task perfectly copes standard utility "Disk management".
And the final stage - it remains to select the path to the Windows installation files in the program interface, as well as separately disks on which the loader will be installed, and the system itself. At the same stage, you can choose a file containing pre-prepared drivers, as well as to pre-optimize (setting up) the future OS.
Features winntsetup.
The utility extends to Portable format - i.e. it works without the need for installation. Enough program WinNTSetup download to the computer, unpack, and run. Interface in Russian. To install the OS, only the image image is required, and the program itself.
On the one hand, WinNTSetUp is simple, but extremely useful toolwhich will help install Windows in the absence of media to write OS image. On the other hand, the program can be used as alternative way Installations of the PC system where Windows does not start or missing. For this you need before WinNTSetup download, and enable the program in the Live-CD flash drive (or other drive) with lightweight WinPE.
Equipment requirements:
USB Requirements:
1. The amount of memory is at least 16 GB (preferably 32 GB or more).
2. NTFS file system.
3. USB 2.0 or USB 3.0 interface (second is preferable, since it has a much greater read / write speed).
Computer Requirements:
1. A processor with a frequency of at least 1 GHz.
2. RAM of at least 2 GB.
3. Availability of a USB port with USB 2.0 or USB 3.0 interface support.
It is worth noting that the loading of the operating system from a USB drive is possible only if it is connected directly to the computer (loading from the drive connected to a USB hub, it is impossible).
Some comments.
1. Due to the fact that the operation of the operating system requires a huge number of read / write operations, we recommend using as a removable media for windows records 10 Removable Winchester or SSD disk with a USB interface, since a flash drive is unsuitable for such a number of operations can quickly fail.
2. It should be noted that the speed of operation of such an operating system when using drives with uSB interface 2.0 will be significantly lower than the speed of the system in normal mode (we recommend using USB 3.0).
3. When preparing a USB drive to record the operating system, it will be completely cleaned, therefore, note that there are no valuable information on it.
Ways to install Windows 10 per USB drive.
To solve our goals, we can use the programs specially invented for this, such as WinNTsetUp or Pwboot. Either make it standard (built into the operating system) tools. For the most inquisitive, we also collapse in detail the installation option with command line. In all cases, we will need an image of the operating system. It must be previously unzipped with some archiver, such as WinRar.
1 way. Installing Windows 10 to USB media using WinNTSetup.
When you first start the WinNTSetup program, a notification is notified of the need to download ADK files. We agree by clicking OK.
In the main window of the program, set the installation parameters. In our case, you need the second tab. Here we first specify the path to the Install.wim file, which is located in the folder with the unzipped system. Then you specify the disc to which the bootloader will be installed, and below, the disk to which the system will be installed - in both cases, specify a USB carrier (in our example Disk E). And if the OS optimization is not required, click the "Installation" button. 
If necessary, you can configure some parameters that optimize the installed operating system by pressing the OS Optimization button. 
After clicking the "Installation" button, the information window will fall as in the figure below. Without changing the click "OK". 
If the error fails during the installation process, "the system image! 0x52" appears as in the figure below, 
then you need to check whether you chose file System USB media. The disk must be formatted in nTFS system. After formatting to the desired file system, we repeat the steps described above.
If the errors did not arise, then after 1.5 - 2 hours, the archive unpacking will be completed, and a reboot request will fall. We agree and load with USB.
Now it remains to boot from the USB media, how to do this is described.
Windows 10 installations using WinNTSetup
2nd way to install Windows 10 on a USB USB flash drive / hard disk using the command line.
Benefits this method before others in that no additional softwareIt is implemented on any version of Windows (including Home and Professional), any drive is suitable for installation, with sufficient memory. To install, we will need only a few utilities built into the operating system, we will work with which we will use the command line interface and of course the image of the Windows 10 operating system.
So, run the command line and enter diskpart. The diskpart.exe utility window will open, where we sequentially enter the following commands (start the command by pressing the "Enter" key:
1. lIST DISK. - show a list of disks (on the size of the disk we can determine the number of the USB drive we need);
2. sELECT DISK 1. - Select Disk 1 (In your case, it can be another disk number. Select a number very carefully to not delete what is superfluous);
3. clean. - cleaning sections configuration;
4. cREATE PARTITION PRIMARY. - creation of the main partition;
5. format FS \u003d NTFS Quick - formatting of the created partition (Quick - for quick formatting);
6. active. - we make the section active;
7. assign Letter \u003d Z - We assign a letter to the section (you can choose any other, not occupied by other sections letter);
8. eXIT - Finish the application. 
To perform the next step, we create on the disk with the windowstogo folder and copy the Windows 10 operating system there (install.wim file), which is located in the Sources folder. 
Now we need to deploy on our carrier image of Windows. 10. To do this, use the Dism.exe utility. Run a command line again, but now with the administrator privileges (click on the right key on the command line icon and select the "Run from the administrator" item from the context menu). 
First we will find out which images are inside the install.wim file.
You can make it a team:
dISM / Get-Wiminfo /Wimfile :C:\\WindowStogo\\Install.wimwhere C: \\ Windowstogo \\ install.wim is the path to the previously copied image. 
Now that the image number is known to us, we can start unpacking it on our drive. To do this, enter the command:
dISM / Apply-image /ImageFile:C:\\WindowStogo\\Install.wim / index: 1 / applydir: z: \\where C: \\ windowstogo \\ install.wim is the path to the operating system image, / index: 1 - the image number, z - the letter of the section on the USB carrier.
On the medium power computer ( intel processor i3 frequency of 2 GHz, rAM 4 GB) Deploying an image on a USB 3.0 USB interface took about two hours. 
It remains only to wait for the end of the deployment procedure. After rebooting, it will take another 15 minutes to prepare for the first launch. 
The next step must be booting from the created media how to do this is described.
Video installation Windows 10 on a USB flash drive using a commercial string.
3rd Method - Windows To Go
Installation in this way is not suitable for all due to the fact that this option is only available windows users 10 versions of Enterprise (Corporate) and Education (for educational institutions). The fact is that Windows to Go for large organizations was conceived as a way to organize workplace activities with the possibility of non-standard placement. In addition, not any carrier is suitable for recording the operating system C using windows to go, since there are certain requirements for this to do with drives. 
The list of devices certified for Windows to Go can be viewed on the Microsoft technical factory (https://technet.microsoft.com/ru-ru/library/hh831833(v\u003dws.11 ).aspx#wtg_hardware). If your equipment does not meet the specified requirements, then try using the installation method.
To start Windows to Go, use the built-in "search engine" and enter to Go or Windows to Go. Among the proposed options, select the desired and follow the instructions of the wizard. 
WinNTSetup. (Windows Setup Tool) - a program to create an additional Windows operating system boot module. The utility is a certain alternative installer, which allows you to set the second operating system as in the free section of internal or external hard diskand on a virtual hard disk (VHD) and a USB flash drive. In this case, the presence of a flash drive or distribution disk is not necessary (but if necessary, these drives can be used for installation).


Features winntsetup
- Supports work with Windows 2K / XP / 2003/2003 / 2012 / Vista / 7 / 8.x x86 / x64.
- Does not require installation (portable version).
- Fully Russified interface.
- It works even on the most minimalistic WinPE.
- Supports everything existing files WIM: WIM / SWM (Xpress / LZX / Xpress Huffman \u003d Wimboot compression).
- Supports unencrypted eSD files (LZMS compressed WIM).
- Supports the WimBoot option.
- Supports "Windows to Go" for Windows 7 and later.
- Supports the integration of drivers into the system.
- Flexible preset settings.
[Collapse]
WinNTSetup how to use
- When you first start the program will require the download of additional ADK files for further work, load and get to the main program window.
- Specify the path to the install.wim file, which lies in the folder with a unpacked ISO-manner of the operating system distribution.
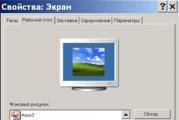
- Specify the disc partition for the bes panel and the download manager. The disc partition should be active, for this you need to go to the "Disk Management" of the Windows system and "make the section Active". After this action, all manipulations with WinNTSetup must be completed to the end, otherwise you will not be able to boot (you can not turn off or restart the computer after this step).
- Specify the section where Windows will be installed (it may be the same partition where the bootloader is installed). Press the "F" button located next to the selection button and format the selected section.
- Specify the folder with the drivers (if necessary, you can immediately select drivers for a specific iron).
- Press the "Installation" button, be sure to set the checkbox "Find and add to all versions of Windows" and "Automatically restart the PC after installation".
- We expect to unpack the image.
- The computer restarts, select the newly installed system from the boot menu.
- We expect device definitions and creating accounts after the first launch.
- Additional libraries and software are better to install later, using WPI.
[Collapse]
Installing Windows. On Virtual Hard Drive (VHD)

WinNTSetup has a built-in VHD - a virtual hard disk to create a second system to which the second system can be installed. This method is more preferable, since it is easier and safer described above, because the system is not put on a separate logical partition to prepare.
Create VHD sections and assign a disk letter.
Select a VHD disc as a drive installation (make sure you download the IST drive active section On the physical disk - it can be active through "Disk Management").
[Collapse]
Addition
The portable version of the program is provided by the developer, does not require installation.
Note! When you first start, you need to connect to the network for downloading additional files.
How to install the second windows to another section of the disc from the operating first Windows? In order not to languish waiting until the installation media is loaded while it is copied to the hard disk. system filesInstalling the second Windows can be simplified using free program WinNTSetup.
1. About WinNTSetup
WinNTSetup is a small program designed for a narrow task spectrum: it allows you to install Windows to other sections in the simplified mode and hard drives Computer, as well as virtual VHD discs. As additional features Programs - a small selection of tweaks for the system being installed and the ability to integrate their drivers. If, in the usual case, WinNTSetup is only saving time to install the second operating system, then for cases when there is no DVD drive, nor flash drives, it is also the optimal solution to the problem.
All that will be required to install Windows to another section of the disk from the working current system is the downloaded ISO image of the Windows distribution and, in fact, the WinNTSetup program itself. WinNTSetup works for this principle: it is set to specific parameters in its window, after which the process of installing the system in background mode. At the same time with the computer, you can continue to work further, as if the background tasks were performed by any other rolled program. Upon completion of the Windows installation process to the second disk section, everything that remains to be done in normal mode, downloading from the newly installed Windows - to complete the final stages of the installation process: wait for the installation of the driver installation, set the region, keyboard layout and other parameters, create a local profile or to plug account Microsoft. Consider all this more detailed.
First of all, of course, you need to make a backup of the current Windows. Not so much for the sake of it directly, how much for the boot sector, where, naturally, during the installation of the second system to another section of the disk, changes will be made. The presence of emergency boot media The disk with the backup program is welcome.
2. Downloading WinNTSetup.
You can download WinNTSetup from its official site. This is a portable program that does not require installation in the system. After launch, you immediately need to accept the download of some data.
3. Connecting the ISO image of the Windows distribution
The installation files of the second Windows WinNTSetUp takes either from installation DVD In the drive, or from the ISO image downloaded from the Internet. The downloaded ISO image must be mounted in virtual drive. In Windows 8.1 and 10 systems, this is done simultaneously using the "Connect" option context menu on ISO-image.

In Windows 7, for mounting ISO images, you must use third-party programs Type Daemon Tools.
4. Installing Windows to another disk section
WinNTSetup will start with an active installation tab versions of Windowsstarting with Vista. In the first section of the program window, you need to specify the path either to the instal.wim file or to install.esd as part of the Windows Distribution. Depending on the build Windows Its distribution will contain the "Install" file or with one or another extension. Click the "Select" button.

And specify the path to the file, it is on the installation disk in the "Sources" folder.

In the second paragraph of the WinNTSetup window, the disc partition is specified that will serve as the boot sector installed Windows. In Windows 8.1 and 10, a certain section of Z is specified by default. As the Z WinNTSetup section defines a small technical partition (350-500 MB) of these versions of Windows with the name "Reserved System" (System Reserved).

You do not need to change anything here.

In Windows 7, in this default point will be a disc C, since in this version boot sector Placed on the same section along with the operating system itself. And in this case, we also do not change the presets, we leave the C. disc

Let's go down to the next item and using the "Select" button indicate the very second section hard Disc, where are going to install the second windows.


If selected for the second Windows section The disk was not pre-formatted, it can be done without leaving the WinNTSetup window. Pressing the "F" button starts full function Formatting disk partitions.

The basic information of the installed system is made, now you can start the installation of the installation process. But before you press the button at the bottom of the "Installation" window, you can dig in the program settings. In the lower window of the window, the path to its drivers is specified and applied to the tweak system installed.


After pressing the "Installation" button, start the Windows installation process to the second section of the disk additionally confirm by pressing "OK".

After that, the program window can be collapsed and engaged in your affairs. The completion of the WinNTSetup operation will notify this notice.

This means that the launch of only installed Windows will begin at the stage of preparation of the operating system to deploy. After restarting the computer, we will meet the loader menu with the choice operating systems for start. Choose, respectively, just installed Windows. And we pass the Windows Deployment Steps - specify regional data, keyboard layout, network settings, create an account, etc.

5. Installing Windows to another hard drive
The installation process of the second Windows to another hard drive is slightly complicated because for windows systems 8.1 and 10 will have to manually form a separate section for the bootloader. For Windows 7, it is sufficient to simply make an active partition of another disk to which the system is planned. Run a regular disk management utility by pressing the + R keys and enter:
If another hard disk is unbelievable, we form partitions on it. On the first section, call the context menu and click "make the section Active".

We are convinced that the section is active, remember its letter.

In the WinNTSetup window, specify the path to the installation file, as shown in the previous paragraph of the article. And as a section of the bootloader and partition of Windows 7 itself, we specify the prepared active section. And launch the installation process.

For Windows 8.1 and 10, you need to prepare and system section, and the loader section is the same technical partition that is not displayed in the system conductor, but in disk space managers, as the section "Reserved by the System Reserved). If the first partition of another hard disk is already formed, it must be removed, and at its place to create a new one. In the context menu on the unallocated space of the remote partition, select "Create a simple volume".

We pass the steps of the wizard, pointing out the section of the section size for the Windows 8.1 - 350 MB installed, and for Windows 10 - 500 MB.


From the remaining unallocated space, we form a section for the system.

Carefully check that the first small partition is active, and remember the letters of both sections.

In the WinNTSetup window, you just specify the prepared sections: in the second paragraph - a small section, in the third, the section of the system itself. And launch the installation process.

After WinNTSetUp completes its work, you must restart the computer, log in to the BIOS, set the boot priority, respectively, from another hard disk and go through Windows Deployment Stages.
Excellent day!