How to change the color of the fill in Photoshop. Pouring - PainTBucket tool, edge trimming sewing (CROP)
Good day, dear readers of my blog. Background is one of the most important elements of the picture. Thanks to him, you can even turn the most unimportant photo into stylish and modern. Make it is not difficult even for a beginner who has minimal knowledge of Photoshop.
Today I will tell you how to fill the background in Photoshop with four ways, show what instruments to use for a quick result, the highest quality and ladies have several useful recommendations so that the picture looks more professionally performed.

Let's proceed?
Tool "Pouring"
If you want to fill the background on the finished photo, then you will not work out until you get rid of the existing rear background. You can do this in several ways. I recommend to you to start to deal with the fill, having worked with the current publications and a "clean" document, and then read the article in my blog about that, and work with PNG.
Create a new document through the file "File" - "Create".

In Photoshop, some tools are located on the same button. As, for example, the "gradient" and "fill". To open an additional menu, you just need to press the left mouse button for a few seconds, it will open and you can choose what you need.
Since I use the latest version of Photoshop CC, then I still have a "3D-material selection". To be honest, I never used this feature.
If you want to pour a document in one color, then you will need the usual "fill".

Just below, in the same panel you can see two colors. One top - the current one you use now, to the second, lower, you have the possibility of quick access. You can switch between them with the help of arrows in the upper right corner, and the thumbnail in the lower left allows you to switch to the most common and frequently used - black and white.
In addition, some two-color filters, for example, "clouds" are displayed in the color scheme that you have been set in this menu, but this is a completely different story.

Click the top color to the left mouse button and you will have an additional selection window. First in the strip on the right you choose the main color, and in the square on the left are determined with the tint. Then click "OK" to apply changes.

We click the mouse in any place of the workfield with a picture and the background changes its color to the one that you just chose. 
Application of filters
In nature, never has one clear color, there are shades, overflow, shadows, some kind of texture or glare. Therefore, just the pouring a priori cannot please our eye.
Usually on the background I, at least add "noise". You can open the filter gallery and try one or another in practice to understand how it looks like. Well, or simply use my scheme. In one of my articles, I told, perhaps this article will be useful for you.
Select "Noise" and then "Add Noise".

Almost any filter has a preview function, click on the tick and see how the changes are reflected in your photo. In the case of noise, you will only resist the slider to achieve a better result.
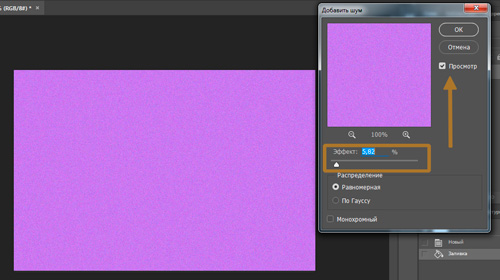
That's the result I got. For some colors, I also use the "Blur" filter - "Blur over Gauss", but in the case of purple it is superfluous. But you can come in handy. Try to do it yourself.

I noticed that not so many people use the "story", which displays all the actions used by the user. In vain, because it is very convenient. One click at a specific step returns you to the time you performed it.
Open the "Window", check the box opposite the "History" and place it in the bottom panel on the right.

Now, to return to the beginning I just need to click on the "new" and all colors and noises will be removed. You can start first

Tool "Gradient"
Open the folder with the image and drag it to the working window.

It remains only to stretch. There is nothing complicated in this. But you can read the article about whether you may find out something new.

Well, almost everything.
Video instruction
After I wrote an article, I thought that some of you could be interested in collages. That is, you have some reason, and from above you add a picture as a background. When creating a video, I immediately put an object in the center of the image. In this case, the product page with Aliexpress - Telescope for phone .
To pour the background, you just need to activate the background, click on it. Then all changes will be applied not to the object itself, namely to the rear layer. Well, I think that you will understand when you see a video. I specifically did not cut out of it.
You can see with what difficulties I encountered while working.
If you like this article - subscribe to the newsletter and find out about photoshop more. Well, if you want to learn how to work with the program professionally and know everything about her tools and opportunities, I can advise the video course " Photoshop from scratch in video format ».

You no longer have to look for answers on the Internet. If you know what instruments and what can be done, then the solutions will appear with yourself. This is distinguished by professionals.
That's it. To new meetings and good luck.
First of all, you need to install the Adobe Photoshop program on your computer. The program is paid and you can buy it on the manufacturer's website Adobe, or try searching and downloading it for free on the Internet.
So, you installed and launched Adobe Photoshop.
This is the main program window. Do not be afraid of the abundance of interface elements and all kinds of tools, in just a few days you are quite comfortable in this environment. To consider this window, we will now not, in practice it will be easier and clearer.
Creating a new file
Click file -\u003e new. Consider the window that appears:
- Name (Name) - the name of the future document. Most often, this parameter is not specified, and the file name is prescribed while saving.
- Width (Width) and Height (Height) - Width and height of the future image. It is most convenient to set in pixels. Pixel is an image unit in raster two-dimensional graphics. It is from pixels, as from bricks, a picture is built.
- Resolution (Resolution) - Number of points per unit length. The higher this indicator, the better the image, but also a larger file size. Therefore, the norm is made permission to 72 pixels per inch (the so-called screen resolution).
- COLOR MODE - The most common RGB color (Color), because Allows you to use everything visible to the human eye color. The color depth is set in bits, grabs standard 8 bits.
- Background Contents Contents - Determines image background (white, transparent, background color).
The remaining settings are rarely used. Make settings as in the picture and click OK.
Tool palette
Most often you will have to work with the palette of tools.Today we will look at only some of these tools:
Allocation tools
Selection. Click on this tool and hold the left mouse button, the selection menu will open: rectangular selection, elliptic selection, single column, single line. 
Each tool has a parameter panel, it is under the menu bar and varies depending on the tool selected:
So, for rectangular selection we have the following parameters:
New selection. A new allocation is created, with the available selected areas (if any) disappear.
Add to highlight. An indicated area will be added to the existing allocation.
Remove from selection. Eliminates the dedicated area from the selection.
Select the intersection. Of the two secretions (old and new) allocate the area of \u200b\u200bintersection.
Rastuchevka - on the edges of the selection there appears the area of \u200b\u200bpartially isolated pixels. Allows you to make a smooth transition of an object in the background.
Style - Specifies the method of selection: Normal (Normal) - Free selection, specified proportions (Fixed Aspect Ratio) - Proportional selection, fixed size (Fixed Size) - the selection area of \u200b\u200bthe specified size.
For all allocation tools, the parameters are similar.
Let's try in practice:
Take a rectangular selection tool (click on it), move the mouse cursor to the left upper edge of the white web created at the beginning of the file lesson, press the left mouse button and, without releasing, stretch the square (Fig. 1).
Now on the parameter panel, click on the "Add to Highlight" icon, move the mouse cursor to the center of our square, press the left mouse button and, without releasing, stretch one more square (Fig. 2).
Now on the parameter panel, click on the "Remove from Selection" icon, move the mouse cursor to the center of our second square, press the left mouse button and, without releasing, stretch the square (Fig. 3).
It should turn out, as in Fig.4. 
Let's leave so far and see how to choose and set colors.
Color selection
The main colors of the image are set using two squares at the bottom of the tool palette. 
1 - the color of the foreground.
2 - background color.
3 - set the default colors (i.e. black and white).
4 - Change the color of the foreground and the background.
Click the square, and the colors collector window opens. Click the color you like and then approx. The color you choose will become the color of the foreground. Now click on "swap foreground and background colors" and do the same with the second square. Read more about color in the color article for the Web.
Now consider the following group of tools.
Tools fill
Fill. Click on this tool and hold the left mouse button, the selection menu will open: gradient and fill.

Here you can choose the necessary one.
Bucket - floods the image (selection) with color or texture.
So, for the fill we have the following parameters:
Pouring (Fill) - determines that to use as "paint": the main color (foreground) will fill the main color, the template (pattern - pattern) will fill with some pattern.
Pattern (Pattern) - pattern for fill.
Mode (MODE) - the method of overlaying pixels, the values \u200b\u200bare much and viewed as needed.
Opacity (OPACITY) - determines the degree of transparency of the fill.
Tolerance is a range of colors for filling.
A tick smoothing means to soften the edges of the transition.
Let's try in practice:
Take the Fill Tool (click on the bucket), move it to the allocation made in the previous step, and click. Our selection is painted in the color of the foreground (default - black).
Now on the parameter panel, select: Pouring -\u003e Pattern, Pattern -\u003e Anyone.

Lay our bucket into the allocation and click. Now it is flooded with a template and looks like this:

Pay attention to the template window opening, only a small part is presented. If you click on the right elder, the menu will open at the bottom of which other collections of templates are indicated. You can add them to the existing.
Gradient. Creates a fill with a smooth transition between two or several colors.
Consider the parameters panel:
If you click on the right side, the palette opens with the gradient variants, when double-clicking the gradient editing window (here you can configure your gradient options).
Determines the type of gradient (from left to right - linear, radial, angular, reflected, rhombid).
Inversion (Reverse) - a check mark indicates a geometrically turn the gradient.
Dystering (Depth - Dither) - a tick indicates smooth to reduce segmentation.
Transparency - a check mark indicates the use of transparency.
Let's try in practice:
Create a new file, take the rectangular selection tool and stretch it in the form of a rectangle, then on the toolbar, click on the gradient icon, on the parameters panel, click on the elder and select the gradient you like, rightly select the gradient type (any).

Pay attention to the first two squares in the opening window of the gradient selection window. They use the colors you set by you as the colors of the foreground and the background (colored squares at the bottom of the toolbar). The first gradient carries out a smooth transition from the primary color in the background, the second - from the primary color to transparency.
Now move the mouse cursor to the middle of the left side of our selection, press the left mouse button and, without releasing, stretch to the middle of the right side (Fig.1)
Now stretch the gradient line diagonally (Fig.2)
And now from top to bottom (Fig.3)

Look at the difference and experiment with various gradients and their views.
Saving an image
Our lesson comes to an end, it remains to learn how to keep our masterpieces.Click the File menu item (File), in the Outfit menu you will see the usual item - Save As (Save AS) - and New - Save for Web (Save for Web). We will understand which for what.
If you work on the image and want to be able to change it in the future, you should select the menu item - Save As (Save AS)

Where to save and what name is to give - your personal business, but the format will be * .psd; *. PDD. It is in this format that all your settings are saved (we do not have them yet, but later will appear). Thus, the entire picture is maintained, but its parts are saved, each of which you can change when you want.
If your image is ready, choose the menu item - Save for Web (Save for Web). The image will be saved optimized for the Internet (i.e., with the best combination of the quality \\ file size). The preservation window should be considered Read more:

Four tabs upstairs offer View image options:
Original (Original) - image as it is. As a rule, the large file size is invalid for the Web.
Optimal (Optimized) is the optimal ratio of the quality and size of the file from the point of view of the program.
2-UP, 4-UP - respectively, two and four image options nearby, at the bottom of each size is specified. You can choose the best in your opinion.
In the upper right corner of this window, additional settings are specified:

Here you can select the format of the stored image. General Recommendations - Use JPEG and PNG formats for photos with subtle realistic color transitions, GIF format - for contrasting, low-color drawings. By the way, all the pictures on this page are stored in GIF format.
If you use the tabs discussed above, then configuring this part of the window is optional at least at this stage.
So, choose the most optimal image in your opinion and click the Save button (Save). An already familiar save window will open, where to specify the folder (where to save) and the file name, the rest will be already indicated, click on Save (Save). Image for Web is ready.
This is the first lesson. You learned how to create a new file, allocate areas and pour them in various ways (color, template and gradient), as well as save images in the desired format.
To secure these skills, experiment (create different in the form of the area and pour them in various ways).
In the next lesson, you will learn how to work with the text and get acquainted with the basic concept of the program - layers.
Revealed in the image. It is it that is equipped with a sufficient number of different features and functions, thanks to which photographic processing is accompanied not only by high efficiency, but also by the designers of their creative abilities.
In Photoshop, you can change the fill of individual items, which favors the higher color saturation of the image. Unfortunately, those who are only standing at the origins of designer skill, who begins to master the practical capabilities of a graphic editor, do not even speak simple photo adjustment skills, so they actively want to know how to make a fill in Photoshop.
Pouring in Photoshop is the process of changing the color of a particular area. To perform such tasks in a graphic editor, you can use two functions: "Fill" and "Gradient".

The most used tools for replacing the color of the element - fill and gradient
So that the corrected photograph was accompanied by a high level of aesthetics, the user must feel the difference between these two functions in advance. It is also important for him to figure out what specifically, each of these two functions will be more efficient.
However, the first steps of a novice graphic designer are accompanied by a completely simple, but very important question, nothing to fill in Photoshop, and where it is, how to cause the necessary functions.
Distinctive features of fill types
Running a graphic editor, the user initially must carefully examine the menu panel so that it is subsequently easy to navigate it and run the necessary functions.
On the left side, on the side panel it is easy to find the pictogram with an image of a tilted bucket from which the drop flows. Clicking on this icon with the right mouse button, an additional window appears, in which it is proposed to choose the type of fill.
The first position in the list of choice is directly the tool "Gradient", and the second - "fill".

Graphic designer is obliged to understand not only how to perform the fill in Photoshop, but also the distinctive features of these two tools to accurately determine which type of fill in a particular case is best used.
The "Fill" tool successfully applies when it is necessary to change the color of any object, region, background. Also, this tool allows you to add geometric shapes, patterns, apply fantastic drawings, abstraction.
The "Gradient" tool is needed when it really wants to pour an area not one, but at once a few color shades, while erasing the sharp boundaries between them. Also experienced designers use such a tool to clearly draw the boundaries of any fragment on the image.
After working with any tool, you can call an additional setup menu in which to select the desired fill parameters.

How to change color with fill
The process of color adjustment of images, when the main color of the background or some kind of item changes, in principle, is not accompanied by special difficulties. A beginner designer, finding out where the fill in Photoshop CS6 is located, can safely begin the first practical experience. It is enough to make a correction of several photos, following the recommendations of experienced graphic designers, each detail will become clear, and the process of improving the image will be perceived anyway, accompanied by creativity and increased interest.
The user should initially decide which specifically the area is planned to be changed, that is, perform the fill. This area needs to be highlighted by using some tools like "Lasso" or "Rectangular region".
After selecting the desired area, you can click the right mouse button and select the "Fill" item in the unfolded window or immediately activate the fill mode on the menu panel.
Now an additional panel appears, which allows you to make changes to the parameters of the corresponding tool. In particular, the area can be flooded with a smooth monophonic color layer, as well as an ornament with several color shades can be applied to it.
On the horizontal settings panel, select the main color, and then immediately go to the selection of the desired pattern. On the same panel you can use other offers. In particular, it is possible to make a pouring opaque, as well as take advantage of the proximity of the color shades.

If you run such a function as "smoothing", then a smooth transition from the painted area to an immature one will be implemented.
It is quite interesting to understand how to fill CS6 in Photoshop certain areas using the Gradient tool. Initially, it is also necessary to select the area over which it is planned to work. After that, activate the "Gradient" tool.
In the tool settings, select the main color and color, with which it is planned to paint separate parts of the background.
Now, using the left mouse button, you should draw an arbitrary length of a straight line protruding as the border of the color transition. However, it is important to understand that the longer this line is, the less noticeable color transition.
After completion of this procedure, you can again resort to changes in the setting of the flooded area, adjusting the level of transparency, style and method of overlay.
Applying various types of fillings, all kinds of tools, you can significantly convert the original image. It should be noted that the performance also depends largely on which version of photoshop is installed on the computer. Experienced graphic designers always track the appearance of updates, the release of the new version of the graphic editor. In particular, Adobe Photoshop CS6 is equipped with great opportunities than photoshop previous versions.
So, having at your disposal Adobe Photoshop, having read the recommendations of experienced graphic designers, it is easy to learn to carry out independent adjustments to images, including to apply fill. Digital processing of photos, drawings, images for many acts as an exciting process in which the creative abilities of the designer and its creative thinking are quite clearly revealed.
Creating a layer fill is very often used in Photoshop method. It is used both when creating a new layer and at various editing of one of the current layers. Despite the sufficient evidence of the method, novice users may experience certain difficulties with its implementation. In addition, in various situations, the execution procedure may have its own characteristics and varieties.
Types of fillings in photoshopIn the standard set of supplies in Photoshop, various types of fillings can be used:
- solid uniform color;
- gradient;
- pattern.
Fill performance
- In order to perform a simple color to highlight the area that will be filled with color, activate the Paint Bucket Tool in the main toolbar, select the main color and click on the left mouse button within the selected area. As a result of the specified action, it will be filled with the selected primary color.
- To perform the gradient fill also highlight the fill area on the image. After that, activate the Gradient Tool (Gradient Tool) tool in the toolbar, select one of the preset sets of the gradient fill used. If necessary, perform accurate setting of the parameters of the selected set. Specify the shape and mode of the gradient, after which you indicate inside the selected area direction of the gradient vector. To do this, set the cursor to the starting point, hold down the left mouse button, press the cursor in the selected direction and release the left button. As a result of this action, the selected area will be filled with gradient fill in accordance with the preliminary settings made.
- If you have the need to perform the fill with the pattern from the main menu, go through the next path "layers" - "New Layer-Pouring" - "Pattern" - "Layer" - "Pattern"). Click the "OK" button in the window that appears. As a result of this action, the selected area will be filled with the latest filling in the fill. If you have not yet created such a fill, you must first do the following.
Create a new document. It is desirable that with this image it has a square shape with the same height and width values. This will be subsequently used as a pattern of uniform filling of the source images. Create a conceived pattern or copy it to images from other sources. Select the image area using the Rectangular Marquee Tool (RECTANGULAR MARQUEE TOOL). From the main menu, go along the path "Edit" - "Define Pattern" (Edit-Define Pattern). In the window that opens, assign the name to the new pattern and click "OK". Pouring pattern created and ready for operation.
Hello, readers.
After reading this article, you will know what fill in Photoshop and how to apply it. It will help you to erase unnecessary objects from images, create new figures, frames on them, etc. And you can do this as one color and pattern, gradient or tint of the existing background. We will analyze in detail the main methods.
Tool "Pouring"
 Let's start learning from a tool specially created for our purpose with the appropriate name.
He takes one cell with another - "gradient", about which we will talk later.
Therefore, if you did not find the first immediately, click on the arrow next to the second or right mouse button on it.
This tool is used to fill in one color or patterns. How to work with him?
- Open the image and duplicate the layer using the hot keys Ctrl + J.
Do you know how to highlight the area? Use tools "Rectangle" or "Magnetic Lasso" for this.

- Below on the toolbar there are 2 squares one by one. The first - means the main color. Click on it to select the one you need.
- Apply a bucket to the selected area and click once with the left mouse button. She will sing the selected color. Want to fill part of the image pattern? Excellent idea that is embodied like this:
- On the top panel, under the main menu Photoshop, there are settings of your tool taken. Find a small window with an ornament. Click on the arrow next to it and select the favorite.

- To change the color of the original picture on the pattern, just like in the previous case, click the cursor with the bucket on the selected area.
Tool "Gradient"
You already know where he is. Activate it and pay attention to the settings from above:
Click on the arrow next to the long strip with the image of the gradient. A small window will fall out where you can choose the color and type of tool.

- Located next to several icons determine its form: it can be radial, angular, linear, diamond, etc.
- Try different effects from the "Mode" section, among which there are attenuation, soft light, darkening the base, etc.
- Do you want to see the original picture under the gradient? Play with opacity.
To use the tool to the selected zone, clamp on one of its edges the left mouse button and pull the opposite direction.
Pouring or brush?
Do you need to remove an object from the image, as if it was never there? In this case, the colors of the fill suggested by the program are not suitable, as the original background should remain. To solve this task, you can go in two ways: use a point restoring brush or make a fill with the contents.
About how I wrote this in this article:
The first option is to use when an extra object in the photo is far from other structures and color objects, and it surrounds a lot of monophonic pixels, which will give a sample shade of a point brush.
By the way, you will also find it among other tools - it looks like a plaster. To remove the unnecessary area, simply click on it with a brush of a large diameter, pre-not highlighting the object.
That's what was before:

That's what happened after clicking OK:

Are not painted places? Correct them with a point restoring brush of small diameter.
Stroke
Do you want to make a frame of photography? Photoshop offers a simple option:
- "Rectangle" circle photos, slightly retreating from each side.
- Go to the Edit tab and select the "Run" command.

- In the window that appears, specify the desired color, width and overlay mode.
- Click OK.

Thus, it will be filled with the color of the part of the image that remains for the selection.
http://o.cscore.ru/
Inspiration to you, friends.
Return to me for a new portion of useful knowledge on Photoshop and not only.