How to publish your own dns server. Creating child and custom DNS servers
There are several ways to configure DNS servers on VDS, VPS server. Moreover, if the provider has not limited you in how to configure DNS, then you, as the owner of the server with root rights, can configure the DNS servers on the VDS / VPS server in several ways.
What is DNS in a nutshell
DNS stands for Domain Name System... Domain name servers, united in a hierarchical structure, support and allow you to get information on how computers look for each other on the Internet. It works like this: You type the resource address in your browser, your ISP checks it through the DNS (domain name server) of the entered domain in order to know where to send your request.
http://www.domain.com → check in the DNS system → DNS by domain looks for the IP address of the resource domain.ru \u003d IP: XX.XXX.XXX.XX → You get the content of the site.
Therefore, in order for your site to be found on the Internet by your domain, it must be linked to DNS servers. On VDS / VPS servers, this can be done in any of the possible ways that exist on the Internet.
Bind the domain using the provider's DNS servers
This method of domain binding is carried out by any provider. You need to look at the addresses of the DNS servers of the VDS provider and enter them at the name registrar in the "DNS Management" tab. You can also bind a domain name to the DNS servers of the name registrar.
Configure DNS servers on VDS / VPS server via IP
Yours has its own unique IP address. Since the IP is unique, then you can bind your domains to it. This is done at the name registrar. First, attach your domain to the registrar's servers, and then in the "DNS zone management" tab, create three records: [@],, and [*], type A.

We create our own DNS servers
The good thing about a dedicated server is that you can perform any necessary operations on it.
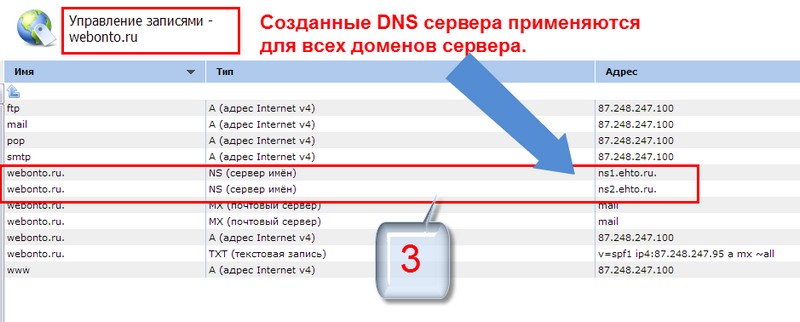
You can configure DNS servers on the VDS / VPS server on your newly created DNS servers. To do this, you need any domain, you can use the domain on which you put WordPress. Each DNS server is created on a separate IP address. You have one IP address and it is the main one. On the main IP address of the server, create a primary DNS server (ns1). One DNS server will not be enough, so to create a secondary DNS (ns2), you need to purchase another IP address from your provider. The created DNS servers (ns1 and ns2) are used for all domains created on the VDS server.
It is better to create your DNS servers before creating and. To create your DNS servers in, in the "Domains" tab, select the desired domain and open the "Records" of the domain. We make two new records of type "A", binding ns1 and ns2 to specific IP addresses.

Further, in the same records, we change the records of the "NS name server" type. In the "Name" field, enter the domain with a dot at the end. "Record type" select "NS (name server). In the "Address" field, instead of the provider's DNS servers, we enter our created subdomains of ns1 and ns2 DNS servers.

The created DNS servers can be used for all domains of the server.
Greetings, brain engineers! Shouldn't we combine our internet devices at home using a DNS server made by do it yourself from WiFi module and Foscam webcam interface? I think it will be interesting, so let's go!
Selected for this homemade Foscam webcam is controlled directly from a smartphone, has its own web interface, works in any browser and on any device, even with your phone's 3G connection, does not require third-party applications and is password protected.
Video streams from cameras are broadcast in separate windows, quickly and flawlessly, and under complete control.
I want to warn you right away - I AM NOT RESPONSIBLE for misuse or damage caused by this project, in any way! You act at your own peril and risk!
What's for this brain project it is necessary:
- a web server with PHP support with a domain name,
- wi-fi module Esp8266 ESP-01,
- push button - 2 pcs.,
- pull-up resistor 2k2 or similar - 2 pcs.,
- uSB-TTL adapter (for programming the wi-fi module) and several pin-connectors ("female"),
- voltage regulator Ams1117 3.3V (to reduce the voltage from 5V to 3.3V to power the wi-fi module),
- power supply 5V 1-2A (preferably 2A),
- in the first version of the layout: if there is enough space inside the power supply case, then the wi-fi module is placed inside this case,
- in the second version of the layout: the power supply has a USB female connector, then you will have to add a male USB connector to the module board and supply power with it
- broken USB stick,
- updated Arduino IDE
- optional: Foscam webcams to work with the web interface
- to ensure: blinking LED, to indicate successful download and waiting for download
- an internal server allowing WAN IP (this version connects to an external site to obtain IP: checkip.dyndns.org).
Step 1: Preparing the Wi-Fi module for programming


In order for the module to be programmable, it needs to be slightly modified:
- solder two resistors - one to the CH-PD pin, the other to RST, solder both free resistor leads to the 3.3V pin,
- solder two push buttons - one between GPIO0 and Ground and the other between RST and Ground.
It is better to solder from the top side of the module board so that the contacts on the bottom side are left for mounting pin connectors. If desired, the circuit can be assembled using a breadboard, but brain solder still more durable, although see for yourself.
In the next step, the power supply will be finalized, but I immediately warn you: the USB output of your computer is not suitable for powering the ESP module !!!
Step 2: Modification of the power supply - lowering the voltage from 5 to 3.3V


The 5V power supply unit should provide a "reliable" 1A, or better 2A, since the module is rather "gluttonous" during the transmission of the Wi-Fi signal.
IN homemade we use a voltage regulator Ams1117 3.3V, because a voltage divider assembled from resistors is likely to "give out" too little current, and even if we get 3.3V to power the module, we will still be disappointed. And this regulator is an inexpensive and best solution.
I did not use the capacitor and resistor that, according to the instructions, should be added to the regulator, because it operates from a stable power source, and I will say that this brainwave has been working reliably for several years.
pin 3 - 5V (orange wire)
pin 2 - 3.3V (yellow wire)
pin 1 - GND (two blue wires)
Several wires with pin connectors can be soldered to the contacts, thereby simultaneously obtaining two voltage sources at 5V and 3.3V, which is very useful when assembling on a breadboard. In this case, do not forget to add two grounding wires, for +3 and + 5V, and for reliability, fasten all the wiring with a plastic clamp-tie.
To connect these wires to an ESP module (which has male connectors), you will need intermediate wires with female male connectors at the ends.
Step 3: Connecting Wi-Fi module to USB-TTL adapter and 3.3V voltage regulator


Connections (module - adapter - regulator)
GND - - - - GND- - - - GND
TX - - - - - RX
RX - - - - - TX
3,3 — — — — — — — — — — — — — 3,3
Ground contacts of the voltage regulator, module and adapter are connected together, 3.3V coming from the regulator is connected to the input of the ESP module.
In no case do we connect the ESP module with the 3.3V contact of the adapter, even if they are on it, as this can damage the USB port of the computer, because it does not have protection against current of the same rating that is used in this brainwashing! And to power the ESP module, always use a power supply with the required parameters.
You should be aware that some TTL-USB adapters have a 5V logic circuit, which is not suitable for our craft, only 3.3V logic is needed, otherwise the ESP module will be damaged. The type of logic can be determined using a voltmeter by connecting its probes to the TX and Ground pins, and if necessary, the voltage can be reduced by adding a level shift or voltage divider.
Step 4: Configuring Files on Web Hosting

Create a folder "/ ip" (the name is case sensitive) in the root directory of your public_html folder, and unpack / ip files into it with a resolution of 644.
Htaccess restriction prevents users from listing files in this folder because it cannot be password protected, otherwise the ESP8266 module could not access it and execute files inside it.
input.php and input2.php generate according to the browser URL ip.txt and ip2.txt with the updated IP of the ESP8266 module, the current code supports 2 different locations, and to add something else you just need to edit these files.
To control a FOSCAM camera, you need to create a folder "/ cam" (again, case sensitive) in the root directory of the public_html folder, and unpack / cam files with a resolution of 644 into it. Protect this folder brain password, if cpanel is available on your server, then you can find the "password protection" icon and set a password that will be requested when you tell the browser to go to www.yourhost / cam, then a dialog box will pop up in any browser asking for this password, all this will protect access to cameras.
foscam.php contains the camera interface, as well as the date / time stamp of the ip files and the current ip location. By the date / time stamp you can see if the module is working. In this case, the time zone may not be displayed correctly, since it shows the time on the server.
The IP can be changed manually, it will be recorded in ip.txt and ip2.txt, and for this you need to enter ip in the field and click update ip.
interface.png and interface2.png are transparent images that tell the interface how the screen will be displayed. You need to edit foscam.php and set the value, static or ptz, corresponding to your FOSCAM camera. By default, the resolution is 320x240, but clicking on the control center opens only this camera with the best refresh rate at a resolution of 640x480.
To edit foscam.php, you can use a code editor or HTML editor that can work in WYSWYG mode.
During work brainpayers the files ip.txt and ip2.txt will be automatically recorded, containing the updated ip of two locations where two different cards can work. Every hour (or when you specify) the board will connect to the router via wi-fi, receive an ip-address and register it in a txt file on the server. And even if the connection to the Internet is lost or the power is turned off, after the elimination of these problems, the ip will be periodically updated.
Step 5: Configuring FOSCAM Cameras and Router


On the TP-LINK router configuration page:
We look at the settings in the photo, they will help to avoid a conflict when linking the MAC address and LAN-ip, the router will provide only the assigned LAN-ip for this MAC address.
Virtual servers - you need to add the local ip of your camera and the corresponding ports.
We set the DHCP server enabled, and also check if UpnP is enabled.
You can also set up remote control of your router, for the TP-Link router there is a corresponding firewall sub-item.
Do not change the default login, as the router must be public. Further in the corresponding brainfields you should set 255.255.255.255 and the port, as a rule, 8080.
On the FOSCAM camera settings page:
Username and password - you should set a new username and password, and do not forget to “find and replace” them in foscam.php instead of admin and password.
For "Basic Network settings" set: "Obtain IP from DHCP Server".
In the Http Port item, set: 8081, 8082 8083 sequentially to your cameras.
In UPnP Settings, set: Using UPnP to Map Port. This will help to restore the connection after a power outage.
After configuring the router and cameras in order for the settings to be updated, they should all be rebooted, with the router first.
If the cameras and the router are configured correctly, then they can be remotely accessed from your Wan IP address, for example, this one: http://187.34.157.22:8081. You can check your Wan IP at https://www.whatismyip.com/
Step 6: coding and programming the ESP8266 module with the Arduino IDE
For programming homemade you need to open the attached sketch in the Arduino IDE, and in the corresponding lines set ssid "// your wifi ssid" and the password "// your wifi pwd" of your WiFi router, as well as the name of your host "// your host without / IP" and the path to the "/ ip" folder containing the server files, you do not need to change it.
You may need to change the line
url + \u003d "input.php? ip \u003d";
which appears twice in the sketch, and if you have a second module, just change to input2.php.
Before starting to download the code, you need to set the board type correctly, for this tool submenu you should select "Generic ESP8266", and if this is not the case, add additional boards in your preferences.
To download, you need to hold down the GPIO0 button, quickly press the RST button, and then release the previous one (GPIO0 button). Next, in the IDE, run compilation and brain load.
If all goes well, opening the serial port monitor at 9600 baud (bps) will show the following:
Connected To:
IP address: 192.168.0.103 (LAN IP)
Connected - Acquiring WAN IP:
connecting to
Requesting IP Update: /ip/input.php?ip\u003dxxx.xxx.xxx.xxx
Ok
Step 7: Install the boards in the chassis


After checking homemade for operability, it is necessary to place its electronics in the case, thereby making an independent completed device.
If in your chosen building for brainwashing there is enough free space, the resistors and buttons can be connected as shown in the photo, but if later you plan to reprogram it, then you should not place the board inside the case.
First option: Placement inside the enclosure
To do this, you need to open the case of the old power supply, unsolder the black (outgoing) wire with a connector, and then place the module board and voltage regulator in the case, having previously insulated them, and "power" from those contacts to which the outgoing wire was soldered. Components can be insulated with suitable foam tape or hot glue.
As a result, a power supply should be obtained, without any wires, and in this version the power supply can be 5V 1A.
A variation of this layout method can be placing the boards inside a power supply with a USB female connector at the output. Then the boards should also be fixed inside the case, insulated, and powered from the contacts of the USB connector. Thus, through this modified power supply, you can still charge your phone, but the truth is the power supply should provide 5V 2A.
Option 2: Placement outside
If you have a non-working USB flash drive that can fit boards homemade, then you can use it.
You need to disassemble the USB flash drive, remove the memory card, and in its place place the WiFi module and voltage regulator, and power them through the USB connector of this flash drive. In this case, you will also need to cut the module's pins so that it fits into the body of the flash drive. AND NEVER CONNECT this modified flash drive to your computer's USB port!
Then the USB flash drive with the module inside must be connected to the power supply and check for WiFi signal using your smartphone. And in general, check the performance of the finished brainwashing you can go to /cam/foscam.php of your server through your browser. And yet, it should be updated with the current ip and date / time stamp.
That's all, I hope this information brain articles will be useful to you!
We will now install the server role DNS server on the operating system Microsoft Windows Server 2012 R2 Datacenter, then we will create a forward lookup zone, and also remember what DNS is and what it is for.
And before installing and configuring a DNS server, let's remember what DNS and DNS server are. Since there is a lot of such information on the Internet, we will consider this briefly and get straight to the point. Let me remind you that in previous articles we examined the installation of Windows Server 2012 R2 and the installation and configuration of a DHCP server on the same operating system, now we continue and we have a DNS server next in line.
What is DNS and DNS Server?
DNS (Domain Name System) Is a domain name system that allows you to find out the IP address of a host by a domain name and vice versa. Since each computer or network device has its own IP address, and in order to access a particular computer or device, respectively, you need to know this IP address, but since memorizing a certain sequence of numbers is not convenient, and even as if, for example, you turn to many computers (it is simply not realistic to remember), therefore, in order not to remember these numbers, there is a domain name system, for example, which is better for the perception of 192.168.1.1 or mycomp. This is such a simple definition, but since the material is for novice administrators, this is quite enough.
DNS server Is a network service or, in simpler terms, software that enables and maintains DNS. The DNS server can be responsible for a specific zone in which the corresponding computers are located. And since the DNS system is hierarchical, the DNS server can redirect the request to the upstream server if it cannot determine the host's ip address by the domain name.
Enough theory, and since the material is devoted specifically to the installation of the DNS server role, let's go directly to this.
Note! As the name implies, we will install the DNS server on Windows Server 2012 R2 Datacenter, only we will use, as in previous articles, an evaluation version.
Installing DNS Server on Windows Server 2012 R2
Step 1
Open the server manager and select " Add roles and components»
Step 2
On the next window, nothing needs to be done, this window is a simple reminder to the administrator that the administrator account must be protected by a strong password, that all the latest updates must be installed, by the way, you can make sure that this window does not appear next time. to do this, check the corresponding box. And we press " Further»

Step 3
At this step, you also do not need to do anything, everything is selected by default correctly exactly as we need it, click " Further»

Step 4
Then you have to choose a server on which the DNS server role will be installed, since I have only one server, I choose it, press " Further»

Step 5
It is just at this step that we need to choose which roles we will install, and we will accordingly install the role of the DNS server, so we select it

Then we will immediately be prompted to install the DNS server administration tools, and since I will administer it on the same server, I press " Add components", So that at the next step you do not need to search for them and not forcibly select them. And if you will be administering the DNS server from another server, then you may not add these tools, but add them accordingly on the server from which the configuration and management will be carried out.


Step 6

Step 7
On the next window, we are told what to look for when installing the DNS server role, click " Further»

Step 8
We confirm the installation by pressing the button " Install", You do not need to check the" Automatic server restart "checkbox in this case.

That's all the installation started

It will not last long for about 3 minutes, and the following message will appear, click " Close»

That's it, the DNS server role is installed. To run the DNS server management tools, use Server Manager -\u003e Tools -\u003e DNS

Or through the start menu

The control itself looks like this

Create a forward lookup zone on DNS Server 2012 R2
On the "Live View Zones" group, right-click and select " Create a new zone»

After that, the wizard for creating a new zone will start, click " Further»

In the next window we select the type of our zone, you can look at the description directly under each type, I select “ The main"Press" Further»

Then we have to write the name of our zone, in my case, since the test server I will choose the name local, You, in turn, write the name of your domain, or if your domain will not have access to the Internet in other words local (purely in your network), then in principle you can write whatever you want.


Then you have to select the "Type of dynamic update", I will prohibit such functionality for now, but later I can always turn it on, and you can turn it on if, for example, you have a DNS server only for your local network, I press " Further»

The final window, which tells us that everything is ready, we respectively press " Done»

That's all the zone has been created, let's create a record of type A, for example, for our own server. To do this, right-click on the zone and press “ Create Node A or AAAA»

Then we enter the name of our node, which we want it to have, and, accordingly, what is its IP address, this is already in fact. Click " Add node»

A message appears stating that the node has been created

And the corresponding entry will appear

Then do not forget to check which dns server is installed in our network interface settings (it should be ours, that is, the ip address of this server). Then, accordingly, we can check the operation of the newly installed DNS server, for example, run the command line and try to ping the node that we created a little earlier

As you can see, the system recognized its IP address by the domain name. And I propose to end here. Good luck!
the Internet is a collection of local area networks of computers located all over the world, which communicate with each other according to uniform rules, called protocols.
In order not to remember the numerical address of the computer, the DNS system was created. Domain Name System or DNS (Domain Names System), associates names similar to the numeric addresses (185.12.92.137) that computers use to communicate with each other.
In order for your site with your domain name to work, you need to specify the DNS-servers on which it will be "recorded" on which server (hosting) your site is located. DNS servers look like:
Ns1.yourhosting.ru
ns2.yourhosting.ru
There are three ways to configure DNS:
- DNS registrar. In this case, you will need to fully configure the DNS zone as in the third option.
- DNS hosting provider. In this case, the hosting provider will do all the preliminary DNS settings sufficient for the normal operation of your site.
- Third party DNS. You can specify DNS hosting in general on a third-party DNS server, for example, Yandex-DNS.
How do I specify (change) DNS servers for a domain?
To specify / change the DNS server for a domain, you need to:
- register with a domain name registrar;
- Find the desired domain and select there "DNS Server Management / Delegation"
- In the form that opens, specify the required DNS servers (IP can be omitted). or check the box "Use registrar's DNS servers".
- Click on the "Save" button.
Information about your changes will be available for a period from a few minutes to 72 hours. Therefore, at first, it is possible that the DNS servers will be old. It does not depend on the registrar or the hosting provider. You just have to wait.
Configuring DNS records.
To add / change records on the DNS server, you need to do the following:
An example of entering records in DNS:
Suppose you have registered the mydomain.ru domain and the IP address of the web server that will host the site - 195.128.128.26. In this case, you will need to create at least two "A" records for your domain (to link mydomain.ru and www.mydomain.ru with the address 195.128.128.26). To do this, in the form for adding records "A" in the "Subdomain name" field, specify "@" for the first record and "www" for the second record, and in the "Data" field specify 195.128.128.26 (for both records).
To send all subdomains to an IP address, you need to specify * as the "Subdomain name"
Example 2: You want the mail.mydomain.ru address to point to the same host as relay.highway.ru. To do this, specify "mail" in the "Subdomain name" field, select the "Record type" CNAME, and in the "Data" field, specify "relay.highway.ru.".
An example of DNS records for the mydomain.ru zone:
@ A 195.161.114.80 @ MX 10 relay.highway.ru. www A 195.161.114.80 ctrl CNAME ctrl.muse.highway.ru. ftp CNAME ftp.muse.highway.ru. mail CNAME relay.highway.ru. ssh CNAME ssh.muse.highway.ru.
Instructions for changing DNS servers
- If you specify the domain RU, SU, RF DNS-servers that are located in the same domain (ie "their" DNS), for example, for the domain testsite.ru you specify the DNS servers ns1.testsite.ru and ns2.testsite.ruthen necessarily it is necessary to specify its IP address for each DNS server.
- If you specify any domain's DNS servers that are located in another domain, for example, for a domain testsite.ru you specify the DNS servers ns1.abrakadabra.ru and ns2.abrakadabra.ru, then specify IP addresses for each DNS server not necessary.
- IP addresses of DNS servers (if necessary, specify them, see above) for domains RU, SU, RF must differ by at least one digit! The same IP for all DNS is not allowed.
- For international domains (com, net, org, info, etc.), the DNS servers that you specify for the domain must be necessarily registered in the international database NSI Registry. If they are not registered there, then they cannot be specified. For international domains, there is no need to specify IP addresses for DNS servers. They are specified when registering DNS in the NSI Registry database
How to attach a domain to an IP address?
In order to attach a domain to an IP address, you need:
Now you need to wait until the changes take effect and your site will open from this IP address. This can take up to 72 hours.
How long does it take to change DNS?
The changes themselves to the DNS are made instantly. But due to the fact that providers cache DNS, the process of changing DNS around the world can take from a few minutes to 72 hours.
What DNS servers can I use to access the Internet?
To obtain an IP address by domain name, you can use the following DNS servers:8.8.8.8 4.4.4.4
77.88.8.8 77.88.8.1
Learn more about Yandex DNS and how to protect yourself from malicious sites using DNS at dns.yandex.ru
- To read
A zone is a database containing authoritative information about the scope of the DNS namespace. When you install a DNS server along with a domain controller, a DNS zone is automatically created to support the Active Directory domain. If the DNS server was installed on a domain controller, domain member server, or stand-alone server, zones must be manually created and configured.
This lesson describes how to create and configure a zone, and provides the information required to properly configure a zone.
Creating zones
Zone DNS is a database containing records thatassociate names with addresses in the described scope of the DNS namespace. Althoughthe DNS server can use a cachedinformation from other servers, he is authorized to respond to requests only inlocally administered zone. For any scope of the DNS namespace,represented by a domain name (e.g. google .ru), there is only oneauthoritative source of zone data.
If you need to create a new zone on the DNS server, you can use the New Zone Wizard in the DNS Manager. To start the wizard, right-click the server icon in the DNS Manager console tree and use the New Zone command.
The New Zone Wizard contains the following configuration pages:
■ Zone Type;
■ Zone replication scope integratedin Active Directory (Active Directory Zone Replication Scope);
■ Forward or Reverse Lookup Zone;
■ Zone Name;
■ Dynamic Update
The following sections describe the configuration concepts associated with these five pages of the wizard.
Zone type selection
On the Zone Type page of the New Zone Wizard, you can choose to create a main zone, a secondary zone, or a stub zone. By creating a primary or stub zone on a domain controller, you can store the zone data in Active Directory.
* Main zones
The most common type of DNS zone is the Primary zone. It provides the original read / write source data to authorize the local DNS server to respond to DNS queries for the DNS namespace scope.
The local DNS server that manages the primary zone is the primary source of information about that zone. The server stores a master copy of the zone data in a local file or in Active Directory Domain Services (AD DS). If the zone is saved in a file rather than Active Directory, the file is named but by default zone_name.dns and is stored in the% systemroot% \\ System 32 \\ Dns folder on the server.
* Additional zones
Provides a read-only authoritative copy of the main zone or another secondary zone.
Secondary zones provide the ability to reduce the amount of DNS query traffic in areas of the network that are heavily queried and used for zone data. In addition, in the event that the server that manages the primary zone is not available, the secondary zone can provide name resolution until the primary server becomes available again.
The original zones from which the additional zones receive information are called master zones, and the data copying procedures that keep the zone information up to date are called zone transfers. The master zone can be the main zone or another secondary zone. The master zone can be assigned to the additional zone being created in the New Zone Wizard. Since the secondary zone is a copy of the primary zone managed by another server, it cannot be stored in Active Directory.
* Stub zones
Similar to the secondary zone, but containing the resource records required to identify the authoritative DNS servers in the primary zone. Stub zones are often used so that the parent zone (for example, google .ru) can use the updated list of nameservers available in the delegated child zone (for example: translate .google .ru). They also serve to improve name resolution and simplify DNS administration.
* Storing zones inActiveDirectory
When you create a primary or stub zone on a domain controller, on the Zone Type page of the wizard, you can choose to save the zone to Active Directory. Active Directory-integrated zone data is automatically replicated to Active Directory according to the options selected on the Active Directory Zone Replication Scope page. With this option, there is no need to configure zone transfers to additional servers.
There are several benefits to integrating a DNS zone into Active Directory. First, because Active Directory replicates zones, there is no need to configure a separate mechanism for transferring DNS zones between the primary and secondary servers. Multiple replication on the network automatically provides fault tolerance and increased performance with the availability of multiple primary servers with read / write access. Second, Active Directory allows you to update and replicate specific properties of resource records on DNS servers. Since many complete resource records are not transferred, there is less load on network resources during zone transfers. Finally, Active Directory-integrated zones also provide the optional security requirements for dynamic updates that are configured on the Dynamic Update page of the New Zone Wizard.
NOTE: Read Domain Controllers and Active Directory Integrated Zones
On traditional domain controllers, the copy of the zone is granted read / write access. On Read-O nly Domain Controllers (RODCs), the copy of the zone is assigned only read access.
* Standard zones
When creating a zone on a domain controller, the option to save the zone to Active Directory on the Zone Type page is selected by default. However, you can clear this check box and create a so-called standard zone. Only standard zones can be created on a server that is not a domain controller, and the check box on this page is grayed out.
Unlike an Active Directory-integrated zone, a standard zone stores its data in a text file on a local DNS server. In addition, when using standard zones, only the master copy can be configured with read / write access to the zone data. All other copies of the zone (additional zones) are assigned read-only permission.
The standard zone model assumes one point of failure of the rewritable version of the zone. If the main zone is not available on the network, no changes can be made to the zone. However, queries for names in a zone may not be interrupted as long as additional zones are available.
Selecting the replication scope of the zone integrated inActiveDirectory
On the Active Directory Zone Replication Scope page of the New Zone Wizard, you can select the domain controllers on the network to save the zone data. This page appears only when you select the option to save the zone and Active Directory. The zone replication scopes options determine the domain controllers among which the zone data will be replicated.
The following options are presented on this page:
■ Saving the zone on all domain controllers that are also DNS servers in the entire Active Directory forest;
■ Retention of the zone on all domain controllers that also serve as DNS servers and the local Active Directory domain;
■ Preservation of the zone on all domain controllers and the local Active Directory domain (used for compatibility with Windows 2000);
■ Preserves the zone on all specified domain controllers and the scope of the custom Active Directory partition.
These options are described in more detail in the second topic.
Create forward and reverse lookup zones
On the Forward or Reverse Lookup Zone page of the New Zone Wizard, select the type of zone to create; Forward Lookup Zone or Reverse Lookup Zone.
For forward lookup zones, DNS servers map FQDNs to IP addresses. In reverse lookup zones, DNS servers map I P addresses to FQDNs. Therefore, forward lookup zones respond to FQDN to IP address resolution requests, and reverse lookup zones respond to IP address to FQDN resolution requests. Note that forward lookup zones are named according to D NS domain names for which permission is executed like google .com. Reverse lookup zones are named in reverse order of the first three octets of the address space for which name resolution is provided, plus the optional in-addr.arpa tag. For example, if you resolve names for the 192.168.1.0/24 subnet, the reverse lookup zone will be named 1.168.192.in-addr.arpa. In the forward lookup zone, a single database record that maps a hostname to an address is called a knot (A). In the reverse lookup zone, a single database entry that maps an IP address to a hostname is called pointer or a PTR record.
The principle of my forward and reverse lookups is shown in the figure.
Live view area

Reverse lookup zone
NOTE: DNS Server Configuration Wizard
You can use the Configure A DNS Server Wizard to create both forward and reverse lookup zones at the same time. To start the wizard, in the console tree of DNS Manager, right-click the server icon, and then click Configure A DNS Server.
Zone name selection
On the Zone Name page of the New Zone Wizard, you can select the name of the forward lookup zone to be created. Reverse lookup zones are named according to the range of IP addresses for which they are authoritative.
If you create a zone for name resolution in an Active Directory domain, it is best to specify a zone name that matches the Active Directory domain name. For example, if an organization has two Active Directory domains named google .ru and translate .google .ru, the name resolution infrastructure should include two zones named after those domains.
If you create a zone for a DNS namespace outside of Active Directory, you must specify the organization's Internet domain name, such as wikipedia .org.
NOTE: AddingDNS server per domain controller
To add a DNS server to an existing domain controller, you typically add a copy of the primary zone to provide name resolution in the local Active Directory domain. To do this, you just need to create a zone whose name matches the name of an existing zone in the local Active Directory domain. The new zone will be populated with data from other DNS servers in the domain.
Configuring dynamic update options
DNS client computers can register and dynamically update their resource records using a DNS server. By default, DNS clients with static IP addresses update the host (A or AAAA) and pointer (PTR) records, while the DNS clients that are DHCP clients update only the host records. In a workgroup environment, the DHCP server updates pointer entries on behalf of the DHCP client every time the IP configuration is updated.
For DNS dynamic updates to succeed, the zone in which clients register or update records must be configured to accept dynamic updates. There are two types of this update:
■ Safeupdate (Secureupdates)
Enables registration only from computers in the Active Directory domain and updates only from the computer that originally performed registration.
■ Unsafeupdates (Nonsecureupdates)
Allows updating from any computer.
On the Dynamic Update page of the New Zone Wizard, you can enable secure, unsafe dynamic updates, or disable updates altogether for the newly created zone.
Parsing Inline Resource Records
When creating a new zone, two types of records are automatically created. First, the zone always includes the Start Of Authority (SOA) zone record, which defines the zone's basic properties. In addition, new zones contain at least one Name Server (NS) record that specifies the name of the authoritative server (s) for the zone. The functions of these two resource records are described below.
Initial zone records
When a zone is loaded, the DNS server uses the Start Of Authority (SOA) zone record to determine the basic properties and authority of the zone. These parameters also characterize the frequency of transmission of zones between the primary and secondary servers. Double-clicking an SOA record opens the Start Of Authority (SOA) tab of the zone properties dialog box.
■ Serialserial Number
This text box on the Zone Initial Record (SOA) tab contains the revision number of the zone file. The number listed here is incremented each time the resource records in the zone change. It can also be increased manually using the Increment button.
If zones are configured to perform zone transfers to one or more secondary servers, those secondary servers periodically query the zone serial number from the core server. Such requests are called SOA requests. If the SOA request receives a primary zone serial number equal to the secondary zone serial number, no transfer occurs. If the zone serial number on the master server is greater than the corresponding value on the requesting secondary server, the latter initiates a zone transfer.
NOTE: Transferring zones on the main server
Clicking the Increment button initiates a zone transfer.
■ Mainserver (PrimaryServer)
■ Responsibleperson (Responsible Person)
Enter the Responsible Person (RP) name that corresponds to the domain mailbox of the zone administrator. The name entered in this field must always end with a period. The default is hostmaster.
■ Intervalrefresh Interval
The value in this field determines how long the secondary DNS server will wait before requesting a zone update on the master server. At the end of the refresh interval, the secondary DNS server queries the master for a copy of the current SOA record. When the secondary DNS server receives a response, it compares the serial number of the current SOA record of the primary server (specified in the response) with the serial number of its local SOA record. If the values \u200b\u200bare different, the secondary DNS server requests a zone transfer from the primary DNS server. The default update interval is 15 minutes.
■ Intervalretry Interval
■ Termexpiresafter (Expires After)
The value in this field determines the time interval during which the secondary server continues to execute queries from DNS clients without contacting the primary server. After this time, the data is considered unreliable. By default, this parameter is assigned one day.
■ MinimumtermtTL life (Minimum (Default)T TL)
TTL values \u200b\u200bdo not apply to resource records in authoritative zones. And these zones use the resource write cache lifetime on non-authoritative servers for TTL values. The DNS server that cached a resource record from a previous request flushes that record, but the TTL of the record expires.
■ Term life (TTL)records (TTL For This Record)
The value specified in this field defines the lifetime of the current SOA record. This value overrides the default value specified in the previous field.
Name server records
The name server (NS) record specifies the authoritative server for the zone. When a zone is created in Windows Server 2008, each server managing the master copy of an Active Directory-integrated zone will have its own NS record in the new default zone. When creating a standard primary zone, the local server NS record will be added by default.
For servers managing secondary zones, you must manually add NS records to the primary zone copy.
NS records are created using a different procedure than other types of resource records are created. To add NS records, double-click any existing NS record in DNS Manager. The Name Servers tab of the zone properties dialog box opens. On the Name Servers tab, click the Add button to add the FQDN and IP address of the server that manages the secondary zone of the local primary zone. After adding a new server, click OK and a new NS record will appear in DNS Manager indicating this server.
NOTE: Enabling transmission to additional zones
The secondary zone does not recognize this entry as a valid name server as long as it contains a valid copy of the zone data. For the additional zone to receive this data, you must enable zone transfer for that server on the Zone Transfers tab of the zone properties dialog box. This tab is described in more detail in the next topic.
Below is an example of a record created in a standard zone file:
@ NS dns1.lucernepublishing.com.
The @ symbol represents the zone defined by the SOA record in the zone file. The full record then maps the wikipedia .org domain to the dns1.wikipedia .org DNS server.
Creating resource records
In addition to SOA and NS records, several other resource records are automatically created. For example, during the installation of a new DNS server when the server is designated as a domain controller, many Active Directory Domain Services (AD DS) SRV records are automatically created in the locally managed zone. In addition, by default, many DNS clients automatically register host (A and AAAA) and pointer (PTR) records in a zone through dynamic updates.
Although many resource records are generated automatically, corporate environments typically need to create some resource records manually, such as Mail Exchangers for mail servers, aliases (CNAME) for web servers and application servers, and host records for servers and clients. that cannot perform their own updates.
To manually add a resource record for a zone, in the DNS Manager console, right-click the zone icon and select the type of record to create from the context menu.
After selecting an entry from the context menu, a dialog box will open where you can specify the entry name and the associated computer. Note that only host records are associated with a computer name with an IP address. Most record types associate a service name or alias with the original host record. Thus, the MX record relies on the presence of the SRV node 12.nwtraders .msft in the zone.
Post types
The following are common manual resource records:
■ node (AorALAA);
■ alias (CNAME);
■ mailexchanger (MX);
■ pointer (PTR);
■ locationservice (SRV).
Node (A or AAAA)
For most networks, the majority of the resource records in the zone database are host resource records. These records are used in the zone to associate computer names (hostnames) with IP addresses.
Even if you enable dynamic updates for zones, in some scenarios, host records will need to be manually added to the zone. In the figure below, Contoso, Inc. Uses the contoso .com domain name in the public namespace and internal Active Directory domain. In this case, the public web server www .contoso .com is located outside the Active Directory domain and only performs updates on the public authoritative DNS server contoso .com. But internal clients forward their DNS queries to internal DNS servers. Since the A record of www .contoso .com is not dynamically updated on internal DNS servers, it is added manually so that internal clients can resolve names and connect to the public web server.

Host records can be added manually if your network is using a UNIX server. For example, Fabrikam, Inc. has one Active Directory domain on its private network named fabrikam, com. This network also includes the UNIX server App1.fabrikam, com, which runs an essential application for the daily operations of the company. Since UNIX servers cannot perform dynamic updates, you will need to manually add the App1 server host record to the DNS server that manages the fabrikam zone, com. Otherwise, users will not be able to connect to the application server by specifying its FQDN.

Alias \u200b\u200b(CNAME)
These records are sometimes referred to as canonical names. They allow you to use multiple names to refer to a single node. For example, well-known server names (ftp, www) are typically recorded using CNAME records. These records map the hostnames associated with their services to the actual record of the Computer running the service.
■ When you want to rename the node specified in the A record of the same zone.
■ When the group name of a well-known server (such as www) needs to be resolved into a group of individual computers (each containing individual A records) that provide the same service (such as a group of redundant web servers).
Mail exchanger (MX)
These records are used by email applications to localize the mail server in the zone. They allow you to match the domain name specified in the e-mail address with the record of the Computer that manages the mail server in the domain. Thus, this type of record allows the DNS server to process email addresses that do not include a mail server.
Often, MX records are created to provide fault tolerance for another mail server in case the preferred server is unavailable.
Preference values \u200b\u200bare assigned to multiple servers. The lower the value, the higher the server preference order.
NOTE: @ Symbol
In this example, the @ symbol represents the local domain name contained in the email address.
PointerPTR
This entry is used only in reverse lookup zones to support the reverse lookup that occurs when resolving IP addresses to hostnames or FQDNs. Reverse lookups are performed in the root zones of the domain in -addr .arpa. PTR records can be added to zones manually or automatically.
Below is an example of a textual representation in a zone file of a PTR record generated in DNS Manager that maps to the IP address 192.168.0.99 to the hostname of server 1.google .ru:
99 PTRserver 1.google.ru.
NOTE: Record number 99PRT
In a reverse lookup zone, the last octet of the IPv 4 address is equivalent to the hostname. Therefore, the number 99 represents the name assigned to the node within the 0.168.192.in -addr .arpa zone. This zone corresponds to the 192.168.0.0 subnet.
Service locationSRV
Recordings SRV is used to indicate the location of services in a domain. Client applications that use SRV can use DNS to retrieve the SRV records of application servers.
An application that uses SRV is Windows Server 2008 Active Directory. Netlogon Logon uses SRV records to localize domain controllers by searching the Active Directory Lightweight Directory Access Protocol (LDAP) domain. DNSto improve fault tolerance or troubleshoot network services.
InclusionDNS for resolutionWINS
On the WINS tab of the zone properties window, you can specify the WINS server that the DNS Server service will contact to look up names that were not found using DNS queries. When you specify a WINS server on the WINS tab of the properties dialog box for a forward lookup zone, a special WINS entry is added to the zone that refers to that WINS server. When you specify a WINS server on the WINS tab of the reverse lookup zone properties dialog box, a special WINS -R entry is added to the zone that identifies that WINS server.
For example, if a DNS client asks for the name ClientZ .contoso .com and the preferred DNS server cannot find the answer in normal sources (cache, local zone data, and by polling other servers), the server asks for CLIENTZ. on the WINS server specified in the WINS record. If the WINS server responds to the request, the DNS server returns its response to the client.
Cleaning and deleting obsolete records
Time stamps are used in DNS to track the age of dynamically registered resource records. Purge obsolete records is the process of removing obsolete time-stamped records. Cleaning can only be performed when using time stamps. Time stamping and scrubbing combine to remove old records that may accumulate over time in a zone. By default, time stamping and clearing are disabled.
Enabling cleaning
To enable scavenging for a specific zone, you must enable this feature at the server and zone levels.
To enable scavenging at the server level, in the DNS Manager console tree, right-click the server icon, and then click Set Aging / Scavenging For All Zones. Then, in the Server Aging / Scavenging Properties dialog box that opens, select the Scavenge Stale Resource Records check box. While this setting includes server-wide timestamping and purging for all new zones, it does not include timestamping and purging existing Active Directory-integrated zones.
To enable them, click OK, and then, in the Server Aging / Scavenging Confirmation dialog box that appears, select the check box to apply these settings to existing Active Directory-integrated zones.
To enable time stamping and cleaning at the zone level, open Zone Properties and then on the General tab, click the Aging button. In the Zone Aging / Scavenging Properties dialog box that opens, select the Scavenge Stale Resource Records check box.
Time Stamps The DNS server performs cleanup by using the timestamps set on the resource records in the zone. Active Directory-integrated zones set default timestamp values \u200b\u200bfor dynamically logged entries before scavenging is enabled. However, basic standard zones set timestamps for dynamically logged entries in a zone only after scavenging is enabled. Manually generated resource records for all zone types are assigned a time stamp of 0; this means that their age will not be determined. Is the time between the last update of the stamp and its possible next update. Blocking prevents the server from processing unnecessary updates and reduces traffic. The default blocking interval is 7 days.
■ Modificationintervalupdates
The update interval is the interval between the earliest timestamp update and the earliest start time to clear the record. After the lock and update intervals have elapsed, records can be deleted from the zone. By default, the interval is 7 days. Therefore, if you enable time stamps, dynamically registered resource records can be deleted after 14 days.
Performing cleaning
Cleaning is done in the area automatically or manually. To automatically perform a cleanup, you must enable automatic deletion of obsolete resource records on the Advanced tab of the DNS server properties dialog box.
If this option is not enabled, you can manually clean up zones by right-clicking the server icon in the DNS Manager console tree and using the Scavenge Stale Resource Records command.
GlobalNames Zone
Windows Server 2008 includes a new feature that allows all DNS clients in an Active Directory forest to use single-label names such as Mail to connect to server resources. This component is useful when the default DNS suffix lookup list for DNS clients prevents users from quickly connecting (or connecting at all) to a resource using such a single-label name.
The DNS Server in Windows Server 2008 allows you to create the GlobalNames zone. By default, the GlobalNames zone does not exist, however, by deploying a zone with this name, you can provide access to selected resources using names from a single label without using WINS. Typically, single-label names are assigned to important and widely used servers that are already assigned static IP addresses. GlobalNames on the remote server, replace the period with the name of the remote server.
■ Creatures ony GlobalNames
The next step in deploying the GlobalNames zone is to create a zone for a DNS server that serves as a Windows Server 2008 domain controller. The GlobalNames zone is not a special type of zone, but just an Active Directory integrated forward lookup zone named GlobalNames. When creating a zone, select to replicate the zone data for all DNS servers in the forest. This option is located on the Replication Scope page of an Active Directory Integrated Zone (To enable single-label name resolution, create a resource alias (CNAME) record for zone G lobalNames. The name assigned to each CNAME record represents a single-label name that users can use connect to a resource Note that each CNAME record specifies a host record in another zone.


