Remote Desktop Connection Manager 2.7 Adding a server. Customize RDP (Remote Desktop Protocol)
Good day! Dear Readers and Guests, Computer Blog №1 In Russia, the site. I write a lot about how using technologies to save your time in various aspects of your life, a recent example, this is the payment of utilities services through Sberbank online, where I described this process in detail. The system administrator or engineer can also save its time and do its work as convenient as possible and preferably everything from one or two consoles. Today I will tell you about a very ease of system administration tool, which allows from one utility to produce a huge amount of RDP connections displayed in one window, and even with different parameters and structuring. Today it will be about the super utility from Microsoft. We will analyze where to download the Remote Desktop Connection Manager and how to install it, and of course set up.
What is Remote Desktop Connection Manager
The RDCM is a Microsoft utility, designed from one window conveniently manage a large number of remote RDP connections to various servers:
- I allow the user to create folders to structuring servers
- Set automatic input with saving user credentials
- Set the resolution of the compound
- Console input
- Interactive open connections miniatures updated in real time
- Much more
Where to download Remote Desktop Connection Manager
You can download RDCM from the official site of Microsoft or from my site, where I poured it on Mail cloud.
The official page of Microsoft https://www.microsoft.com/en-us/download/details.aspx?id\u003d44989
Go on official page Remote Desktop Connection Manager 2.7 and click the download button. You have a small MSI distribution, 1 megabyte size (rdcman.msi).

Installing RDCM 2.7.
Installation of this software I should not call any problems, as it is trivial. I will only give her for the integrity of the article. Install Remote Desktop Connection Manager I will be in the operating room windows system 10 1803, in the workplace I owe it.
Run the installation, to do this, open the RDCman.msi file. You will find the installation wizard, in the first step you simply click "Next".


Well, the last step, this is pressing the Install button (Install)
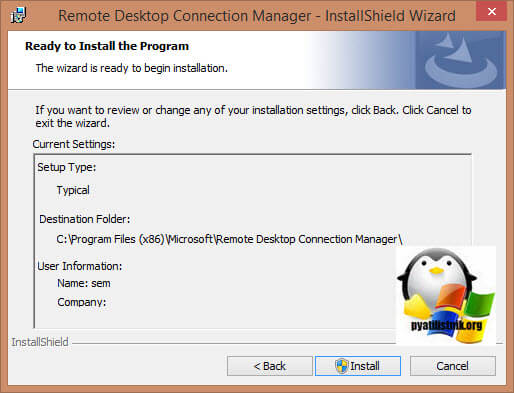
After a couple of moments, you will see that everything is successfully installed, you can see the log if you wish, press the "FINISH." Button

All installation RDCM 2.7 in Windows 10 I produced, now let's show how to configure it. Open the utility, she had to create an appropriate icon on the desktop. If it is not, then look for it through the "Start" button

You will find the program window, the default everything will be empty here and you need to create a configuration file to start.

It is done through the File menu - NEW or simply pressing hot keys Ctrl + N

we specify the name of your file, you can call files by accessories to various Active Directory domains or sites.

Since this utility allows you to structure your RDP in a hierarchical form, it will correctly create the desired number of groups that combine servers for any service or territorial accessory, so for example, you can conveniently combine all participants in terminal farms. I click the right click on the root and from the context menu select the "Add Group" item to add a group.

In the first step, you will be asked on the GROUP Settings tab to set the name of the group, I advise you to write meaningful names, in order not to be confusing, and not just Windows 2008 R2 or 1012 R2. In my example, I called the domain controllers group

Go to the "Logon Credentials" tab, on this tab, the RDCMAN will ask you to specify the credentials on behalf of which will be deleted connections. I asked my domain data, do not forget to click Save.to save them.

Saving will allow you to use them later for other groups created in RDCMAN 2.7

Now your credentials are saved, you can go to the Connection Settings tab.

On the Connection Settings tab, you will see the RDP connections port, it is 3389 by default, unless of course you did not change it for security purposes.

Remote Desktop Connection Manager allows you to change the standard RDP port, To do this, remove the Inherit From Parent dawkey and the fields are activated. The "Connect to Console" field will allow you to connect both by the console if you connect to the monitor and keyboard, it is useful to do when connected to a farm member so as not to receive an error "Connect to a remote desktop could not be connected to a remote computer"

On the Remote Desktop Settings tab, you can select the desired screen resolution, but I advise you to install Full Screen (full screen)

So that you have no scrolling and your entire screen in RDCMAN focused on, then be sure to set the "Scale Docked Remote Desktop to Fit Window"

Local Resources tab will allow you to choose which devices you would like to redirect when the connection is remotely connected, I only left the clipboard.

We now add the server to the desired group. It is also done through the right click, but already in the group, all rights of the group will be applied to the participants, but you can also change them. Once you have added server, do not forget save configuration fileOtherwise, coming out from Remote Desktop Connection Manager, you will lose all your settings.
I eventually have my modest, test stand looks like this. Everything looks like comfortable tiles, which by the way remind you, updated in real time.

Operations are available on the server:
- Connect Server - A regular connection will be made on behalf of the account, which is specified in the settings.
- Connect Server AS - Run on behalf of another person
- Reconnect Server - Convenient When the server has been blocked
- Send Keys - Sending keyboard commands
- Disconnect Server - Disconnect from server
- log Off Server - Output from the operating system
- Properties - Properties
The rest are little useful.

There is a version of the RDCMAN version created by the community for Linux to download it go to the site:
http://www.shashlik.io/download/
For Android
Version 3.6 https://cdn.devolutions.net/download/linux/rdm/remotedesktopmanager36.apk.
The latest version https://cdn.devolutions.net/download/linux/rdm/remotedesktopmanager.apk.

Installation in Linux
- $ sudo dpkg -i / path / to / the / shashlik / deb / file
- $ sudo apt-get install -f
- $ sudo APT-Get Update
- $ sudo APT-Get Install Libgl1-Mesa-Dev
I think I told you in detail about what Remote Desktop Connection Manager is, as you can use it conveniently, and the most important utility is completely free and from the developer, the operating systems to which we connect.
The system administrator of the large network daily has to connect via SSH or Telnet to network hardware for configuring and troubleshooting. And how many times a day does he introduce his credentials to once again connect with Windows RDP server?
Utility Rdcman. (Remote Desktop Connection Manager) - Convenient RDP connections for system windows administratorallowing you to manage in one window with a large number of RDP connections, create tree structures with remote Windows servers (With which you are constantly working or managed), use various RDP connection settings for individual servers and groups and save administrator credentials (user) to automatically authorize on RDP servers, which eliminates routine and saves time.
Download and install RDCMAN
The RDCMAN utility is free and is available for download on Microsoft. Actual version 2.7.1406.0. Upload file rdcman.msi. (size 1.1 mb) by reference:
All modern versions of Windows are supported, up to Windows 10 and Windows Server 2016. Windows XP and Windows Server 2003 are also supported, but on these OSs you need to pre-install the RDP client version 6 version and above.
RDCMAN installation standard, no tricks. We run, click Next-Next-Next and actually everything. The label on the desktop is not created, look for a program shortcut in the "Start" menu.
Configure RDP Server RDP groups in RDCMAN
Run Rdcman.exe. And we see an empty console. First you need to create a configuration file in which your settings will be stored by pressing Ctrl + N or through the "File" menu - "NEW". We specify the name of the * .rdg file (in fact, this is a text XML file that can be edited manually). In one configuration file, you can save any number of RDP connections to your remote servers. The utility allows you to structure RDP connections on a feature convenient to you: Use this and create groups.
For example, you can create a group with 1C servers and a group with domain controllers. You can group remote servers by location, roles or by customer.
You can save the user RDP credential to connect to servers in this group. In the properties of the group, we find the "Logon Credentials" tab and enter your credentials. All servers in this group inherit the group settings. To change any server parameter other than the specified group settings, remove the checkbox in the Inherit From Parent checkbox and set the personal settings.

Do not forget to click "Save".
Attention! Passwords for RDP connections in RDCMAN are not stored in Windows Credential Manager, and directly in the RDG file in encrypted form (independent of domain). However, the encryption algorithm is unstable and there are many utilities that you can decrypt the RDG file and get a password for the RDP connection in the open form (it is desirable to encrypt the RDCMAN configuration file using, for example or TrueCrypt).
Configure RDP Parameters Connections in RDCMAN
Now go to the RDP settings on the Connection Settings tab. By default, the RDP connection is used standard port 3389. You can change the port if yours. Remove the daw from the Inherit From Parent checkbox and change the port. Put the checkbox in the CONNECT TO CONSOLE check, it will allow you to connect to the server in the console mode. The console mode simulates a direct connection to the local monitor server, is used to connect to the server with RDS without use or in situations where the licensing server is not available or.

Customize the screen resolution to be used in the remote RDP session on the "Remote Desktop Settings" tab (I recommend setting "Full Screen") and local resources in "Local Resources", which you want to redirect when you remotely connected (for example, you can arouse in the RDP session Buffer sharing, local printer, local disk, etc.). So that you do not have scrolling and the RDP window is guaranteed to fit into your monitor, be sure to set the "Scale Docked Remote Desktop to Fit Window".

PCM click on the group and add the server.
- Server Name - host name or IP;
- Display Name - server name displayed in the RDCMAN console.

As a result, you will have this console with the tiles of servers that are updated in real time.

Now, when double-clicking, the server will be installed RDP connection using the saved password.
You can make a Connect Group - then the RDP console will be open to all servers in the group.
You can perform standard actions with the server, they are all intuitive.

- Reconnect Server - reconnect if the server is blocked;
- Send Keys - send standard keyboard shortcuts to the server;
- Disconnect Server - Disconnect from the server;
- LOG OFF Server is to be divided into the server;
- List Sessions - view sessions connected to the server;
- Undock - makes the current server in a separate window;
- Dock - Returns the server to the console.
Most importantly - be sure to save the configuration file. Otherwise, when you exit all the settings will disappear.


Import servers in RDCMAN
Unfortunately, it is not possible to import servers directly from Active Directory.. Pretty strange, as this is a developed Microsoft tool.
But you can import servers from a text file or CSV file (you can upload lists of computers or servers from AD using cmdlet). To do this, in the "Edit" menu, select Import Servers. In the window that opens, specify the path to the file with the server list and click "Import"

In order to smash the imported list of server servers, use the "Edit" option -\u003e "Add Smart Group" option. Name the group and set the rules by which servers will be placed in it (for example, a common fragment of the displayed name or IP address).


RDCMAN: Access to the Hyper-V Virtual Machines Console
In RDCMAN 2.7, you can configure direct connections to the consoles of virtual machines running on the Hyper-V host (mode mode). To do this, you need to get a virtual machine identifier on the Hyper-V server. Use the command:
Get-vm -name your_vmname1 | SELECT ID

After you received a VM ID, you can use it when configuring the connection to RDCMAN. When adding a new server in the RDCMAN console, specify the name of the HYPER-V host, check the " VM Console Connect."And in the ID field, copy the received Identifier VM. Connection is performed under accounting With the Hyper-V administrator rights, through the VMBus bus (i.e., you do not need network access to the IP address of the guest OS - access works through the Hyper-V host by port 2701).

RDCMAN has a simple user interface and is very easy to use. There is also an installation version on Linux.
If you just need a RDP connection manager, then it is a great and easy-to-use administrator tool.
Configure RDP (Remote Desktop Protocol) - Remote desktop
If you have a professional or maximum version - you can configure the input to your PC via the remote desktop. For this you need to do a few things.
- Allow the login through the remote desktop (for the younger versions of this menu) 
- Add users who have the right to work through a remote desktop (usually Windows adds the current user automatically)
How to start a remote desktop in Windows 7?
All through the "Start" button:
We type in the search bar "Connect to the remote desktop" (ridiculous - this is exactly how Microsoft recommends that Microsoft recommends via the "Search" line) or "mstsc.exe" - the program itself is so called


Or through the folder "Standard" in the programs. Not in all versions of Windows, there are, for example, in Windows 7 Started (yes, that is the most with the program restriction of RAM in 2 GB) there is no such folder.

After starting, we get the form of remote desktop settings, we need a detailed option (with parameters)

On the general tab, configure:
Computer - or IP address or computer name
User - user, under which we will enter a remote PC

On the Local Resources tab, choose whether printers of the main computer and the clipboard will be available.

If you have all the PCs on the local local network (i.e., the network speed is not critical) - you can use the background drawing of the remote PC desktop on the Advanced Desktop tab.

Well, it seems to be configured - we return to the first tab, save as a shortcut - we try to connect.
Result:(

The main reasons for such a situation are:
- remote PC has an IP address assigned to him by a router via DHCP, it changes periodically. It is necessary to register a fixed IP address in the adapter properties.
- forgot to resolve remote access through the "Properties" of the computer
- remote access was allowed, but forgot to specify a user who can be included
- prohibits Windows Brendmauser, you must add "Remote Desktop" in exceptions
- You made a remote reboot of the PC and before the local user login, the remote desktop will not work
In most cases, Windows 7 must do all this itself (add the current user, resolve in the brandmoreser, etc.), but it does not always work. Those. For example, a "remote desktop" in the program list in the Bredmauser added, but the check mark is not installed: (I need to check everything yourself.
Additional remote desktop settings.
1. There is a need to restart the PC via the remote desktop. The reboot itself is not a problem - either through the task manager either through Alt F4. (The "Start" button will not be this feature). But before the local user login, the remote desktop will not connect. And if the PC is standing in a dark room, where there are no local users?
Here Surprise - you need to create a shortcut for the remote desktop via the command line with the / admin parameter
Like this: mstsc.exe / admin.
Visually, the label setting will be the same - but the system will be allowed through a remote desktop after rebooting the remote PC.
Here full list Remote Desktop Start Options from Command Line

2. If necessary, allow the login of without a password (it is extremely recommended for the corporate segment)
start menu - Run - GPedit.msc - "Computer Configuration" - "Windows Configuration" - " local politicians"-" Security Settings "-" Restrict the use of empty passwords ... .. "-" Disabled " 
Yes, on the younger versions of Windows, of course, the gpedit.msc does not start (there is no this setting)
- All household versions of Windows allow only one user to work on a PC (when the new user logins the current user will be forcibly closed), unlike server options. This is a licensing restriction - but there is a way out. Some shamanism - and everything works, look (opening in a new window)
3. Automatic input with saved login and password
There is a magic check mark "Allow me to save credentials". If you start the change again - the checkbox will be changed to "always request credentials"


We receive a request for data entry, they are saved, the input to the remote machine only works on click on the label.

And if credentials are not saved (in Windows 7 and older)?
Or we get a warning "The system administrator forbade use the saved credentials for logging into the remote computer system, since its authenticity is not completely verified. Enter new credentials. "

What to do?
The fact is that in recent versions Windows password is not stored in the RDP file, but in a separate storage (Credential Manager - credential manager). At a minimum - the following parameters must be disabled in group policies:
- User Configuration - Administrative Templates - Windows components - Deleted Desktop Services - Customer Connection to the Remote Desktop - Disable Password Saving;
- Computer Configuration - Administrative Templates - Windows components - Remote Desktop Services - Customer Connection to the remote desktop - disable password saving.
Here you can (opens in a new window)
4. Sometimes when connected you see such a picture - "Unable to check the authenticity of the remote computer"

Authentication was added, starting with Windows XP SP3. But it is disabled by default (on WiBDows Vista is already included).
How to enable remote computer authentication on Window XP SP3?
We go to the regriedit.exe registry (execute)
Branch HKEY_LOCAL_MACHINE \\ SYSTEM \\ CURRENTCONTROLSET \\ CONTROL \\ LSA
Open the parameter Security Packages. And we are looking for a word tspkg.. If it is not, add to the already existing parameters.
Branch HKEY_LOCAL_MACHINE \\ SYSTEM \\ CURRENTCONTROLSET \\ CONTROL \\ SecurityProviders
Open the parameter SecurityProviders. and add to already existing providers credssp.dllif there is no one.
Close Registry Editor. Reboot.
If this is not done, then when you try to connect the computer, you will ask us the username and password, but instead of the remote desktop, the following will answer:
Connect to a remote desktop
Error checking authentication (code 0 × 507)
5. When connected, a prevention of Windows security system appears.
"Could not identify this publisher remote connection»

This means that the RDP file is not protected by a signed certificate. For the local network, there is nothing terrible here, you can put a tick "no longer output ..."
The security system itself works as follows. The policy parameter allows you to specify whether users can run on client computer Unsigned remote desktop protocol files (RDP) and RDP files received from unknown publishers.
If this policy setting is enabled or not configured, users can run on the client computer unsigned RDP files and RDP files obtained from unknown publishers. Before starting the RDP session, the user will receive a warning and a request to confirm connection.
If this policy parameter is disabled, users cannot run on the client computer unsigned RDP files and RDP files received from unknown publishers. If the user tries to start a RDP session, then it will receive a message about blocking the publisher.
Supported: No lower Windows Vista Service Pack 1 (SP1)
| Registry Hive. | HKEY_LOCAL_MACHINE |
| Registry Path. | Software \\ Policies \\ Microsoft \\ Windows NT \\ Terminal Services |
| Value Name. | AllowunsignedFiles. |
| Value Type. | REG_DWORD. |
| Enabled Value. | 1 |
| Disabled Value. | 0 |
File default.rdp
Actually, it is the file, and not a label of a remote desktop. This configured file can be sent to another user, it will save it - and everything will work.
Moreover, this is a simple text file in which all the remote connection settings are stored and this file can be opened with notepad. By the way, part of the parameters is not edited through the standard settings, you can enter them with your hands.
screen Mode ID: I:- 1 - a remote session is performed in the window mode, 2 - in full screen. Edited on the "Screen" tab of the "Connection desktop" options "Connect to the remote desktop".
use Multimon: I:- 0 - Prohibition of support for multiple monitors, 1 - resolution of support for multiple monitors. Can be used in Windows 7 / Windows Server 2008 and later versions.
desktopWidth: I: - Width of the desktop. Selects on the "Screen" tab of the "Connection Table Remote Desktop" tab.
desktopheight: I: - Height of the desktop. Selects on the "Screen" tab of the "Connection Table Remote Desktop" tab.
session BPP: I: - color depth. Selects in the "Color" group on the "Screen" tab "Parameters" window "Connect to a remote desktop".
winPosstr: s: - Position and size of windows in Windowpos format
compression: I: - 0 - Do not use data compression, 1 - use.
keyboardHook: I: - Determines how the shortcuts of the Windows keys are interpreted. The value of this parameter matches the setting in the "Keyboard" field on the "Local Resources" tab of the "Connect to the Remote Desktop" tool. 0 - on the local computer. 1 - on a remote computer. 2 - only in full screen mode.
audioCaptureMode: I: - Determines where the sound is played. The value of this parameter corresponds to the "Remote Sound" settings on the "Local Resources" tab of the "Connect to the Remote Desktop" Tools. 0 - on the client computer. 1 - on a remote computer. 2 - sound is not reproduced.
videoplayBackMode: I: - 0 - Do not use RDP Efficient Multimedia Streaming when playing video. 1 - use.
connection Type: I: 2 - connection type to achieve maximum speed. Complies with the "Speed" settings on the "Advanced" tab of the "Parameters" window "Connect to a remote desktop" is determined by the type of selected connection speed.
displayConnectionBar: I: - Displays the connections panel when entering the remote computer in full screen mode. The value of this parameter corresponds to the status of the checkbox "Display the connections panel when working on full screen"On the" Screen "tab, the" Parameters "tool" Connection to the remote desktop ". 0 - Do not display the connections panel. 1 - Display the connections panel.
dISABLE WALLPAPER: I: - Ban display background pattern of remote desktop. Complies with the settings in the "Speed" group - check box "Background drawing of the desktop" on the "Advanced" tab of the "Connection to the remote desktop". 0 - Display background pattern. 1 - Do not display the background pattern.
aLLOW FONT SMOOTHING: I:- Permission to smooth fonts. Corresponds to the settings in the "Speed" group - the "Font Smoothing" checkbox on the "Advanced" tab "Parameters" to the "Connection to the remote desktop". 0 - Do not use smoothing. 1 - use.
allow Desktop COMPOSITION: I: 0 - Complies with the settings in the "Speed" group - the "Smoothing fonts" checkbox on the "Advanced" tab of the "Connection to the remote desktop" checkbox. 0 - Do not use smoothing. 1 - use.
disable Full Window Drag: I: - Displays the contents folder when dragging. The value of this parameter corresponds to the status of the "Display the contents of the window when dragging" on the "Advanced" tab of the "Connect to the remote desktop". 0 - Display content when dragging. 1 - not display.
disable Menu Anims: I: - Prohibition of visual effects. The value of this parameter corresponds to the status of the Visual Effects checkbox when displaying the menu and windows "on the" Advanced "tab of the" Parameters "windows. 0 - Use visual effects, 1 - not to use.
dISABLE THEMES: I: - Prohibition of using topics. 0 - Use themes. 1 - Do not use themes.
dISABLE CURSOR SETTING: I: 0 - Ban the cursor settings. 0 - Cursor Setup is allowed. 1 - prohibited.
bitmapcachepersistenable: I: 1 - caching of point drawings on the local computer. The value of this parameter corresponds to the status of the "Permanent caching of point drawings" on the "Advanced" tab of the "Parameters" window. 0 - Do not use caching. 1 - Use caching.
full Address: S: - The name or IP address of the remote computer to which RDP is connected. If necessary, you can specify the number of the TCP port used.
audioMode: I: - Determines where the sound is played. The value of this parameter corresponds to the entry in the "Remote Sound" field on the "Local Resources" tab of the "Parameters" window. 0 - on the client computer. 1 on a remote computer. 2 - The sound is disabled.
redirectPrinters: I: - Using printers during a remote session. The value of this parameter corresponds to the "Printers" checkbox on the "Local Resources" tab of the "Parameters" window. 0 - Do not use local printers during a remote session. 1 - Use the automatic connection of printers.
redirectComports: I: - Use serial ports of a local computer when connected to a remote desktop. 0 - not to use. 1 - use.
redirectsmartcards: I: - Use of a local computer smart card when connecting to a remote desktop. 0 - not to use. 1 - use.
rEDIRECTCLIPBOARD: I: - Use a common clipboard for a local and remote computer. The value of this parameter corresponds to the status of the "Exchange Buffer" on the "Local Resources" tab of the "Parameters" window. 0 - Do not use the overall clipboard. 1 - use.
redirectPosDevices: I: - Redirect devices that use Microsoft Point of Service (POS). 0 - not to use redirection. 1 - use.
redirectDirectX: I: - Redirection DirectX. 0 - Do not use DirectX redirection. 1 - use.
autoreConnection Enabled: I: 1 - Automatic connection when the connection is broken with a remote computer. The value of this parameter corresponds to the "Restore connection when breaking" checkbox on the "Advanced" tab of the "Parameters" window. 0 - Do not use the automatic restoration of the connection. 1 - use.
authentication LEVEL: I: - Authentication level for remote connection. Defines actions in the case when it fails to confirm the authenticity of the remote computer. Determined by the configuration of the Server Authentication group on the Connection tab. In Windows 10, the "Connection" tab corresponds to the "Interaction" tab. 0 - If you failed to confirm the authenticity of the terminal server, then connect without warning. 1 - not connect. 2 - Connect with a warning.
pROMPT FOR CREDENTIALS: I: - request to the user to confirm credentials in case they have been saved earlier. 0 - Do not request credentials if they have been predetermined. 1 - Always request credentials.
nEGOTIATE SECURITY LAYER: I: - The encryption level of the RDP session. 0 - TLS 1.0 encryption session (SSL) will be used in case of support by the client. If the client does not support it, the standard built-in RDP encryption will be used. 1 - remote session will use X.224 encryption
remoteApplicationMode: I: - Mode of operation with a remote application. 0 - Mode of operation with a remote desktop. 1 - working with a remote application.
alternate Shell: s: - The name of the alternative user shell.
shell Working Directory: S: - the working directory of the user's shell.
gatewayHostname: s: - The name of the gateway server of remote desktops. The values \u200b\u200bof the gateway server parameters are determined by the "Connection from anywhere" group on the Connecting tab (for Windows 10 - on the Advanced tab).
gatewayUSAGeMethod: I: 4 - Method of using a remote desktop gateway server. 0 - Never use a remote desktop gateway server. 1 - Always use a remote desktop gateway server. 2 - Do not use the remote desktops gateway server for local clients. 3 - Use the default settings of the remote desktop gateway server. 4 - do not use the remote desktop gateway server, but in the "Connection from anywhere" setting - "Options" are enabled. Do not use the remote work desks for local addresses.
gatewayCredentialssource: I: 4 - Used user authorization method. 0 - Use NTLM (Password Request). Complies with the option "Input method" - "Request Password (NTLM)" in the "Connection from anywhere" settings - "Parameters". 1 - Use smart cards. Parameters that determine the use of a remote desktop gateway server and input parameters and connection parameters are interconnected, and a change in one of them can cause a change in the other.
driveStoreduct: s: - redirection of local computer disk devices. The value is determined by the settings on the Local Resources tab - "Read more"
Supported redirections peripheral devices The local computer and the syntax of the contents of the RDP file depend on the RDP version and may differ in a slight degree.
Fighting a "cross" terminal session.
Here it is a pest (on the connection panel when working in full screen)
The problem is that the "cross" only closes the "remote desktop" on the user's PC, but leaves the server open terminal session on the server. If users are much - all of their sessions remain on the server open and occupy memory.
Solutions.
- In general, remove the panel from the user - in the settings when creating a remote desktop (output only through the completion of the session)

2. Remove the "Cross" himself (exit only through the completion of the session)
We will figure it out on the local network to make a permanent IP address for the device. We assign a permanent IP address through Windows 7 settings. We go to changing the adapter parameters. Then in the properties of the desired connection, we choose the Internet Protocol ...
First of all, what is the RDP client? Actually, RDP (Remote Desktop Protocol - a remote desktop protocol) is a protocol purchased by Microsoft from Citrix and used to ensure the remote user to work with the server on which the terminal connection service is running. In addition to ownership of the data transfer protocol itself, Microsoft owns and client programs that are used to exchange data with remote desktops. Nevertheless, as often happens, to implement in their products the functionality that suits all users, Microsoft may not always, therefore there is a sufficient number of custom RDP customers in the world for various platforms. The purpose of this article was to study the most affordable RDP clients for tablets on the Android platform.
Why do you need it? The popularity of cloud infrastructure Tucha is growing, respectively increases the number of tablets that many customers would be convenient to use as a tool for accessing their virtual desktops. And here is the question of how to do it? If we talk briefly, it is enough to install some RDP client and everything! But when I began to pick it up for myself, and then my colleague with my colleague tested an Android device, which is used as an alternative to a thin client, it turned out that there are many nuances. In one application, for example, there was no Russian layout and hotkeys, and in the other, the drive did not connect. And how can the administrator work with virtual server Without "Ctrl + Alt + Del" or a shopping agent remotely edit the XLS list in a million lines without familiar to it of the index arrows? In a word, no pleasure!
Therefore, it was decided to test the available clients for Android as the most common operating system for mobile devices.
In our comparison, the paid and paid and paid, and free Apps. However, in the testing process, I came to the conclusion that all the necessary functionality may well provide free clientsTherefore, they were part of the final version of the article.
After testing from the entire market, I had three applications - Accesstogo. from Ericom, Parallels Client. from 2 I. RDP.Remote.Lite. From Yongtao Wang. They are, in my opinion, the most qualitative and rich in functional possibilities. The rest of the clients did not suit one or several critical parameters. What? For me, these are.
- The implementation of the keyboard and its capabilities: hot and special keys, convenience, supported layouts.
- Cursor control system.
- The possibility of fine tuning to their needs.
- Additional affair from developers, such as sharing the clipboard between the device and the remote desktop or the connection of the tablet drive.
Testing was conducted on the Huawei MediaPad tablet running Android 4.0.3. Looking forward, I can say that I managed to reveal the leader and distribute to whom to give gold to whom - silver, and who will only get the sleeves from the vest.
Parallels Client.
The authorship of the first client to connect to the remote desktop belongs to Parallels Client. It is available absolutely free for all mobile and stationary platforms. In particular, I use it on my iPhone.
Information
- Cost: is free.
- Interface language: Russian.
- Screen resolution:
- Screen position lock: not.
- Controls:
- yes.
- Yes.
- Yes.
- SD Card Connection: Yes.
- Supported OS: Windows 7, Windows Server 2008.
- Link to download: iOS; Android; Windows & Linux & Macos.
Main screen
The client has a pleasant and convenient interface made in bright colors. In Parallels Client, controls are focused on the right, in the upper corner - the "Add", "Parameters" buttons.
Fig. 1. Main screen Parallels Client
Customer settings
Parallels Client has a wide set of custom parameters. The user can configure both a separate connection and the application itself. So, that's what we can do in Parallels Client.
- Configure connection security settings.
- Configure the quality of the graphics of the remote desktop - the number of colors, design of the desktop, etc.
- Add hot gestures, for example, assign a combination "Ctrl + Alt + Del" gesture "Three fingers flip up".
- Connect the tablet drive to the virtual machine.
- Turn on the redirection of the audio flow from the virtual machine to the tablet.

Fig. 2. Configure connection settings

Fig. 3. Configuring application parameters
Keyboard
The client supports embedded android keyboard or your own keyboard with special keys (F1-F9, ALT, WIN, SHIFT, cursor keys, etc.). At the moment of writing the article version 10.5.1346, a Russian layout appeared; Ukrainian, unfortunately, is not supported.
Disadvantages of the keyboard:
- small distance between the buttons;
- russian layout with humor: "X,", w, e, "for some reason were moved to numbers and special keys;
- there are special keys, but there are no hot keys, as in previous versions of the application.

Fig. 4. Keyboard with Russian layout and humor from developers

Fig. 5. Keyboard in "NUM" mode in 2x client
Cursor control
In most cases, I use exactly sensory control And in rare cases - the mouse emulator. In my opinion, everything is fully implemented here. Double Pressing your finger - the left key, pressing with two fingers - the right key, the scrolling is carried out with two fingers.
In Parallels Client, the user can configure hot gestures (with two and three fingers), assigning any combinations or actions to them.
- Various combinations: Ctrl + Alt + Del, Win + R, Alt + Tab.
- Switch between mouse keyboard modes.

Fig. 6. Creating "hot gestures"
Additional features
The most pleasant opportunity is definitely the ability to connect to the tablet drive virtual machine.
Summary
One of the best applications, but serious flaws with Russian layout make it less attractive. However, in terms of wealth of settings - this is one of the best among free customers.
Barrel Möda
- The Russian language is supported.
- Ability to customize: Security, graphic parameters, etc.
- Convenient implementation of the cursor control and mouse emulator.
- Creating "hot gestures".
- Connect to the virtual machine of the tablet drive.
- Keyboard with special keys.
Pretty big truth spoon
- There is no lock position and scale recovery.
- If we speak subjectively, then not a very comfortable keyboard due to a small distance between the keys.
- Lack of some letters on the main layout.
- The Ukrainian layout is not supported.
- Not a very convenient scrolling, for example, in the large list of programs in the "Start" menu.
Video Testing Parallels Client
http://youtu.be/ab9krs-lbgk.
RDP Remote Lite.
RDP Remote Lite is a free editorial board of a paid client from Yongtao Wang. In this version, the user can create no more than 5 connections.
Information
- Cost: is free.
- Interface language: English.
- Screen resolution: Manually / Automatic Setup.
- Screen position lock: not.
- Controls: Mouse emulation, sensory control, keyboard.
- Extended keyboard (hot and special keys):yes.
- Setting the security parameters:
- Adjust advanced graphics parameters: No, only in the paid version.
- SD Card Connection: No, only in the paid version.
- Supported OS.: Windows Server 2000/2003 / 2008 (R2) / 2012, Windows Vista, 7, 8.
- Link to download: FREE VERSION, STANDART, ENTERPRISE. You can read about the comparison of the editors on the official website of the application creators.
Interface
Say that this client has a simple interface, it means nothing to say.
Running the application, the user will see a black background, a list of connections and a menu bar with buttons "Add", "Parameters", "Search". There is nothing more about the interface, it is just there.

Fig. 7. Main screen Remote RDP Lite
You can import and export connections by calling the context menu. Supported standard desktop * .rdp format.

Fig. 8. Context menu that is available on the main application screen.
Customer settings
Cases here are much worse than 2x client. In a free version, you cannot change the security and schedules for some users. Fine customer setup is available only in paid versions Remote. RDP Lite.
What we can turn, press and configure in Remote RDP Lite.
- Customize graphics quality settings - resolution and number of colors displayed.
- Change the automatic connection settings when breaking.
- Customize controls when using a remote desktop.
- Add hot keys on the "key 1 key 2 + key 3". You can do this through the context menu on the main screen of the application.

Fig. 9. Configure connection settings

Fig. 10. Setting application parameters

Fig. 11. Setting up hot keys
Keyboard
If the 2x client is implemented on the own keyboard, then the Remote RDP Lite uses the built-in Android keyboard. The client has hot keys, but there are no special keys (F1-F9, WIN, etc.).
You can turn on the keyboard or the list of hot keys through the panel (called by touch anywhere in the display). With it, you can also increase or decrease the screen or scaling the display size.

Fig. 12. The panel that allows you to turn on the keyboard, scale image
Switching between modes (sensor control / mouse emulator) and some other settings are also available through the menu called by pressing the button in the form of three squares.

Fig. 13. Menu to switch between mouse modes / touch control, disconnecting from desktop
The combinations of hot keys are available by clicking on the "SHIFT Z X Ctrl Alt" button and are presented as a list. As already noted, the key combinations can be customized by the user independently.

Fig. 14. List of hot keys in Remote RDP Lite
Cursor control
In this client, management is well implemented by means of a touchscreen display. Double touch is the left mouse button, and the long-touch causes the context menu. The selection and scrolling is perfect.
When traveling along the long menu, each item is highlighted similar to working with the usual mouse. It is quite convenient to change the size of the window, such as the Windows Server Manager. These buns are not enough 2xClient, but Remote RDP Lite would not prevent the possibility of creating "hot gestures". Alas, nothing is perfect in our world.
Additional features
There is absolutely nothing to brag this client in a free edit. Advanced security settings, connection will be available in the paid version. external drive and redirect sound, but it is already a completely different knee. From a special: Connection search function, import / exports * .RDP files is implemented.
Summary
Annual client in order to work comfortably with virtual machineUnless, of course, do not take into account the simple interface.
Barrel Möda
- Cursor control system.
- Built-in keyboard and hot keys that we can add.
- If you use any hotkeys, for example, to start applications, you can be successfully used at a remote session.
- Import / Export connections.
- Convenient panel to access the keyboard, hot keys, etc.
Little Spoon of Deaf
- Not supported by Russian localization.
- Subjective opinion: not very convenient location of controls on the main screen.
- Needless cutting capabilities for configuring the application in the free version.
Video Testing Remote RDP Lite
http://youtu.be/uaorsjmnoqs.
Accesstoga by Ericom.
The brainchild of Ericom Software, which develops various virtualization solutions for enterprises. It is available for free download without any restrictions.
Information
- Cost: is free.
- Interface language: Russian (but there are shortcomings in localization).
- Screen resolution: Manually / Automatic Resolution Setup.
- Screen position lock: not.
- Controls: Mouse emulator, touch control, keyboard.
- Extended keyboard (hot and special keys):yes.
- Setting the security parameters: Yes.
- Adjust advanced graphics parameters: Yes.
- SD Card Connection: not.
- Supported OS.: Windows Server 2003/2008 / 2008 R2 / 2012, Windows XP, Vista, Windows 7/8.
- Requirements for the tablet: RAM of at least 512 MB.
- Link to download: Android; IOS.
Interface
As they say, simply and tastefully: a list of connections, the "New Connection" buttons, "Settings" and "Online Help" (you can read about the parameters of the application). No additional buns were found.

Fig. 15. Main Screen Accesstogo
Customer settings
The user can configure the client just as he wants. A variety of parameters are available to configure the application and separately the connection itself.
What we can turn, press and configure in this client.
- Customize the quality of graphics - the number of colors, design of the desktop, etc.
- Different interaction options with a virtual machine - keyboard type, on / off auxiliary panels, use the clipboard between the device and the virtual machine, the automatic connection when breaking the communication.
- Configure automatic launch of the application or opening a specific folder on a remote machine.

Fig. 16. Configure connection settings

Fig. 17. Setting application parameters
Keyboard
At the top there is a panel for controlling keyboard modes, mouse and scaling. It also contains special keys: ESC, Tab, Ctrl, Alt and Windows.
Fig.18. Control panel of keyboard modes, mouse, etc.
The user can use the built-in Android keyboard or application keyboard. Accesstogo is the only one of three customers supporting Russian, Ukrainian layouts and hotkeys.
In my opinion, the keyboard is quite convenient due to a sufficient distance between the keys. I especially liked that with a debt of clicking the letter is printed in the upper case.

Fig. 19. ACCESSTOGO keyboard with Ukrainian layout
In addition, the user is available hot and special keys (F1-F9, cursor keys).

Fig. 20. Extra keyboard with hot keys
Cursor control
I will say briefly: one touch on the file is a selection, a long touch is the right mouse key, one touch and moving - drags the selected object. Perfectly running text and files. For convenience, the user can enable the mouse emulator or cursor mode. The last mode displays the cursor that is controlled by touches.

Fig. 21. Cursor Management and Mouse Emulator in Accesstogo
Separate attention is paid to two modes - allocations and scrolls. In the first of them, the user can scroll through the vertical page, but cannot select the text or call the context menu. The left key in this mode works. In the second - the user is available to the function of the left and right mouse button, the selection, and the scrolling of the page is only by the scroll bar.

Fig. 22. Scroll mode and secretion Accesstogo
Additional features
Of the additional features, you can select the sharing of the clipboard between the device and the virtual machine, supporting the start of a specific application or open the folder in the connection session, redirect the audio stream to the Android device, the connection protection.
Triple Union: Accesstogo, Physical Keyboard and Tucha
When you use an Android device as a thin client with a connected physical keyboard, a question arises about the support of Russian layouts in a session and switching between layouts by any combination. To solve this problem, I had to install another application. But agree that it is inconvenient.
It turned out that the Accesstogo-peacekeeper could help here, which in two scores made friends the keyboard, Android and remote desktop in. It is enough to go to the "Parameters" section, and there in the "keyboard type" tab to choose a "PC keyboard"! In this case, the switching between the layouts is carried out with a combination for us, and the virtual keyboard is simply turned off.
Summary
Ericom For a long time happy in Tucha with its Ericom Blaze client, allowing you to optimize the connection with slow connections. And today this company has pleased even more, mowing 2xclient in the "best and free" nomination and make friends the physical keyboard with a remote Tucha Desktop.
Barrel Möda
- Gorgeous implementation of the keyboard with hot keys, etc.
- Full support of the physical keyboard with Ukrainian, Russian layout and switching between them through "Alt + Shift".
- Support on the extended keyboard of Ukrainian and Russian layouts.
- Wealth settings available to the user.
- Excellent cursor control system and mouse emulation.
- Support sharing clipboard.
- Russian localization, although with the shortcomings of the translation - "Editors", "Lalable".
Tiny spoon of degty
- The selection mode and the scroll mode could be combined.
- You can not connect the drive device to the virtual machine.
Video testing ACCESSTOG by Ericom
Conclusion
In my testing the title "Annual Client" and Gold Gets Accesstogo. from Ericom. I believe that he rightfully deserves it thanks to the functional capabilities and wealth of settings. It implemented a beautiful extended keyboard with the support of Russian, Ukrainian and english layout. At the same time, all the letters of the Russian alphabet are located in their places, and not hide, do not understand where. There are hotkeys and special keys, including cursor arrows.
Cursor control by means of a touchscreen display or mouse emulator also do not cause any complaints. The right and left keys, the selection of text and scrolling pages - everything is there and everything works fine, without delivering discomfort to the user.
If we talk about configuration Accesstogo., he does not limit us in anything, allowing you to customize the application for yourself. This equally applies to changes in graphics parameters, and to change connection security settings. In a word, he conquered my heart, and his label moved to the tablet desktop.
Silver I awarded the client Parallels Client. From the company 2x, based on the fact that the developers have added support for Russian layouts, but there are no some letters on it, which no one has translated into the category of unnecessary and unnecessary. This is a very serious drawback for me and, perhaps, for most users. However, the client has a fairly thought-out control system by means of a sensor, the ability to create "hot gestures" and the function of connecting the tablet drive to the remote desktop. This opportunity is not enough Accesstogo.. therefore Parallels Client / B\u003e pulls only in second place and right to stay among applications on my tablet.
Sleeves from vest or bronze gets RDP Remote Lite.. There are leaders in it, but there are no necessary functions in the free version, and only the native Android keyboard is included in the list of supported. This means that it makes no sense to use it in the free version, and it is meaningless, since there are better products at a stitching price of 0 hryvnia.
The only reason that can make it use, in my opinion, is the ability to create new hotkeys. This will allow you to run applications or scripts into one touch by assigning certain key combinations to them.
Small photo report
Perhaps each of us at least once was on a school excursion to a dairy or a chocolate factory. I personally had always been interested to know about the process of creating a product and people who work on it. Therefore, I decided to attach several photos to this note, which were made during testing. I hope that you will be interested!

Fig. 23. Start testing ACCESSTOGO

Fig. 24. Customer from Ericom in action

Upd..: After publishing this article, the readers began to ask questions already on setting up and using customers considered. We answer all questions that we personally asked, but since raised topics are often repeated, we will publish detailed descriptions in the blog. Use the search by tag maybe we have already described your problem. If not - write to us, help.
Publication reprint is allowed only when specified.