Overclocking the processor using programs. Detailed instructions for overclocking the processor Where is the pll chip in a laptop
Processor manufacturers during production always set the average frequency selected during testing. That is, you can slightly change the frequency and thereby increase the processor performance by 15 percent.
There are a huge number of various programs allowing you to overclock your computer's processor.
To overclock, we need:
- the computer itself;
- CPU Tweaker program;
- the SetFSB program.
Overclocking instructions
So, before starting the overclocking process, you need to install the SetFSB program. This program is considered the most secure and allows you to easily change the frequency. system bus.
Next, start the program you installed by double-clicking on it with the left mouse button. Study the program well. As you can see, the program has a very simple and intuitive interface and even novice users should have no problems using it.
Go to the second tab, which is called "Control" and you will see the current frequency of the system bus of your processor and a little lower a slider that allows you to change its value.
On the third tab, which is called "Customize", you can change additional parameters of the system.
Try experimenting with the program settings, but be careful when changing the processor bus frequency. The frequency must be increased a little bit, for example, increased by 50 MHz, immediately check the temperature of the processor and if everything is fine, then add 50 MHz and so on.
In order to tune the parameters of your processor directly from the operating system, install the CPU Tweaker program. This program allows you to change the settings of your computer without increasing heat dissipation and power consumption.
The main thing when overclocking and tuning do not overdo it, so that later you do not have to buy a new processor or computer.
Greetings!
I think that there are hardly many users who would not want high speed and performance from their laptop. In this situation, the unquenchable interest in the topic of increasing performance and overclocking looks natural.
The processor plays a key role in the operation of a computer; it also affects the performance, the speed of performing certain tasks. By overclocking the processor, you can achieve an increase in the speed of work and the execution of tasks on a laptop, in some cases, quite significant.
V this review will talk about the methodology for increasing the performance of laptops from the most different manufacturers: ASUS, HP, DELL, ACER, Lenovo, MSI, etc.
Well, let's get started.
I draw your attention to the fact that overclocking involves the work of some components in a stressful mode. This can affect performance (overheating, etc.) and ultimately lead to damage to your existing equipment.
The actions that are described in this material - you do at your own peril and risk.
Utilities that we need to implement our plan:
SetFSB(overclocking program). The utility works in demo mode, but it exists and free version which is a little older. Official site of the utility.
PRIME95- a utility whose task is to test the stability of the processor. The program is free, you can download it from the official website.
It should be noted that the above utilities can be replaced by analogs, of which there are a few. But this review will be built using these particular utilities.
Overclocking the laptop processor using the SetFSB utility
In general, overclocking the processor that is installed in a laptop is not so easy - the increase in performance is often not as substantial as one would like. This is prevented by possible overheating of the processor and other components that are installed in the laptop.
Naturally, this scenario is initially laid down during the development of the device, because all modern processors have in their arsenal a system that prevents overheating: upon reaching a critical temperature, the processor automatic mode implements performance degradation. If this is not enough, then the laptop will simply automatically shut down (or freeze).
Yes, overclocking the processor by raising the supply voltage will not be considered in this review. carries with it increased risks, especially in terms of mobile processors that are installed in laptops. And often given opportunity and is completely locked at the hardware level.
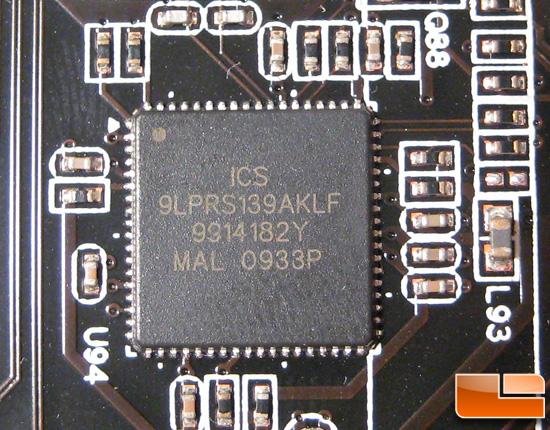
1) Determine the PLL microcircuit
In order to proceed directly to overclocking, you need to find out the brand of the PLL microcircuit that is installed in the laptop.
In short, this microcircuit is responsible for the formation of the operating frequency for individual nodes and elements of the laptop, provides synchronization between them.
In various laptop models (including from the same manufacturer, with a specific lineup), a wide variety of PLL chips can be used. It is impossible to single out any specific solution that is widely used by laptop manufacturers.

PLL chips are manufactured by third-party companies, the most famous of which are: STMicroelectronics, ICS, Texas Instruments, Silego, etc.
In order to determine the PLL chip used in your laptop, you can use the following methods:
- You need to find out the brand installed in the laptop motherboard... How to find out the brand and name of the motherboard can be found in the article. And then, using search engine(for example, Google or Yandex), find out which PLL chip is installed in this motherboard.
This information, as a rule, is posted on the Internet by overclocking lovers who have previously encountered a motherboard / laptop that you have. - Or you can independently disassemble the laptop and visually emphasize the necessary information from the microcircuit. However, if you have not previously disassembled your laptop, then this method is not recommended.
2) Specify the microcircuit and increase the frequency

Run the previously downloaded SetFSB utility. Select your PLL chip from the list in the displayed window and click on the button Get FSB.

The window will display the current frequency characteristics. In the lower right corner of the utility, the current frequency of the processor that is installed in your laptop is displayed.
To increase it, check the box next to Ultra, and then start moving the slider to the right side. You should not get carried away with this, having driven the slider to the extreme position, the likelihood of stability of work may decrease. Start small, move the slider a few notches (literally 5 ... 20MHz).
Then click on the button located next to Set FSB, to apply the settings.
If you did everything correctly, choosing the correct PLL microcircuit, and the manufacturer at the hardware level did not block the possibility of raising the frequency, etc., then you can watch how the total frequency (Current CPU Frequency) of the processor will increase in the lower right corner.
If the laptop freezes during the frequency change, then after rebooting, check the correctness of the set PLL microcircuit, the overclocking level, etc. Chances are, you made a mistake at some point.
Having successfully raised the frequency of the laptop processor, you should test it for stability.
3) Testing an overclocked processor

As a rule, if the processor is overclocked and exhibits instability or overheating, then this program will reveal it within 5 .. 10 minutes. As a result, the computer will either freeze or display errors.
Undoubtedly, this utility can be tested and with a long time interval, for example, left for an hour, but in most cases this will be superfluous.
If, according to the test results, no instability was found in the operation of the laptop, then you can try to raise the frequency by a few more points, repeating everything that is described in the second step.
And after that, of course, it will be necessary to re-test the stability of the system. In such a simple way, you can identify the maximum permissible overclocking frequency, at which the processor performance increases, but the stability of the processor and the system as a whole does not suffer.
Based on the average values, then in this way you can achieve an increase of 5 to 15 percent.
Short summary
From the article we learned how to raise the frequency mobile processor that is installed in the laptop. This method overclocking is relatively safe, but it is necessary to control temperature regime(you can read about this in the material) and the stability of the overclocked system as a whole.
I wish you a successful overclocking!
If you have any questions, you can ask them in the comments.
Overclocking a processor is not difficult, but it requires some knowledge and caution. A competent approach to this lesson allows you to get a good performance gain, which is sometimes sorely lacking. In some cases, you can overclock the processor through the BIOS, but if this feature is absent or you want to carry out manipulations directly from under Windows, then it is better to use special software.
One of the simplest and most versatile programs is SetFSB. It is good because it can help you overclock the processor. intel core 2 duo and similar older models, as well as various modern processors. The principle of operation of this program is simple - it increases the frequency of the system bus by acting on the PLL chip installed in the motherboard. Accordingly, all that is required of you is to know the brand of your board and check if it is included in the list of supported ones.
First you need to find out the name of the motherboard. If you do not own such data, then use special software, for example, the CPU-Z program.
Once you've identified the brand of the board, head to. The design there, to put it mildly, is not the best, but all the necessary information is there. If the board is in the list of supported ones, then you can happily continue further.
Download features
The latest versions of this program, unfortunately, are paid for the Russian-speaking population. You need to deposit approximately $ 6 to receive an activation code.

There is also an alternative - download old version programs, we recommend version 2.2.129.95. This can be done, for example,.
Installing the program and preparing for overclocking
The program works without installation. After starting, you will see a window like this.

To start overclocking, you first need to know your clock generator (PLL). Unfortunately, it is not so easy to recognize him. Computer owners can disassemble system unit and find the information you need manually. This data looks like this:

PLL chip software identification methods
If you have a laptop or don't want to disassemble your PC, there are two more ways to find out your PLL.
1. Go in and look for your laptop in the table.
2. The SetFSB program will help to determine the PLL chip company itself.
Let's dwell on the second method. Switch to the " Diagnosis", In the drop-down list" Clock Generator »Select« PLL diagnosis", Then click on the button" Get FSB».

We go down below, in the field “ PLL Control Registers"And we see a table there. We are looking for column 07 (this is Vendor ID) and look at the value of the first row:

If the value equals xE, then the PLL from Realtek, for example, RTM520-39D;
if the value equals x1, then PLL from IDT, for example, ICS952703BF;
if the value equals x6, then PLL from SILEGO, for example, SLG505YC56DT;
if the value is x8, then the PLL from Silicon Labs, for example, CY28341OC-3.
x - any number.
Sometimes exceptions are possible, for example, for chips from Silicon Labs - in this case, the Vendor ID will be located not in the seventh byte (07), but in the sixth (06).
Checking software overclocking protection
You can find out if there is hardware protection against software overclocking as follows:

We look in the field " PLL Control Registers"On column 09 and click on the value of the first row;
we look in the field “ Bin"And find the sixth bit in this number. Note that the bit must start from one! Therefore, if the first bit is zero, then the sixth bit will be the seventh digit;
if the sixth bit is equal to 1, then for overclocking via SetFSB you need a hardware PLL mod (TME-mod);
if the sixth bit is 0, then no hardware mod is required.
Getting started overclocking
All work with the program will take place in the " Control". In field " Clock Generator"Select your chip and then click on" Get FSB».
At the bottom of the window, on the right, you will see the current processor frequency.

We remind you that overclocking is carried out by increasing the system bus frequency. This happens every time you move the center slider to the right. We leave all other half-marks as they are.
If you need to increase the range for adjustment, then check the box next to the parameter “ Ultra».

It is best to increase the frequency carefully, 10-15 MHz at a time.

After adjusting, click on the "SetFSB" button.

If after that your PC freezes or turns off, then there are two reasons for this: 1) you specified the wrong PLL; 2) greatly increased the frequency. Well, if everything was done correctly, the processor frequency will increase.
What to do after overclocking?
We need to find out how stable the computer is at the new frequency. This can be done, for example, in games or specialized test programs (Prime95 or others). Also, monitor the temperature to avoid possible overheating when the processor is under load. In parallel with the tests, run the temperature monitor program (CPU-Z, HWMonitor or others). The tests are best done for about 10-15 minutes. If everything is working stably, then you can stay on the new frequency or continue to increase it, performing all the above actions in a new circle.
How do I get my PC to start at a new frequency?
You should already know that the program works with new frequency just before the reboot. Therefore, in order for the computer to always start with the new system bus frequency, it is necessary to put the program into startup. This is a prerequisite if you want to use an overclocked computer on a permanent basis. However, in this case we are not talking about simply adding a program to the Startup folder. There is a way to do this - creating a bat-script.
Opens " Notebook", Where we will create the script. We write a line there, something like this:
C: \ Desktop \ SetFSB 2.2.129.95 \ setfsb.exe –w15 –s668 –cg
ATTENTION! DO NOT COPY THIS LINE! It should be different for you!
So, we parse it:
C: \ Desktop \ SetFSB 2.2.129.95 \ setfsb.exe is the path to the utility itself. You can differentiate between the location and the version of the program!
-w15 - delay before starting the program (measured in seconds).
-s668 - overclocking setting. Your figure will be different! To find it out, look at the green box on the Control tab of the program. There will be two numbers separated by a slash. Take the first number.
-cg is the model of your PLL. This data may be different for you! In square brackets it is necessary to enter the model of your PLL as it is indicated in SetFSB.
By the way, along with SetFSB itself, you will find text file setfsb.txt where you can find other options and apply them as needed.
After the line has been created, save the file as .bat.

The last step is to add baht to startup by moving the shortcut to the "" folder or by editing the registry (you can find this method on the Internet).
Overclocking is a forced increase in the processor clock frequency above the nominal. Let us immediately explain what these concepts mean.
A cycle is a conditional, very short time period during which the processor executes a certain number of program code instructions.
And the clock frequency is the number of clock cycles in 1 second.
The increase in the clock frequency is directly proportional to the speed of program execution, that is, it works faster than an unclocked one.
In short, overclocking allows you to extend the "active life" of the processor when its standard performance no longer meets the user's requirements.
It allows you to increase the speed of your computer without spending on buying new equipment.
Important! Negative sides overclocking is an increase in the power consumption of a computer, sometimes quite noticeable, an increase in heat dissipation and accelerated wear and tear of devices due to abnormal operation. You should also know that by overclocking the processor, you also overclock the RAM along with it.
What should be done before overclocking?
Each processor has its own overclocking potential - the clock frequency limit, exceeding which leads to the inoperability of the device.
Most processors, such as intel core i3, i5, i7, can be safely overclocked by only 5-15% of the original level, and some even less.
The desire to squeeze the maximum clock frequency out of the possible does not always justify itself, since when a certain heating threshold is reached, the processor starts to skip clock cycles in order to reduce the temperature.
It follows from this that good cooling is necessary for stable operation of an overclocked system.
In addition, given the increased power consumption, it may be necessary to replace the power supply with a more powerful one.
There are three things you need to do just before overclocking:
- Update your computer to the latest version.
- Make sure that the installation is in good condition and reliable.
- Learn the original clock frequency your processor (look in the BIOS or through special utilities, for example,).

Also useful before overclocking test the processor stability at maximum load. For example, using the S&M utility.

After that, it's time to start the "sacrament."
Overview of overclocking programs for Intel processors
SetFSB
An easy-to-use utility that allows you to overclock the processor "on the fly" by simply moving the slider.
After making changes, it does not require restarting the computer.

The program is suitable for overclocking both old processor models like Intel Core 2 duo and modern ones.
However, it does not support all motherboards, and this is an absolute necessity, since overclocking is carried out by increasing the reference frequency of the system bus.
That is, it affects the clock generator (PLL chip or, as it is called, clocker) located on the motherboard.
You can find out if your board is included in the list of supported ones on the program's website.

Advice! To avoid processor failure, it is recommended to work with SetFSB only experienced users who understand what they are doing and know about possible consequences... In addition, an untrained user is unlikely to be able to correctly determine the model of his clock generator, which must be specified manually.
So, to overclock the processor using SetFSB, you need:
- Select from the "Clock Generator" list the model of the clocker installed on your motherboard.
- Click the "Get FSB" button. After that, the SetFSB window will display the current frequency of the system bus (FSB) and processor.
- Carefully move the slider in the center of the window in small steps. After each movement of the slider, you need to control the temperature of the processor. For example, using a program.
- Having chosen the optimal position of the slider, you need to press the Set FSB button.
The plus (and for some minus) of the SetFSB utility is that the settings made in it will be valid only until the computer is restarted. After restarting, they will have to be reinstalled.
If you do not want to do this every time, the utility can be placed at startup.
CPUFSB
CPUFSB is the next program in our review for overclocking processors Intel core i5, i7 and others, which can be downloaded from the developer's website.
If you are familiar with the CPUCool utility - complex tools for monitoring and overclocking a processor, then you should know that CPUFSB is a dedicated overclocking module.
Supports many motherboards on Intel chipsets, VIA, AMD, ALI and SIS.

Unlike SetFSB, CPUFSB has a Russian translation, so it's much easier to understand how to handle it.
The principle of operation for these two programs is the same: increasing the reference frequency of the system bus.
Operating procedure:
- Select your motherboard manufacturer and type from the list.
- Select the make and model of the PLL (clock generator) chip.
- Click "Get Frequency" to display the current system bus and processor frequencies in the program.
- It is also necessary to increase the frequency in small steps, while controlling the temperature of the processor. After choosing the optimal setting, click "Set Frequency".
CPUFSB allows you to set the FSB bus frequency at the next program start and at the exit. The current settings are also saved until the computer is restarted.
SoftFSB
Our review ends with the utility SoftFSB - another tool for overclocking the processor "on the fly". It is no more difficult to use than previous programs.
Just like them, it supports many models of motherboards, different models clock generators and any processors.
Unlike the paid SetFSB and CPUFSB, you can use SoftFSB free of charge.
However, there is no guarantee that it will run on your computer as it is no longer supported by the author.

To overclock a processor with SoftFSB, you also need to know your motherboard model, PLL chip and be a fairly experienced user.
Procedure:
- In the "FSB select" section, specify the model of the board and clock generator.
- Press the "GET FSB" button to capture the processor and bus frequencies.
- While controlling the temperature of the processor, find the optimal frequency by moving the slider in the middle of the window.
- After choosing a suitable value, press the "SET FSB" button.
As you can see, everything is the same here. A lot of other programs for overclocking processors under Windows work by a similar algorithm.
In addition to the universal ones, there are overclocking utilities that are produced by the motherboard manufacturers themselves.
They are somewhat easier and safer to use, since they are designed for common user and certainly cannot harm the system.
Important! All considered programs allow overclocking both on laptops and on stationary PCs. But if you have a laptop, you should be very careful not to raise the system bus frequency to high values.
Every second user has thought at least once about how to increase the performance of a laptop. Indeed, due to this, the device will work faster with many games and applications. The most common option is to overclock the processor and increase its clock speed. But how complex is this procedure, often referred to as "overclocking"? Is overclocking a laptop chipset safe? What unpleasant consequences should you be afraid of? Finally, how do you increase the processor power on your laptop yourself? You will find answers to these and many other questions in this article.
Processors from both Intel and AMD lend themselves to overclocking, or, more simply, "overclocking". Indeed, many of them operate at only 60-70% of their maximum power. This fact allows you to overclock many CPUs, bringing the indicator closer to 100%. However, how effective and safe is all this?
Therefore, for a start, it is worth deciding how useful overclocking a processor on a laptop is. In addition, you need to talk about negative consequences, which may appear after increasing the power of the chipset.
Let's start with the pros. Perhaps he is only one. But quite substantial. After all, without spending a single ruble, you can get more powerful processor... But there are a little more cons:
- increase energy consumption;
- battery power will be consumed faster;
- the device will become hotter;
- the life of the processor itself will decrease.
It should be noted that overclocking a processor on a laptop is not only risky, but also difficult. This is due to the fact that on laptops the performance gain is always small. You also often have to deal with overheating. The compact size of all the "insides", the close arrangement of components and a miniature cooling system only contributes to this. As a result, many laptop models get so hot already at the initial stages of overclocking that they constantly turn off and freeze.
Therefore, before you start overclocking a laptop processor, seriously evaluate all the pros and cons. It is possible that it is safer and more reliable to simply save money to buy more powerful laptop... If you do decide to increase the processor's performance, then remember that the maximum increase in power that you will get is 10-15%. No other way. This is no longer safe.
If you need to increase the CPU performance at times, then all this is achieved only special means with the modernization of cooling and power systems!
Step-by-step instructions on how to overclock a processor on a laptop using Windows
You now know all the pros and cons. It's time to talk about how to overclock a processor on a laptop. To do this, you need to enter the BIOS.
However, before overclocking the processor, do the following:
- Clean your laptop from various "rubbish". That is, remove unnecessary files with hard disk devices.
- Optimize windows. For example, remove from startup unnecessary applications or disable services you do not use.
- Eliminate system errors.
- Update your drivers.
- Check your laptop for viruses. And best of all with a few programs.
The fact is that many people start to overclock the processor on a laptop. But in fact, the device slows down and freezes for trivial reasons - operating system is not configured properly, malicious software interferes with the operation of the computer, etc. So first we eliminate all errors, remove unnecessary files and viruses, speed up the CPU speed by installing fresh drivers, etc. ...
The easiest and safest way is to change the power mode. This overclocking option works on any laptop from any manufacturer - Asus, Lenovo, Acer, HP, Samsung, Dell, etc. For example, consider the whole process on a device running Windows 10:
- Through "Start" we go to the "System" section.
- On the left, select the "Power and sleep mode" item.
- Next, click on “ Extra options nutrition ". The corresponding button will be on the right.
- Now in the window that appears, expand the "Show additional schemes" menu.
- Set the marker to the "High performance" mode.

Overclocking the processor on a laptop via BIOS
Through the BIOS, you can also overclock the laptop processor. This is done in different ways. However, we recommend that you start by setting a fixed frequency. For this:
- Go to BIOS menu... How to do it? For example, on a laptop asus, when loading, you need to press the F2 key. If you have a laptop from another manufacturer, then try clicking Esc, F6, F8, F12, Delete when turning it on.
- We are looking for the Power BIOS Features section.
- Next, we are interested in the AGP / PCI Clock tab, in which we set the value to 66/33 MHz.
- Then we find the HyperTransport Frequency parameter and slightly reduce its frequency. Up to about 400 or 600.
- We save all the changes. Press F10. ...
![]()
After these manipulations, the laptop should show more high productivity... It is also possible to increase the parameters of the system bus. This is done again through the BIOS:
- In the POWER BIOS Features section (or Advanced Chipset Features or simply Advanced), select the CPU Clock tab. It can be called differently. For example, Clock Ratio, CPU Bus or CPU Ratio.
- The value displayed here is increased by 10 units.
- Save these changes by pressing the F10 button. Reboot your laptop.
- Now you need to test your laptop. The Everest program is suitable, through which we monitor the temperature central processing unit... It is important not to allow it to exceed 70-90 ° C (depending on the CPU model). If the value is higher, then go to BIOS again and lower the FSB frequency.
- If the laptop shows stable performance, you can increase the value by another 10 MHz. And so on until it starts to get very hot or appear blue screen, freeze, or other problems that mean that the overclocking threshold has been exceeded.

How to overclock laptop processor using utility?
Overclocking is a complex process. Therefore, some manufacturers release special software with which you can easily increase the power of your laptop. True, some users may have difficulties here as well. Therefore, we will tell you in detail how to overclock a laptop processor using the SetFSB utility.
- First of all, download the SetFSB program from the Internet.
- The next step is to define the PLL chip on the laptop processor. It is she who forms the frequency for various components. How do you know which microcircuit is on your device? Use a search engine and try to find the specifications of the motherboard installed on your laptop. Among the various information, the PLL microcircuit can also be indicated. Naturally, you can remove back cover and look directly at the marking of the microcircuit.
- Launch SetFSB. In the "Control" section of the "Clock Generator" window, select your PLL chip model.
- Click the Get FSB button. After that, information about various frequencies and the current processor frequency (Current CPU Frequency) will appear in the main window.
- We put a tick in front of the Ultra item. Move the center slider below to the right. Literally at 10-20 MHz. Click the SetFSB button.
- Next, we test the laptop. To do this, you can use any program. For example, Preime95. If the laptop has passed all the "tests" with dignity, then we return to the SetFSB utility and increase the frequency by another 10-15 MHz.
- And so on until the laptop starts to freeze or reboot. This will mean that you have found the threshold for performance. We'll have to, on the contrary, "roll back" and reduce the frequency by 10-15 MHz.
For reference! Some processors, such as the popular intel core i3, i5 and i7, are difficult to overclock. The fact is that the manufacturer has already set them up for maximum performance. All that can be gained from custom overclocking is a 5-8% increase in power.
There are many other CPU overclocking programs out there. For example, for AMD chipsets, these are AI Booster and AMD OverDrive. For laptops with an intel processor, we can recommend the Intel Desktop Control Center.


