Windows 10 license to replace the motherboard. Replacing the motherboard without reinstalling Windows
Replacing a motherboard always entails a number of natural questions. It seems that what can be difficult here, take it and change it, focusing on the required characteristics, but how to do it without reinstalling Windows, so that later you do not have to spend time installing the operating system, its full configuration and installation of the necessary package of other software? This is what we will talk about in this topic and will try to consider in detail how to change the computer motherboard without reinstalling Windows, keeping all its settings and previously installed software.
Why Windows won't boot automatically after replacing the motherboard
So, do I need to reinstall the Windows operating system after replacing the motherboard? Of course not, if we are talking about a completely stable working OS, not damaged by viruses and not littered with all sorts of unnecessary files that eventually lead to a decrease in PC performance.
But first, let's see why the operating system is generally not able to start automatically on a new motherboard. It seems that all OS files are stored on the hard drive intact, and the motherboard plays only the role of a connecting link for all components of the system unit. What then prevents it from safely booting on the updated system?
The fact is that when installing drivers on a motherboard, the OS registers information about the hardware, or rather, about the SATA controller of the motherboard, to which the hard drive is connected. Therefore, when replacing the motherboard, Windows does not detect the necessary drivers for the newly made controller and a failure occurs, most often expressed as a blue "screen of death" with the error code "0x0000007B INACCESSABLE_BOOT_DEVICE".
Therefore, before changing the old motherboard to a new one, without reinstalling the operating system, you need to perform a number of preparatory steps described below.
Preparing Windows before replacing the motherboard
If, while reading this manual, you have already replaced the MP with all the ensuing consequences, then proceed to its next section, which describes the steps to restore Windows using the offline editor. If not, and the computer is in working order, then we perform the following actions.
First. It is necessary to open the registry editor, where later the adjustments will be made to launch the drivers of the SATA controller "msahci" and "pciide". The way to open it is simple, you just need to use the command "regedit" and the system utility "Run". To do this, simultaneously press the key combination Windows + R and enter the command "regedit" in the input field.
note: following the instructions for opening and then adjusting the registry, the version of the operating system does not matter. That is, the described steps are valid for both Windows 7 and Windows 8, 10.
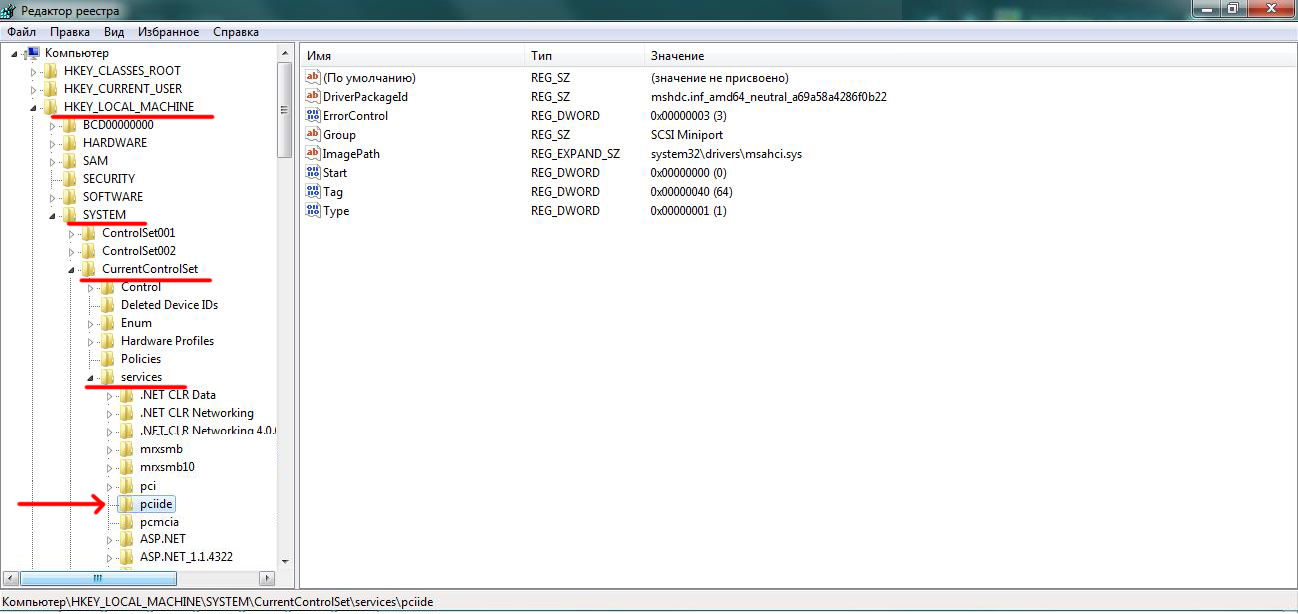
Second. In the left column of the opened editor, go to the branch:
HKEY_LOCAL_MACHINE \\ SYSTEM \\ CurrentControlSet \\ services \\ where we select the driver folder "msahci". Next, go to the right field of the editor and right-click twice on the "Start" parameter, after which we change its value to zero "0".

Third. We repeat the procedure for adjusting the "Start" parameter in the same registry branch, but already select the "pciide" driver folder

note: if the disk system of your PC operates in RAID mode, then the adjustment of the "Start" parameter must be carried out in the "iaStor" folder, which is located in the same registry branch.
The set parameter "0" for all SATA controller drivers means that they must be loaded by the system loader when the operating system starts. Therefore, after making these adjustments, the OS boot after replacing the motherboard should go through without problems. All you have to do is turn off the PC, remove the old motherboard, install a new one, turn on the computer and, after successfully loading Windows, install new drivers for all the components of the motherboard that come with the disk.
Recovering Windows after replacing the motherboard
So, if a new motherboard is already installed, without the appropriate preparatory steps described above, and when Windows boots up, a "blue screen of death" (BSOD) appears with the corresponding error, which we also mentioned earlier, then you need to proceed with the OS recovery procedure.
In fact, in this situation, we only need to launch the same registry editor through the command line and perform similar actions to adjust the "Start" parameter in the corresponding branches of the SATA controller drivers.
This will require an installation disc or bootable media (flash drive) with the required operating system. We described in detail how to create it in the article "". Next, you need to turn on the PC and boot from the created media. There are two options for how to do this. The first is to indicate it as a priority device when the system is booted into the BIOS, the second is to select it from the devices suggested by the system at the moment the system passes the POST mode by pressing a certain key on the keyboard. In most cases, the function of launching the boot menu is assigned to the F12 key, but there are exceptions.
After booting from the selected media, the system will offer the opportunity to install the OS.


note: all the steps described below to restore the operating system boot due to the replacement of the motherboard are equally suitable for Windows 7, Windows 8 and Windows 10, with the exception of some interface differences. The principle is the same everywhere.
At the next stage, the action selection screen will appear, where we select the "Troubleshooting" item. Next, we will find ourselves in the "Diagnostics" section containing the "Additional parameters" item. Going into it, we launch the command line.

After launching the command line, enter the already known command to launch the registry editor "regedit" into it.

In the editor that opens, immediately select the registry branch "HKEY_LOCAL_MACHINE" and in the "File" tab click "Load bush".

After completing the last action, the system will be prompted to select the system drive on which the Windows operating system is installed. Open it and go to the "Windows \\ system32 \\ config" section, in which we find and run the "system" file.


The next step is to open the created section, find the SATA controller drivers "msahci" and "pciide" in it and edit the "Start" parameter in them, setting everything to zero, as described above.
The path of their placement, according to the newly created registry key, will be as follows:
HKEY_LOCAL_MACHINE \\ recovery \\ ControlSet001 \\ services \\ After completing all the operations, select the created section and in the "File" tab of the editor click "Unload Hive". Next, replace the motherboard, boot the computer in normal mode and install the chipset and Internet controller drivers that come with the MP.
Sooner or later, each of us thinks about a complete update of our computer, or about a partial upgrade by replacing its individual components. The main advantage of such a "spot update" is that the user after the upgrade does not need to reinstall Windows OS (provided that the user does not change the system hard disk). However, when changing the motherboard, some difficulties may arise, since it is the fundamental link in the operation of the entire PC. Therefore, before upgrading the motherboard, it is necessary to carry out a kind of "preparatory stage".
What problems promise the user after upgrading the motherboard
As already mentioned, the motherboard is a kind of "central link" of the entire computer, where data on all devices connected to the PC is concentrated. During the installation of Windows 10, information about the installed ATA / SATA drivers for hard drives (especially the system one) is received in the "database" of the motherboard, but during the upgrade, this data is lost, which ultimately leads to problems starting Windows. Such as - BSOD error or "blue screen of death":
How to keep Windows 10 running when you upgrade your motherboard
To protect your computer from BSOD errors and to ensure that Windows 10 starts correctly after upgrading the motherboard, you need to do a little preparatory work - make certain adjustments to the data in the system registry.
Windows Registry "preparatory phase"
To prepare your PC for upgrading components, follow several steps in stages:
- Open the "task bar" (WIN + R) and write regedit in it.
 The "task bar" can also be launched through the "Task Manager" Windows
 - Then in the root directory of the registry find: HKEY_LOCAL_MACHINE \\ SYSTEM \\ CurrentControlSet \\ services \\ msahci.
 The path made through the directory is also displayed at the bottom of the registry window
 - In the working area (right column) select the line "Start". Double-clicking on it with the mouse, open the parameters and set "0" in the "Value" field.
 You can also open the Start parameter settings by right-clicking on it and selecting "Change"
 - Then go to the directory: HKEY_LOCAL_MACHINE \\ SYSTEM \\ CurrentControlSet \\ services \\ pciide.
 The sequence in which the registry settings are changed does not matter
 - Find the line "Start" again, and similarly set "Value" to "0", saving the data.
 Even if in the settings of the parameter "Value" is equal to "0", still write zero again and save the data
 - Done, now you can exit the system registry.
The "preparatory phase" is over. You can turn off your PC and upgrade your motherboard. The next time you start your computer, Windows 10 should boot without critical errors.
Based on my personal experience in upgrading a motherboard to a PC, I would like to note that even after completing the "preparatory stage" to change the registry settings, there is still a small probability of a "blue screen of death" after the upgrade. This can usually happen due to different versions of the chipsets on the motherboards. The way out of the situation may be - "busting" the settings for starting the PC in the BIOS. You just need to load the BIOS and in the Configure SATA As tab (Main category) alternately set the available boot modes. Cycle through them until Windows boots.
 The Configure SATA As category can also be called SATA Mode
 How to recover Windows 10 after replacing the motherboard
Do not forget that it is not always possible to complete the "preparatory stage" before upgrading your computer. What to do if the motherboard has already been replaced and it is too late to edit the system registry settings? Don't worry, you can still tweak the registry and get Windows 10 back on track thanks to System Restore. All you need to have is bootable CD / USB drive with Windows 10.
- Before starting the PC, insert the bootable CD / USB media into the drive / slot. After turning on the computer, enter the BIOS parameters (which button must be pressed is written in the information help of the start window).
 The BIOS setup key depends on the PC motherboard model
 - Next, in the BIOS settings window, select the Boot tab.
 Navigation through the BIOS settings menu is carried out using the arrow keys
 - In the Hard Disk Drives category, highlight 1st Drive, press Enter and set the CD / USB device value. Press F10 to accept the changes.
 If the boot device is not a USB drive, but a CD or DVD, then the corresponding drive must be highlighted
 - After restarting your computer, you will see a black screen with a notification: Press any key to boot from CD / USB. Hit Enter.
- Next, the "installer" will autorun the "Windows Setup Wizard". Go to the parameters of the "System Restore" function.
 Through the "System Restore" function, you can access the offline Windows registry
 - In the subsequent Diagnostics window, go to Advanced Options.
 You don't need to restore Windows 10 itself
 - Click on the "Command Prompt" icon.
 If you accidentally entered the wrong section of the settings, then you can always go back one step by clicking on the "arrow" icon at the top of the window
 - After activating the "command line", write the value regedit. Press Enter.
 "Command line" is automatically launched as administrator
 - In the root directory of the registry select the subdirectory HKEY_LOCAL_MACHINE, click on the File tab / Load hive option.
 You need to select the entire folder as a whole, and not its individual files
 - Specify the path to the installed Windows OS on the hard disk, namely: Disk \\ Windows \\ system32 \\ config. Open the file system.
 It is necessary to open the system file (be guided by the description "file type"), and not its text document
 - Give the new "hive" a name.
 The name can be anything (in Latin)
 - After that, go to the root directory of the registry to the branch: HKEY_LOCAL_MACHINE \\ Name of the created "hive" \\ ControlSet001 \\ services \\ msahci. Set the value \u003d 0 in the properties of the "Start" parameter.
 To open the parameter settings, right-click on it and select "Properties"
 - Then, in the same way, change the "Start" value in the pciide folder, which is located along the path: HKEY_LOCAL_MACHINE \\ The name of the "hive" created \\ ControlSet001 \\ services.
 The path made through the root directory of the registry is displayed at the bottom of the window
 - Select the "bush" folder you downloaded, click on the "File" / "Unload bush" tab.
 You only need to select the "hive" you created, not the entire HKEY_LOCAL_MACHINE folder
 - Done, now you can close the registry and restart your PC. After that, your Windows 10 OS should boot.
Windows 10 license recovery after motherboard upgrade
An equally important problem after changing the motherboard can be the "unexpected zeroing" of the license of your Windows 10 operating system, i.e. after booting the system, a notification about the lack of activation will appear on your desktop.
 "License reset" can happen even if you made all the necessary adjustments to the registry before changing the motherboard
 In order to prevent and quickly fix this kind of trouble, you will need to perform a number of specific actions, which can be conditionally divided into two stages.
The first stage is "preparatory". Before you upgrade the motherboard, you need to "link" the licensed copy of your "Tens" to your Microsoft account. For this:
- In Windows 10 Settings, go to Update & Security settings.
 In "Settings" you can go through the "Start" menu by selecting the appropriate tab
 - Next, go to the "Activation" tab, where in the "Add Microsoft account" section, select the line of the same name.
 Make sure your Windows 10 is activated with a digital license
 - Then enter your account information in the provided form and click the "Login" button.
 If you do not have a Microsoft account, then create one by clicking on the line "Create one!"
 - Done, now the Windows 10 license (digital key) is linked to your Microsoft account. You can start replacing the motherboard.
 After logging into your Microsoft account, a message will appear in the OS activation field stating that Windows 10 is activated and linked to your account
The second step is to restore your Windows license after a successful upgrade of your PC components.
- Go back to the settings "Options" / "Update and Security" / "Activation", where find and click on the line "Troubleshoot".
 When you change a hardware component, an entry will appear in the activation section warning that your OS version is not activated
 - Wait for the scanning process to complete, then select the "This device has recently had hardware changes" line.
 You will also be prompted to go to the Windows store to purchase a new version of the OS (you do not need to do this)
 - Next, you will be prompted to sign in to your Microsoft account, do it.
 If you are already logged in, then this step will be automatically skipped
 - After successful authorization, select the replaced components (motherboard) from the proposed list and click on the "Activate" button.
 If you changed several hardware components at once, then in the presented list you must select all of them
 - Done, now Windows 10 is reactivated on your PC.
 After troubleshooting, a record will appear in the settings about the successful completion of Windows 10 activation
If you do not have a Microsoft account or you have not “tied” a Windows 10 OS license to it before changing the motherboard, then you may have problems reactivating the system. In this case, I will advise you only one way out - contact Microsoft support: either in writing through the official website, or by calling the hotline 8-800-200-8001. It is categorically not worth using other solution options, as this can lead to permanent loss of the license.
An upgrade of PC components can often bring a number of inconveniences associated with the correct operation of the Windows system. The most "problematic" is replacing the motherboard. The result of such an upgrade may be a BSOD (blue screen of death) error when trying to start the computer. However, if you correctly approach the change of components and first carry out the "preparatory stage", then such errors and inconveniences will not bother you.
If one day you decide to replace your old motherboard with a new one, you do not need to reinstall the Windows 10 operating system. In this article, we will show you how to replace your motherboard without reinstalling Windows.
In fact, this is a very simple instruction, but many users do not know about this method, so they just reinstall Windows. All you have to do is change your Windows account to a Microsoft account instead of a local account.
Now let's take a closer look at each step.
Step 1. Change your Windows 10 account to Microsoft account.
What does it mean? Instead of logging into Windows 10 using your local account, you will be logging into Windows using your Microsoft account. To do this, you need to use Microsoft's online password to log into Windows (temporarily), or set a 4-digit PIN as your password.
The key to this step is that when you link Windows 10 to your Microsoft online account, your operating system "activation key" is stored on the company's servers. This way, you can reactivate the OS without reinstalling it.
To switch to a Microsoft account, follow these steps:
Click the " Start"(Windows logo) and select" Options". Press on " Update and security". Then choose “ Activation"In the menu on the left, and click on" Add account» 
You will need to enter your Microsoft account email and password.

Step 2. Replace your motherboard and reactivate Windows 10.
Once you've upgraded to using a Microsoft account, you can replace your motherboard. When Windows 10 boots up again, go back to the section "Options" - "Update and Security" - "Activation"... You will see that Windows is not activated.


Then sign back in to your Microsoft account as shown in the picture above.
On the next screen, you need to select your computer and click the " Activate»:

Windows 10 will copy " activation key»From your Microsoft online account and re-link it to your computer.
That's all! You can now work with your old Windows system and new motherboard using a Microsoft account. If you want to switch back to your local account, follow the next step.
Step 3. Go back to your local account.
You can revert to using a local account instead of a Microsoft account. To do this, follow these steps:
1. Click " Start"And" Options».
2. Select the section " Accounts».
3. From the menu on the left, select " Your data».
4. Click on " Sign in with a local account instead».
You will need to enter your Microsoft account password and set a new local account password (if required).
Voila! You just replaced your motherboard and upgraded your PC without reinstalling Windows 10 and everything else.
Very soon (or to be precise, July 29, 2016) an upgrade from Windows 7, 8, or 8.1 to Windows 10 will cost $ 119 for the Home version or $ 199 for the Pro version. There is no alternative. And this is, as it were, one aspect. But there are others as well. For example, activation.
If you remember that Windows 10 uses a so-called "digital license" instead of a traditional product key. Then the question arises: will the free upgrade remain free after replacing some computer components, in particular the motherboard?
And now, as it turned out, the answer to this question is likely to be yes.
At least judging by the changes found in the Windows 10 Insider Preview Build 14371 released recently (by the way, they should also be included in the upcoming July mega-upgrade of the system).
This assembly presents a new utility, Activation Troubleshooter, with which the user will have to solve “ most common problems"That will appear upon activation" original Windows 10»On a PC after replacing its motherboard or hard drive.
Activation Troubleshooter will also tell you how to update to the desired OS if, for example, having an activation key for Windows 10 Pro, the user mistakenly installed the Home version on the PC.
Microsoft also clarifies that the utility is focused only on troubleshooting problems associated with significant changes in the computer configuration (ie, the level of replacement of the "motherboard" or "screw") and will work provided that a user account in Microsoft was already is linked to the digital license installed on the corresponding PC version of Windows 10. However, if some Microsoft account was previously used to log in to this system, then it was automatically "linked" to the digital license.
However, you can manually link your account to a digital license. In Windows 10, this is done as follows: settings menu -\u003e "Options" -\u003e "Update and Security" -\u003e "Activation" -\u003e "Add Account" button (it must have administrator rights). Further, the system may ask for the login and password of the Microsoft account. If the local account is not associated with a Microsoft account, you need to enter the local account password. If the local account is not associated with a Microsoft account, you can enter the local account password.
Upon successful completion of the procedure in the section " Activation"The message" Windows is activated with a digital license associated with a Microsoft account «.
After that, you can run the utility Activation Troubleshooter: settings menu -\u003e "Options" -\u003e "Update and security" -\u003e "Activation" ... If the page displays “ Windows is not activated“, Click Troubleshoot to continue (the account must have administrator rights).
In the next window, click the link “ I recently changed components on this unit ", Enter the login and password of the Microsoft account and click" To come in "(If the Microsoft account has not been added to the computer, enter local account password and click " Further "). The system will display a list of devices that are with this Microsoft account, select the device that should be reactivated (or “ This is the device I am currently using") And click" Activate ". More or less like this.
The Ten became the most secure system in the history of Microsoft. Increasingly, users are interested in activating Windows 10 and switching to using this operating system. Some are stopped by the many spyware modules included in this OS, but there are also third-party programs that can disable user control.
You can use Windows 10 without activation, but the inability to influence the personalization of your PC, frequent reboots and a banner that requires activation will make using the device unpleasant.
Windows 10 forever
According to Microsoft, Windows 10 will be the last boxed version. Further, all operating systems will be distributed as a service by updating Win 10. Due to such statements, many users decided that further versions will be distributed by subscription with charging a fee for the OS subscription. However, so far this fact has been confirmed only in the case of the corporate version of the system, which can really be bought 1 time or used for a limited time (month, year).
As much as you love the Aero interface and privacy of old Windows 7, after 2020 you will have to upgrade to a newer OS. It is possible to use Windows 8.1, its extended support will end only in 2023. But later the question of how to correctly and legally move to the top ten will become inevitable. For several years and 2 major updates since the release, Windows 10 has become more stable and faster. It can be used even on weak devices, and in terms of performance and security it is better than the G7.
At first, users had problems with the drivers, but now they have already been resolved.
Do you need activation of Windows 10
Users often ask the question of why it is necessary to activate Windows 10? Can't you use an unactivated one? Similar problems (black screen and periodic reminders) that were in Win 7 could be repeated from 10. However, even Windows 8 / 8.1 did not work very well without validation.
Now, by activating the top ten, you protect yourself from many periodic reboots, which do not allow you to complete even work with files correctly. This is very frustrating, as is the large banner requiring activation, the inability to change system colors, desktop wallpaper or icons. A non-activated product has no official developer support. And I could be wrong, but what can prevent the company from further harm to lovers of pirated software? This is why Windows 10 activation methods are so popular among users. There are several of them, and all of them allow you to become users of a normal "dozen" with a license.
How to activate Windows 10
There are several ways to permanently activate Windows 10. You can use the 25-digit key from the purchased boxed version. Not so long ago, keys from Windows 7 / 8.1 came up, allowing you to confirm the authenticity of the product during the first installation.
It is possible to activate the product through a digital license. It involves activating the system even without entering numbers, the PC, connecting to the servers of the corporation, will receive validation. You only need to enter the key for the first time, then activation will be automatic for all subsequent OS installations. The method is relevant for those who switched to Win 10 by updating their "seven" or "eight", bought a digital license in the Windows Store or participated in the 2015 promotion, then the Insider Preview participants were awarded digital licenses after the OS was released.
You can be an insider even now, but you have to use a "test" OS, but it's free and legal. You will have to get used to the instability of assemblies and the high consumption of Internet traffic.
Even on the "slow update circle", there are frequent critical bugs that lead to crashes.
Repeated activation of "tens"
Are your Windows 10 activation crashed and your computer is running very slowly? You can help "Reset settings" and re-passing the validation procedure. But this way you can delete your data and necessary programs. You can simply reinstall the OS, the process will take less time, then connect to the Internet and reactivate the system. But if you used the pirated version, then you need an activator. There are no other options. You can also go through a lengthy procedure, after which you will not be afraid of re-activating Windows 10. To do this, you will need to obtain a digital license, and in a legal way, without violating the rules and legislation. Use the Disabled Upgrade Program and get activation for the new OS for free. Although all the terms of the free upgrade have long passed, there is still a small opportunity: only an old licensed and genuine system is needed (you can only use Windows 7 or 8.1). For Windows 8 owners, you need to rush to "upgrade" to version 8.1, and then to 10.
Upgrade to 10 after July 29, 2016
Officially, such a free method of "updating" from older versions no longer works. But if you have already updated to Windows 10 before July 2016, do not despair, the data about your PC has remained on the servers. You can safely install the new version, activation will take place automatically. It doesn't matter if then you switched back to Windows 8.1 or 7.
Just download the latest release from Microsoft and do a clean install or bootable build tool. On the corporation website, select "Download the tool now". A program will be downloaded that will load the latest version of the OS and create an installation media (DVD or USB flash drive).
But how to activate Windows 10 right now if you haven't done so before? For people with disabilities, the transition from older OS versions is unlimited in time. Moreover, the company does not check the very fact of "limitedness", but believes the users. This gives you the standard version of the OS. Moreover, after the update, it is better to install it again and get Windows 10 without activations by third-party activators.
Activation of "ten" by phone
If during the installation of the system you could not connect to the Internet, the connection was lost or at that moment the servers of Microsoft Corporation were too loaded, a failure may occur (sometimes it occurs when installing updates).
Can't activate Windows 10 over the network? In this case, telephone activation is required. Press Win + R, enter "slui 4" and confirm the action with the Enter key. A window with a choice of country will appear in front of you, indicate yours. Next, a window will open in which you will need to enter the code. Call the specified phone number, following the prompts of the answering machine, activate the system. But remember, this option is available only for users of a device in which a "dozen" was preinstalled (within the framework of a volume license or MSDN subscription) with a key or upon purchase (electronic or physical with installation media).
But what if there is no money to buy a licensed device or a key, but you would not want to break the law? What remains is the insider program or an attempt to update the "pirate" through the program for the disabled.
The method is not the most reliable and only conditionally legal.
Insider program
For those who do not know how to activate Windows 10 for free, without having a license for an older OS or a key for a new one, there is an opportunity, without breaking the law, to get a stable and new system. Participants in the Microsoft Pretesting and Evaluation Program get the opportunity to run a licensed version of Windows 10. However, remember that the person who activated the test version agrees to any inconvenience caused by its operation. After all, assemblies are sent not fully finalized, but this fact is not essential for a home user.
In the corporate segment, this problem is significant, the stability of the OS in this case is extremely important.
By participating in the Insider Program, you can choose the degree of release readiness. So, you can choose "early release" - these are fresh builds with which the most problems. But on the other hand, they offer the most advanced ideas and functions that may not even be included in the final product. If you need stability, you can choose "Release Preview", that is, late access, the so-called "slow update ring". These builds are the most stable test builds, almost ready for mass production.
How to become an insider

Can't get a license? Choose to participate in the Insider Preview. You will get acquainted with the world of new opportunities and become a legal user of Microsoft products. You can connect the testing program for Windows 10 from the unlicensed version, which has already started asking for activation. To do this, go to All Options → Update → Insider Program → Get Started. Then you need to restart your PC and wait for the update to the insider version soon (it will be legal and activated). But it's better to sign up for the Windows Insider Program at Microsoft. After filling in the data, you will need to download the distribution kit and install it on your PC. During installation, you will need to log in to the system using your Microsoft account. This will activate and you will have a license. Among the negative aspects of this way of obtaining validation, it is worth noting the watermark at the bottom of the desktop on the right and frequent releases, which will require a lot of traffic for updates.
It doesn't matter how Vin 10 is activated, the main thing is that it works.
Can an insider get a full-fledged OS
Many people think that everyone who has used the Insider Preview, after a while, is assigned a license that is suitable for regular releases. Such a program worked even before the official presentation of Win 10 to the general public. Then all the testers were given a license, but now the promotion is still in force. The corporation is trying by any means to "promote" its product.
Is there a 90-day Windows 10 Enterprise activation that allows you to legally use a Microsoft product? specially created for corporations. The corporate version has all spyware disabled, no Metro software. It works well on weak PCs (better than the custom version). If desired, you can use the corporate version of the system. However, after 3 months, you will need to buy a license, look for a renewal key or reinstall this top ten. In any case, for older PCs, the corporate version is more preferable. In addition, it is possible to update the device on a corporate 7 or 8.1 to a new version.
Windows 10 software activation
Having exhausted all legal activation methods, you have to use pirated programs. And despite the fact that the list of them is large, only a few actually work, the rest are just viruses that can harm your device: recognize confidential data or erase it.

Before you activate Windows 10 using activators, you must understand that you are breaking the law and putting yourself at unnecessary risk. Activators may require payment by phone or credit card. In no case do not agree, immediately check your PC for viruses after such an activator.
The most reliable and popular activator is KMSAuto Net for Windows 10. As for 8.1, this activator is the best solution. Even offices from Microsoft Office 2010 to 2016 can be activated with this utility. The program is universal, but practice has shown that it activates only for 180 days, then the product key needs to be changed. Re-Loader Activator is also a very popular and effective activator. It is no different from its predecessor, but it has only an English-language interface.
With it, your system will be activated in a few clicks.
Before activating Windows, it is worth finding out if you have a digital key, whether there was an update for the PC to the "dozen". Any versions of Windows 10, activated once, can be re-validated (all information is stored on Microsoft servers).
Users, after activating Vin 10, can perform a number of operations that will help make their PC faster. For example, remove all Metro apps. Only "Weather", "News", "Groove Music", "Movies and TV" are of real value, all others are not required for a desktop device. But their constant updates greatly slow down the system. In addition, you can make a procedure to disable automatic updates. With them, weak PCs generally freeze. A third-party antivirus such as Nod32, Avira, Avast, Kaspersky can provide security for Windows 10. The network also has instructions on how to make the system stop spying on the user. But remember that not all users managed to remove all the spyware modules of the system, so you have to put up with sending telemetry to Microsoft servers.


