Creating a template. Saving a Word document as a template how to create your own template
If you use a built-in template or update one of your own, built-in Word tools will help change patterns according to your needs. To update your template, open the file, make the necessary changes and save it.
IN Microsoft Word. You can create a template, saving a document as a dotx file, a dot file or a DOTM file (a DOTM file allows you to allow macros in the file).
Select items File\u003e Open.
Double-click the item This computer. (In Word 2013 Double-click the item A computer.)
Go to the folder Custom Office Templateswhich is in the folder Documentation.
Click the template and click Open.
Make the necessary changes, and then save and close the template.
Adding content management elements in template
Make your templates flexible by adding and configuring content management items, such as "Formatted text", "Figure", "drop-down list" or "Date Selection".
For example, you can create a template that contains the drop-down list. If you allow you to edit the drop-down list, other people will be able to change its parameters according to their needs.
Note: If content management items are not available, you may open a document or template created using the earlier version of Word. To use content management items, you need to convert document to Word 2013 format by clicking file\u003e Information\u003e Convertand then click OK
So that you can add content management items, display the tab. Developer.
Select commands File\u003e Settings\u003e Configure Tape.
In the drop-down list Set up tape Choose Main tabs.
Check the check box list Developer and click OK.
Adding content management items
On the tab Developer in a group Control elements Press the button Designer mode

Add text control to which users can enter text
Adding the control "Figure"
Adding a field with a list or drop-down list
Note: If you check the checkbox, users will not be able to change the selected items.
Insertion of the Date Selecting Element
Adding flag
Adding a standard blocks collection element
Setting or changing the properties of content management items

Take for example a document "Refusal of responsibility", consisting of three paragraphs. After grouping these paragraphs using the "Grind" command, the corresponding text cannot be changed, and it can only be deleted as a group.
Adding explanatory text to template
Protection Template
Protection of elements template

Password assignment for template
On the tab Review in a group Protect Select Team Limit editing.
In chapter Enable protection Press the button Yes, turn on protection.
Enter the password in the field New password (optional)And then confirm it.
Important:
Use reliable passwords in which there are the letters of the upper and lower register, numbers and symbols. In addition, these elements in the password must flash. Example of a reliable password: Y6DH! ET5. Example of an unreliable password: house27. The password must contain at least 8 characters. The longer the password, the more reliable.
Information about templates
File and click Create
Using an empty template
Open tab File and select Create.
Select option new document And then click Create.
Make the necessary changes in the size of fields and pages, orientation of pages, styles and other formatting options.
Click the tab Fileand then select Save as.
File type Choose Word template and click Save.
Close pattern.
Creating a template based on an existing template or document
Open tab File and click Create.
In a group Available templates Choose Of existing document .
Click the template or document similar to the one you want to create and press the button. Create.
Change the size of fields and pages, page orientation, styles, and other formatting options.
You can also add content management items, such as date selection, explanatory text and graphic objects that must be present in all new documents based on this template.
Click the tab Fileand then select Save as.
Select the file name for a new template, in the list File type Choose Word template and click Save.
Close pattern.
Adding Standard Blocks in Pattern
Standard blocks are repeatedly used content elements or other parts of the document that are stored in collections and are available at any time to reuse. Standard blocks can also be stored and distributed using templates.
For example, you can create a report template containing two types of accompanying letters that users can choose when creating a report based on this template.
Opening a template.
In field Save B. Select the name of the template.
Distribute pattern.
Adding content controls to the template
Additional flexibility The template can be given by adding and configuring content management items, such as formatted text fields, drawings, drop-down lists or date selection.
For example, you can add a colleague with a template that contains the drop-down list, but your colleagues need to use another set of parameters in the drop-down list of the document that it distributes on the basis of your template. Since you allowed editing in the drop-down list when adding a content control in a template, your colleague can easily and quickly change the template according to its needs.
Note: If content management items are not available, you may open a document or template created using the earlier version of Word. To use content management items, convert the document to the Word 2010 file; To do this, open the tab. FileClick Clause Intelligence, Select Team Transform and click OK.. After converting a document or template, save it.
To add content management items, you must display the Developer tab.
Display the Developer tab

On the tab Developer in a group Control elements Press the button Designer mode And add the necessary controls.

Add text control to which users can enter text
In the content management item "Formatted text", users can highlight the text by bold or in italics, as well as enter multiple text paragraphs. To limit user capabilities, insert the content management element "Normal text".
Adding the control "Figure"

Insertion fields with a list or drop-down list
In the list box, users can choose one of the items offered by you or enter your own option. In the users drop-down list can only choose one of the available items.
Insertion of the Date Selecting Element

Insert flag

Adding a standard blocks collection element
Standard blocks are used when you need to provide users with the ability to select a specific text block.
For example, standard block controls are useful when you need to configure the contract template and add a different standard text depending on the specific requirements of the contract. For each version of the standard text, you can create elements of the contents of the formatted text, and then use the controls element of the standard blocks as a container of the content controls of the formatted text.
Standard Block Management Elements can also be used in forms.

Setting or changing the properties of content management items
Select the content management item and click Properties in a group Control elements.
In the dialog box, select whether the content management item can be deleted or changed by another user using a template.
To work with multiple content management elements or multiple text paragraphs as with one object, select these controls or text and then select Group in a group Control elements.
For example, let it be a refusal of responsibility consisting of three paragraphs. After grouping these three paragraphs team Group Disclaimer cannot be changed and can only be deleted as a group.
Adding explanatory text to template
To make a template more convenient to use, you can add explanatory text. You can change the explanatory text by default in the content management item.
That's how you can configure the default explanatory text for the template users.
Protection Template
You can add protection to individual content management elements in the template to prohibit deletion or editing of certain content management items or control group. You can also protect all the contents of the password template.
Protection of elements template
Check the box
Check the box Content cannot be edited
These parameters can be used to protect text if it is enabled in the template. For example, if the refusal is often added, the defense guarantees the immutability of the text and at the same time allows you to remove the refusal of responsibility in the documents where it is not needed.
Select the content management item, the changes to which you want to limit.
To select multiple controls, click them by holding down the Ctrl key.
On the tab Developer in a group Control elements Press the button Groupand then press the button again Group
On the tab Developer in a group Control elements Press the button Properties.
In the dialog box Content control properties In chapter Lock Make the following.
Password assignment for template
Here is how you can assign a password document, allowing to delete protection only knowing it.
Open a template to assign a password.
On the tab Review in a group Protect Select Team Limit editing.
In chapter Enable protection Press the button Yes, turn on protection.
Enter the password in the field New password (optional)And then confirm it.
Important: If you decide not to use a password, any user can change editing restrictions.
Password length should be at least 8 characters.
It is very important to remember your password. If you forget the password, Microsoft Corporation will not be able to restore it. Keep the passwords that you write, in a safe place, without canceling the data that they help protect.
Information about templates
The template is the type of document, when opening it is created by a copy.
For example, a business plan is a common document that is often created in Word. Instead of creating a business plan structure from the very beginning, you can use a template with a standard page layout, fonts, fields and styles. You will only have to open the template and fill out the document with the appropriate text and data. When saving as a file.docx or.docm file, the document is saved separately from the template on which it is based.
In the template, you can save the recommended sections or mandatory text, as well as content management items, such as the standard drop-down list or special emblem. You can add protection for the template partition or apply the password template that protects the contents of the template from the changes.
Word Templates for most types of documents can be found on the Office.com website. If you connect to the Internet, open the tab File and click CreateAnd then select the desired category of templates. You can also create your own templates.
Using an empty template
Creating a template based on an existing document
Creating a new template based on existing
Adding content management items
Note: Documents can also add content management items.
Adding to the explanatory text template
Instructions for filling the content management elements added to the template significantly make it easier with the document. These instructions are replaced by content when using a template.
Saving and distribute standard blocks using templates
Standard blocks are repeatedly used content elements or other parts of the document that are stored in collections and are available at any time to reuse. Standard blocks can also be stored and distributed using templates. For example, you can create a report template containing two types of accompanying letters that users can choose when creating a report based on this template.
Save and close the template designed to meet certain needs to which the standard blocks you want to select the template users.
Opening a template.
Keep an open template to which you want to add standard blocks.
Create standard blocks that need to provide user template.
When entering information in the dialog box Creating a new standard block in field Save B. Select the name of the template.
Distribute pattern.
When sending a template or providing access to it in another way, standard blocks stored with the template will be available in the specified collections.
Protection Template
You can add protection to individual content management elements in the template to prohibit deletion or editing of certain content management items or control group. You can also protect all the contents of the password template.
Protection of elements template
Check the box Content management item cannot be deleted. This will allow you to change the contents of the control, but the control itself cannot be removed from the template or created with it.
Check the box Content cannot be edited. This will allow you to delete the control, but edit the contents in the control item will be prohibited.
These parameters can be used to protect text if it is enabled in the template. For example, if the refusal is often added, the defense guarantees the immutability of the text and at the same time allows you to remove the refusal of responsibility in the documents where it is not needed.
Open the template to which you need to add protection.
Select content controls or control group items, which you want to prohibit.
On the tab Developer in a group Control elements Press the button Properties.
In the dialog box Content control properties In chapter Lock Make the following.
Protection of the entire contents of the template
Open a template in which you need to prohibit making changes.
On the tab Developer in a group Protect Press the button Protect Document and select Limit formatting and editing.
In the area of \u200b\u200btasks Document protection Under the heading Restrictions on editing Check the box Allow only the specified document editing method.
In the editing restriction list, select the desired limitations.
To set additional limit parameters, such as instructions of users with reading and changing the document, click Limit permission.
Limit parameters include the installation date of the expiration date for the document and permission to copy its contents.
In chapter
Templates are regular documents, but containing recommended sections or mandatory text, as well as content management elements, such as the standard drop-down list or special emblem. You can add protection for the template partition or you can apply the password template that protects the contents of the template from the changes.
Word Templates for most types of documents can be found on the Web site Microsoft Office. Online. If you connect to the Internet, press microsoft Office button , Select Create And then select the desired category of templates. You can also create custom templates.
If you often create a document of a particular type, such as a monthly report, a sales forecast or a presentation with a company logo, save it as a template so that it can be used as a starting point, instead of creating a file from zero each time it is needed. Start by the document you have already created, the document you downloaded, or a new template you set up.
Saving a template
Tip: To change the location to automatically save templates on the tab File Select ParametersClick Category Preservation and specify the path to the desired folder in the field Location of personal templates by default. All new templates will be saved in the specified location, and if on the tab File Select a command Create and go to category PersonalThe templates from this folder will be displayed.
Editing template
To update your template, open the file, make the necessary changes and save the template.
Click File > Open.
Double-click A computer (or This computer).
Go to the folder Custom Office Templateswhich is in the folder Documentation.
Click the template and click Open.
Make the necessary changes, and then save and close the template.
Creating a new document using a template
To create new file. Based on the template, click file > create > Customizableand select the desired template.

Note: If you use Office 2013, this button may be called " personal ", but not " Custom".
Using templates from previous versions of Office
If you created templates in an earlier version of Office.You can use them in Office 2013 or 2016. To do this, move the relevant files to the "Custom Office templates" folder to become available in the application. To quickly move templates, use the FIX IT tool.
Word.
Saving a document as a template
Open the document.
Add, delete or change text, images or formatting and enter other changes to the template, which should be reflected in all new documents based on it.
In the pop-up menu Format Select Word template (.dotx).
username
On the menu File Select Team Close.
username
Note: Go
Creating a document based on template
IN Finderopen / Users / username/ Library / Application Support Support / Microsoft / Office / Custom templates and my templates.
Note: Go
PowerPoint.
Saving a presentation as a template
Open a presentation based on which you want to create a template.
Add, delete or change text, images or formatting and enter other changes to the template, which should be reflected in all new presentations based on it.
In the pop-up menu Format Select POWERPOINT template (.potx).
If you do not choose another location, the template is saved to / users / username/ Library / Application Support Support / Microsoft / Office / Custom templates and my templates.
To streamline templates, use the search tool to create a new Folder to / Users / username/ Library / Application Support Support / Microsoft / Office / Custom templates and my templates, and then save the template in the new folder.
Note: In Mac OS X 7 (Lion), the Library folder is hidden by default. To display the library folder, in the Finder, open the menu Go And then press the OPTION key.
Creating a template based on another template
An existing template can be changed to make it more useful. Add static data to an existing template and re-save the file (as a template).
Creating a template based presentation
Deleting a template from the "My Templates" section
IN Finderopen / Users / username/ Library / Application Support Support / Microsoft / Office / Custom templates and my templates.
Note: In Mac OS X 7 (Lion), the Library folder is hidden by default. To display it, click the menu in the search system. GoAnd then press and hold the OPTION key.
Drag the templates to be deleted to the basket.
W Ablona allow you to configure all the necessary parameters that you want to pre-apply to the document layout, styles, formatting, tabs, text template, etc. Then you can easily create a new document based on this template.
When you save a document as a template, you can use this template to create new documents. These new documents contain all text (and images and other content), which contains a template. They also have the same settings, partitions and styles of the page layout as a template. Templates can save you a lot of time when you create multiple documents that must have a consistent layout, format and some text template.
How to save a document as a template
The first thing you need to do is create your document as you want to look like new documents. Divide the text (and etc.) until the material of the template you want to display in new documents. Further adjust the page layout (fields, partitions, columns, etc.), as well as any formatting and styles you want to use.
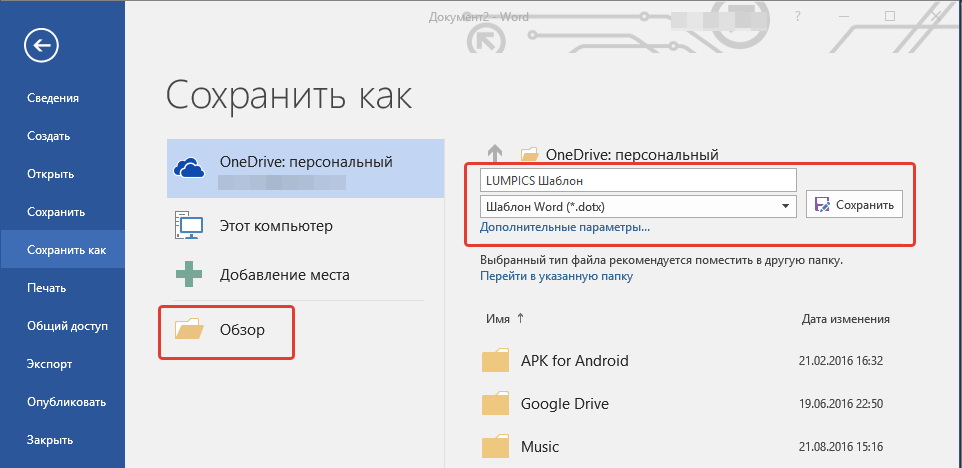
When you have a document you need, it's time to save it as a template. Open the "File" menu, and then click "Save As".


After entering the name for your template, open the name of the name field drop-down menu, and then select the Word Template (* .dotx) parameter.


You saved your own Word template.
How to create a new document based on template
After you have saved your own template, you can create new documents based on it. The easiest way to do is just run Word.
Its pop-up screen shows a bunch of templates that are built-in or downloadable. At the top of the window, click the "Personal" link to display your own templates. Then everything you need to do is click on the desired template, and Word creates a new document based on it.

By default, Word loves to save templates in Documents \\ Custom Office Templates, where they will be displayed along with the templates that you create in any other Office application.

When you save the template, you can choose another location if you want. The problem is that if you save it elsewhere, Word may not be able to see it and display on the screensaver as an option. If it is not very important to you, save them anywhere. You can create a new template based document, just double-click the template file.
You can also open the template in Word so that it can be edited by right-clicking the file, and then selecting the Open command from the context menu.
If you need an even more organized approach, you can change the default location. This allows you to save templates where you want (although they still have to be in one place) and have access to them on the Word screensaver.
In the File menu, select the "Parameters" command. In the Word Settings window, select the "Saving" category on the left. On the right, enter the path in which you want to save templates in the "Location of Personal Templates by default". Click "OK" when you finish.

In the end, Word templates are functionally similar to normal Word documents. The big difference is how Word processes these files, which simplifies the creation based on their new documents.
If you often work in MS Word, saving the document as a template will probably interest you. Thus, the presence of a template file, with the formatting, fields you installed, fields and other parameters, can largely simplify and speed up the workflow.
The template created in the Word is saved in DOT, DOTX or DOTM formats. The latter allows work with macros.
Template - This is a special type of document, when opening it and subsequent change, a copy of the file is created. The source (template) document remains unchanged, as well as its location on the disk.

As an example of how the document template may be and why it is generally needed, a business plan can be brought. Documents of this type are quite often created in Word, therefore, they are also used quite often.
So, instead of creating a document structure every time, choose suitable fonts, design styles, set the fields of fields, you can simply use a template with a standard layout. Agree, this approach to work is much more rational.

A document saved as a template can be opened and fill out the necessary data, text. At the same time, keeping it in standard DOC and DOCX formats for Word, the source document (created template) will remain unchanged, as mentioned above.
Most templates that you may need to work with documents in Word can be found on the official website (). In addition, in the program you can create your own templates, as well as modify existing ones.

Note: Some templates are already built into the program, but some of them, although it is displayed in the list, is actually on Office.com. After you click on this template, it will be instantly downloaded from the site and is available for work.
Creating your own template
The easiest way to start creating a template from an empty document, to open which just run Word.
If you use one of the latest MS Word versions, when you open the program, you will encounter a start page on which one of the available templates can already be selected. Especially pleased that they are all conveniently sorted by thematic categories.

And yet, if you yourself want to create a template, select "New document". A standard document with default settings installed in it will be opened. These parameters can be both software (specified developers) and you created (if you previously saved certain values \u200b\u200bas the defaults used).

Using our lessons, make the necessary changes to the document, which will be used as a template.

In addition to the execution of the above actions as the default parameters for the document, which will be used as a template, you can also add a substrate, watermarks or any graphic objects. All you change will add and save in the future will be present in each document created on the basis of your template.
Working lessons with Word:
Insert pattern
Adding a substrate
Changing the background in the document
Creating flowcharts
Insert signs and special characters
After you make the necessary changes, set the default settings in the future template, it must be saved.
1. Press the button "File" (or "MS Office"If using old version Word).


3. In the drop-down menu "File type" Select the appropriate template type:
- Word template (* .dotx): a regular template compatible with all versions of Word older than 2003;
- Word template with macros support (* .dotm): How is it clear from the name, this type templates supports work with macros;
- Word 97 - 2003 (* .dot) template: compatible with old versions Word 1997 - 2003.

4. Set the file name, specify the path to save it and click "Save".

5. The created and configured file will be saved as a template in the format you specified. Now it can be closed.

Creating a template based on an existing document or standard template
1. Open the MS Word empty document, go to the tab "File" and select "Create".
Note: IN recent versions Word when opening an empty document, the user is immediately offered a list of template layouts, on the basis of which you can create a future document. If you want access to all templates, when you open, select "New document"And then follow the steps described in paragraph 1.
2. Select the appropriate template in the section "Available templates".

Note: In the latest versions of Word, you do not need to choose anything, the list of available templates appears immediately after clicking on the button "Create", directly above the templates is a list of available categories.
3. Enter the necessary changes to the document, using our advice and instructions presented in the previous section of the article (creating your own template).

Note: For different templates of text design, which are available by default and are presented in the tab. "The main" in a group "Styles"may be different and noticeably different from those that you are used to seeing in a standard document.

- Tip: Take advantage of the available styles in order to make your future template really unique, not similar to other documents. Of course, do it only if you do not limit the requirements for the design of the document.

4. After you make the necessary changes to the document, perform all the settings that you consider the desired, save the file. To do this, click on the tab "File" and select "Save as".

5. In the section "File type" Select the appropriate template type.
6. Set the name for the template, specify through "Conductor" ("Overview") Path to save it, click "Save".

7. The template you created on the basis of the existing will be saved along with all the changes you entered. Now this file can be closed.

Adding standard blocks to the template
Standard blocks are called multiplely used items contained in the document, as well as those components of the document that are stored in the collection and are available for use at any time. Store standard blocks and distribute them using templates.
Thus, using standard blocks, you can create a report template in which the accompanying letters of two or more types will be contained. At the same time, creating a new report based on this template, other users will be able to choose any of the available types.
1. Create, save and close the template you have created with all the requirements. It is in this file that the standard blocks will be added, which will later be available to other users of the template you created.
2. Open the template document to which the standard blocks must be added.
3. Create the necessary standard blocks that will later be available to other users.
Note: When entering information in the dialog box "Creating a new standard block" Enter in line "Save in" The name of the template to which you need to add (this is the file you created, saved and closed according to the first item of this section of the article).
Now you have created a template containing standard blocks can be provided to other users. The blocks saved with it themselves will be available in the specified collections.
Adding content controls to the template
In some situations, it is required to give a template together with all its contents some flexibility. For example, the template may contain the drop-down list created by the author. For any other reasons, this list may not arrange another user who will drive with it.
If the content management elements will be present in such a template, the second user will be able to correct the list for itself, leaving it unchanged in the template itself. To add content management elements to the template, you must enable the tab. "Developer" In MS Word.
1. Open the menu "File" (or "MS Office" In earlier versions of the program).

2. Open the section "Parameters" and choose a point there "Ribbon Setup".

3. In the section "Basic tabs" Install a tick opposite the item "Developer". To close the window, click "OK".

4. Tab "Developer" It will appear on the WORD control panel.

Adding content management elements
1. In the tab "Developer" Click on the button "Designer Mode"located in the group "Control elements”.

Insert the necessary controls into the document by selecting them from the group presented in the same name:
- Formatted text;
- Ordinary text;
- Picture;
- Collection of standard blocks;
- Field with a list;
- Drop-down list;
- Date selection;
- Checkbox;
- Repeating section.
Adding explanatory text to the template
Make a template is more convenient to use using the explanatory text added to the document. If necessary, the standard explanatory text can always be changed in the content management item. To configure explanatory text by default for users who will use the template, you must perform the following steps.
1. Turn on "Designer Mode" (tab "Developer", Group "Controls").

2. Click on the content management item in which you need to add or change the explanatory text.

Note: Explanatory text by default is in small blocks. If a "Designer Mode" Disabled, these blocks are not displayed.
3. Change, format the replacement text.
4. Disconnect "Designer Mode" Re-pressing on this button on the control panel.
5. Explanatory text will be saved for the current template.

We will finish this, from this article you have learned about what is templates in Microsoft Word, how to create and modify them, as well as all that you can do with them. This is a really useful feature of the program, in many respects simplifying work with it, especially if there is no one on the documents, but at once several users, not to mention large companies.
Routine work with the same type documents can be minimized if you form them based on Word templates. The fact that they represent, and how to create them, our today's material.
Frequently often in the process of its activities, we create the same type of documents: acts, orders, letters, contracts, coursework, etc. All these documents tend to contain some text or graphic elements - headlines, details, logos, text blocks that are repeated from the document into a document.
Normal user text editor Word.By creating another document, it is forced to use and edit someone created and containing all these elements of the document or simply copy to a new document the necessary elements, again, from the old file, moreover, realizing that in this case, editing is inevitable.
The template defines the basic structure of the document and contains the settings of the document, such as the elements of the autotex, fonts, the designated shortcuts, macros, menus, page parameters, formatting and styles. (From Word help)
This routine can be minimized if you create a template based document. Sometimes more templates are called "fish". However, perhaps, the templates really make it possible to increase the efficiency of work.
The template can be created in two ways by taking as the basis of any document with all those present elements, or starting with a clean sheet, independently including the necessary items.
I will tell you how to create a template from a clean sheet, and thus it will be easier to understand the whole process than to modify the existing file. For example, we will create a simple official letter template. There is nothing difficult in this if you follow my step-by-step instructions.
So, proceed.
1. Create an empty document.
2. Immediately save it. Let's go to the "File" menu and select the "Save As ..." command. The "Saving Document" dialog box, in which we need to choose in the "File Type" field (Save As Type) Type "Document Template" (* .dot).
The "Templates" folder will be opened, in which all templates are saved by default. Assign the file name and click the Save button.
3. Determine which elements (text and graphics) and where exactly will be located in the document.
As a rule, all official letters contain elements such as the name of the organization, the logo, details. In the text of the letter, the letter may be a polite appeal to the recipient of the letter and, in fact, the text of the letter itself. At the end of the letter, the name of the organization's head with his signature is given. We take and we basically like a similar letter structure.
4. Organization name We will place at the top of the document in the center. To do this, print the name of our organization with capital letters, for example, White Nights LLC. Press the ENTER key and go to a new string.
5. Below we can insert the separation line. To do this, click on the "Drawing" button. At the bottom of the screen, the drawing panel will appear with control buttons. We are interested in lines, so we select the corresponding "line" button (Line). Mouse cursor turns into a cross.
Please note: perhaps you will be inserted with the so-called web - dotted field insertion of figures / drawings. To prudently get rid of the web insert, go to the "Tools" menu and select "Options". Click the General tab (General) and remove the checkbox from the Automatic Creation Creation option when inserting AutoFigur (Automatically Create Drawing Canvas When Inserting AutoShapes). Click "OK" and close the "Options" window.
6. Sign the cursor in the form of a cross to the name of the organization and slightly below the line from the flashing cursor to the right edge of the field, pressing and holding the left mouse button. Line is drawn.
7. You can leave the line as it is, and you can give it a more elegant look. To do this, there is a corresponding "Line style" button on the drawing panel. Click on it and choose any type.
8. After you stop at any type of line, double-click the following line - in this place will be printed the address and details of the organization. Print the data you consider: legal and actual address, telephone, fax, site url, e-mail, bank details.
9. Now format the dialed text according to your ideas. The name of the organization, for example, I allocated and assigned it the style of "Headline 1" (Heading 1). I also leveled the title in the center and made a racked interval of five points between the letters.
The font size of the text under the line I reduced to nine items and leveled in the center. Sample you can observe below in the screenshot.
Thus, we created a permanent (unchangeable) part of our template, the so-called "cap". Now move on and create a field in which you will later substitute your data.
On the left side of the template under the "cap" twice click the mouse and print the name of the city, for example, Moscow. Then in the opposite (right) part of the template, twice the mouse twice and in the migration site of the cursor insert the date. For this:
1. In the "Insert" menu (INSERT), select the "Date and Time" command (Date and Time). A window will open in which you select the desired date display format, for example, July 18, 2006.
2. Mark the checkbox "Update Automatically" (Update Automatically). Now, when creating a new document based on this template, the date will already be affixed in accordance with the current time on your computer.
3. On the right side of the template below the date - with an indent from the left edge of about 10 cm along the horizontal line - twice click the mouse. The cursor flashes, and in this place we will insert the field to substitute the recipient's data of the letter.
4. In the "Insert" menu (INSERT), select the "Field" command. The window opens as in the screenshot below:
5. In the category of "Categories", select Automation (Document Automation). In the field Names, select Macrobutton. In the "Message" area (Display Text), type the text "Insert the FIO Recipient" and click OK.
Strictly speaking, in the "Macros name" region, it would be necessary to specify Nomacro (that is, the team without a macro), but it did not turn out this on the list. Therefore, we leave as it is, at least I have never met any errors.
6. We get a field with our text.
If you have this field is displayed as ordinary text without shading, I recommend doing this shading. This will allow you to subsequently easily define in the document the necessary fields for data entry. To do this, go to the "Tools" menu and select the "Options" command and on the View tab (View) in the SHOW tab (SHOW) from the Field Shading list (ALWAYS field shading) ).
Below you can additionally insert a similar field of the address of the recipient and its position.
We have left to insert a welcoming appeal to the recipient of this letter, the text of the appeal and the signature of the sender below. Try to insert these fields into your template, relying on those instructions that are above, and do not forget to save the resulting pattern.
For example, you can look at the screenshot of the template, which turned out to be with me:
Now, in order to use this template for creating a letter, you need to go to the "File" menu and select the "Create" command (NEW). The field of tasks will appear on the right, in which you want to select the "General Templates" option (on My Computer). A window opens with all available templates. You choose the template you created and click "OK". A new document based on your template will be loaded in Word. Add your data to the appropriate fields and enjoy automation.