Creation and configuration of a local network. Networking between two computers or laptops How to set up a computer with a local network
And why is it, in fact, needed by an ordinary user. Let us recall the basic concepts of this lesson:
- - a local network is a system of computing devices connected by communication lines, designed to transmit information to a finite number of subscribers;
- - there are three main types of local network topology, on the basis of which more complex local communication structures are built;
- - by the way computers interact, local networks are peer-to-peer (when all PCs connected to the network are equal) and with a dedicated server.
In this article, we will look at how to create local area network with the same access rights for all its users.
The advantages of such a network include the simplicity of design (setting up a home network is quite "tough" for a beginner) and the economic availability of equipment, but the range functionality such a network is very limited.
So, to create a local network between computers, we need:
Several computers (in this case, we will consider the option of a network that unites more than two PCs, but we will tell you separately), which will become the nodes of our local network. It is necessary to check the presence of a network card for each PC (although most modern devices are equipped with a built-in "network card", but "what the hell is not kidding" ...).
- - Network hardware.To organize local networks, both managed (customizable) and unmanaged network equipment can be used. To make a small home network, a simple unmanaged 4-6 port switch is fine.
- - Network cable to connect each computer with network equipment. The total cable length directly depends on the final number of PCs, their distance from each other and the architecture of the room (building) in which the local network is created.
- - Connectors (RJ-45 connectors), the number of which also depends on the number of computers connected to the network. So, to crimp the cable for each PC, at least 2 connectors are required;
- - Swage (Crimper) - cable termination tool. (In its absence, many craftsmen get by with improvised means (for example, a screwdriver), but it will be quite difficult for a beginner to perform this trick).
Creating and configuring a home network
1. Select the computer from which the creation of the local network will begin, and connect it to the network equipment. For this from both sides crimp the cable and using RJ-45 connectors we connect it to the ports of the switch and the network card of our computer.
The unmanaged switch does not require any additional settings: we only need to register the correct settings for the local network itself in the operating system of each PC
2. To do this, go to the settings of the computer's network card (read, windows 8 and windows XP) and write there IP-address this PC. As a rule, the following IP addresses are used here 192.168.1., 192.168.0;
3. Repeat steps 1-2 for each computer connected to the network.
Important: last digit The IP addresses of each next PC must be different from the previous one (in the above range): for example, if the first computer was assigned IP 192.168.1.1, the second PC will have 192.168.1.2, the third will have 192.168.1.3, and so on.
When all computers are connected, we check our local network for operability.
This can be done in two ways:
Check for other devices connected to the network in the "Network Neighborhood" tab of the control panel of this computer;
Ping any computer on a given network with an ip-address known to us. Pinging is done as follows:
Go to "Start → Run", in the window that opens, assign the command "cmd" and press "Enter";
In the command line window that appears, write ping xxx.xxx.xxx.xxx, where xxx.xxx.xxx.xxx is the IP address of the computer we are looking for.
If, after executing the command, we see a similar picture in the command line window, then the home local network we have created is quite functional, but if the computer displays a message that the request has exceeded the waiting interval or that the specified node is unavailable
 - it is necessary to search for and eliminate technical malfunctions of this network.
Microsoft Corporation starting with Windows Vistahave greatly changed the security policy of their systems regarding the local network. operating system seemed new, somehow too complicated, and therefore many could not figure out how to open access to files on a computer. Today we will analyze how this is done using the example of Windows 8.1, but Vista and 7 have a similar system, and the difference is not fundamental. The local area network can also be used for subsequent creation which will unite all the multimedia devices of the house or apartment, or to share files with your phone or tablet.
In my opinion, this is very convenient when, without additional movements, you can play a movie from a computer, laptop or even a phone on a large TV screen or listen to your favorite music from a phone, on speaker system without connecting additional wires, although here it is already necessary ... But let's move on to setting up a local network.
Video instruction is available by link.
Step-by-step instruction
- For normal functioning of a local network, all computers on this network must be in the same workgroup; for a home network, take MSHOME. To install it, we need to go along the following path: open "Control Panel" - "System and Security" - "System" (you can also right-click on the "Computer" shortcut on the desktop and select "Properties" or the key combination "" ). In the window that opens, in the left column, select "Additional system parameters".

- In the window that opens, go to the "Computer name" tab and press the "Change" button. A dialog box opens, in which we need to record a new working group. We register MSHOME (all in capital letters) and click OK. We also close the system parameters by pressing the OK button and restart the computer.

- Further, it is advisable to configure a permanent IP for both computers. To do this, go to "Control Panel" - "Network and Internet" - "Network and Sharing Center" - on the left side of the "Change adapter settings" window - select the network card, right-click and click "Properties".

- Before doing this, read the notes below the screenshot. Select "Internet Protocol version 4" and click "Properties", fill in as shown in the picture.

P.S. If your local network is organized through a router with a DHCP server enabled - the IP address, the Default gateway and DNS Servers can be left in automatic mode. This action must be done if you have two computers connected directly or DHCP is disabled on the router.
P.P.S.The value of the IP address must be different on computers within the same local network. That is, for this computer we specify the IP 192.168.0.7, and for the next one already 192.168.0.8.
- At this point, we begin to work with the folders that we will share on the network. I will tell you on the example of one folder, but you can open access to the entire local disk in a similar scenario.
First, we need to share the folder. It should be borne in mind that if the network is not limited to two computers (for example, some providers (Beeline) conduct the Internet in apartments on the basis of one large local network), it makes sense not to give the right to change the contents of the folder; if you are sure of computers included in the local network, feel free to give "Full Control". So, open the properties of the folder we need, for this we right-click on the folder and select "Properties", open the "Access" tab and click the "Advanced settings ..." button.
- In the window that opens, put a checkmark "Share this folder", click the "Permissions" button and give the necessary rights to the folder; since this is an example, I give full access to the folder, but you put it at your discretion. That's what I did:

- Click OK to accept the changes, also click OK in the "Advanced Sharing Settings" window, then in the folder properties go to the "Security" section and click the "Change" button.

- Click the "Add" button, in the window that opens, write "All" (without quotes) and click OK.

- Select our new group in the window and give it full access at the bottom of the window.

- Click OK, in the properties of the folder, too, OK, and for reliability, restart the computer again.
Next, we need to configure the visibility of the computer within the local network. To do this, go to the "Control Panel" - "Network and Internet" - "Network and Sharing Center" - on the left side of the window, select "Change advanced sharing settings" and we will open profiles of sharing settings. Here your task is that in all profiles you must enable "network discovery", and "file and printer sharing", and "sharing, so that network users can read and write files to shared folders", As well as" Disable password protected sharing. " We press to save changes.


Visit our partner store OGO.ru, where you will find a lot of electronics from computer components to refrigerators and washing machines at delicious prices.
That's all. I hope you found this article helpful, click one of the buttons below to tell your friends about it. Also subscribe to site updates by entering your e-mail in the field on the right or by subscribing to a group on Vkontakte.
Thanks for your attention!
Good day!
Eh, if in the 90s of the last century a computer was a luxury, now many people have not one, but several computers / laptops at home ...
If you connect computers to a local network (which will even have only 2 devices), you can get undeniable benefits:
- the ability to open files located on another PC, work with them, etc. Now you do not need to run back and forth with a flash drive or disk;
- the ability to make a network printer (scanner, CD / DVD drive, etc.), and use it from all PCs in the local network;
- the ability to play network games (this is a separate and most interesting opportunity that can be talked about for a long time).
In this article, I wanted to consider the issue of building a home local network (and setting it up), which will be useful to all novice users.
I'll go along the path of step-by-step analysis, I'll start with the issue of connecting one PC to another, then I will consider setting up Windows, and how, in fact, to share (make it accessible to the local network) folders, printers, etc.
When creating a home local network, two options are most often used:
- connect two computers (PC with laptop, PC with PC, etc.) using a cable (it is often called a twisted pair);
- acquire specials. a "box" called (😎). A PC is connected to the router using a network cable, and laptops, phones, tablets and other devices get access to the Internet via Wi-Fi (the most popular option today).
Option number 1: connection of 2 PCs using a twisted pair
pros: simplicity and cheapness (you need 2 things: lAN card, and network cable); providing a high enough speed that not every router is capable of delivering less indoors.
Minuses: extra wires create confusion, get in the way; after reinstalling Windows OS - network configuration is required again; for Internet access to be on the second PC (2), the first PC (1) must be turned on.
What is necessary: so that each PC has a network card, network cable. If you plan to connect more than 2 PCs to a local network (or so that one PC is connected to the Internet, and at the same time is on the local network) - one of the PCs must have 2-3 or more network cards.
In general, if both PCs have network cards and you have a network cable (also called Ethernet cable) - then connecting them with the help of it is not difficult. I don't think there is much to consider here.
Note: Please note that usually the green (yellow) LED on the network cards starts to light up when you connect the cable to it.

Another important point!
Network cables on sale are different: not only in color and length 👌. The fact is that there are cables for connecting a computer to a computer, and there are those that are used to connect a PC to a router.
For our task need a crossover network cable (or cable, cross-pressed - here who calls what).
In a crossover cable, the yellow and green pairs are swapped at the end connectors; in standard (for connecting a PC to a router) - the colors of the contacts are the same.

Twisted pair / network cable
In general, if two PCs are turned on, they are working, you connected them with a cable (the LEDs on the network cards blinked), the network icon next to the clock stopped displaying a red cross - it means the PC found the network and is waiting for its configuration. This is what we will do in the second section of this article.
Option number 2: connecting 2-3 or more PCs using a router
pros: most devices: phones, tablets, laptops, etc. will get access to the Wi-Fi network; less wires "underfoot", after reinstalling Windows - the Internet will work.
Minuses: purchasing a router (after all, some models are far from cheap); "complex" device configuration; radio waves of the router, more and freezing (if the router cannot handle the load).
What is necessary: router (it usually comes with a network cable to connect one PC to it).
With connection router, as a rule, too, there are no big problems: the cable coming from the Internet provider is connected to the special. router connector (it is often called "Internet"), and local PCs are connected to other connectors ("LAN ports").
👉 To help!
How to connect and configure a new Wi-Fi router yourself -
Those. the router becomes an intermediary (An approximate diagram is shown in the screenshot below. By the way, in this diagram, there may not be a modem on the right, it all depends on your Internet connection).

By the way, pay attention to the LEDs on the router case: when you connect an Internet cable from the provider, from the local PC, they should light up and blink.
In general, setting up a Wi-Fi router is a separate big topic, besides, for each router, the instructions will be slightly different. Therefore, it is hardly possible to give universal recommendations in one single article ...
☝ By the way, when connected via a router - the local network is usually configured automatically (i.e. all computers connected via a network cable should already be in the local network, a couple of small touches will remain (about them below)).
The main task after that is to configure Wi-Fi connection and internet access. But since this article is about a local network, I do not focus on this ...
Setting up a local network (Windows 7, 8, 10)
In this subsection of the article I will give universal instructions, regardless of how your local network is organized: connected via a network cable, or using a router. Where the settings will relate to a specific option, there will be notes.
Note: all settings are relevant for Windows 7, 8, 8.1, 10.
Computer and workgroup name
Allegory: each person has his own name, surname, patronymic, date of birth, city, etc. - no two people are exactly alike. The same is in the network - there should not be computers with the same name ...
The first thing to do when setting up a local network is to check and configure working group name and computer name... Moreover, you need to do it on every computer on the local network!
Control Panel \\ System and Security \\ System
- pC name and slave. the group must be in Latin;
- each PC / laptop in the local network must have its own unique name (for example: PC1, PC2, PC3);
- every PC / laptop must have the same working group (ex: WORKGROUP).
To change the name and workgroup - press the button "Change parameters" .


Change workgroup and PC name
In general, when you bring all the names in accordance with the requirements above, you can proceed to the next stage of configuration.
Enable Sharing of Printers and Folders
Relevant for connecting via a router, and directly ...
This innovation appeared in Windows 7, supposedly provides greater OS security (purely in my opinion, it only creates the need for additional configuration of the local network).
The bottom line is that windows default blocks and does not give access to open and share folders, a printer, etc., until the security policy is "relaxed".
To remove this block and enable sharing, you need to:

Setting up IP addresses, DNS, masks, gateways
1) For a network organized using a router
In general, for PCs connected to a local network using a router, usually nothing needs to be configured (everything works by default). If something is wrong, just in case, I recommend that you go and check the connection properties.
To do this, you first need to open "network connections" ... This is done simply:
- first open the window "Run" - combination of buttons Win + R;
- then enter the command ncpa.cpl and press Enter (works in all windows versions 7, 8, 10) .

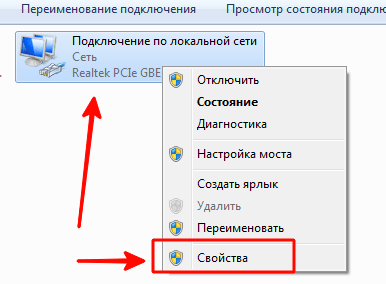
Next open local area connection properties . (to do this, just click on the connection with the right mouse button - select the required one in the pop-up menu, see the screen below).

Local Area Connection Properties
2) To connect PC to PC via network cable
PC 1
By PC 1, I mean a computer that has two network cards: one of them is connected to the ISP's Internet cable, and to the second is a local network cable going to PC 2.
Note: although, the Internet cable from the provider does not have to be. If not, choose PC 1 and PC 2 - arbitrarily ...
And so, we open local area network connection properties (how to do it - see a little higher in the article).
- IP address: 192.168.0.1;
- subnet mask: 255.255.255.0 (see screenshot below);
- save the settings.

IN iP version 4 properties (TCP / IPv4) second PC, you need to set the following parameters:
- IP address: 192.168.0.2,
- subnet mask: 255.255.255.0;
- main gateway: 192.168.0.1;
- preferred DNS server: 192.168.0.1 (see screenshot below);
- save the settings.

👉 Actually, directly configuring the local network is completed. Now you can start the fun part - sharing and using the shared resources of the local network. Actually, what we were going to ...
Sharing Internet access on a second PC
Relevant for PCs directly connected with a LAN cable ...
It is necessary to configure PC 1 (i.e. the one to which we have an Internet cable provider connected).
First we open network connections : press the combination Win + R , we introduce ncpa.cpl , Further Enter .

Next open the tab "Access" , and check the box next to "Allow other network users to use this computer's internet connection" ... Save your settings.

Allow other users to access the internet
If everything is done correctly, the Internet will be on both computers.
Note: of course, for the Internet to be on PC 2 - PC 1 must be turned on! This, by the way, is one of the inconveniences of such a local network, when connected through a router - the Internet will be regardless of which PC is turned on / off.
Sharing folders / files for sharing

3) Set permission: read or read and write.
☝ Note:
- read allowed: users can only copy your files to themselves (they cannot delete or change them!);
- read and write allowed: Local network users will have full control over files in folders: they can delete all files, change any of them, etc. 👉In general, I would not recommend providing such access to important and large folders (for transferring files, it is better to have a separate folder to which you give full access).


5) After a few seconds, Windows will inform you that the folder has been shared. So everything went well.

6) To access the folder:
- open the explorer;
- then open the "Network" tab (left, bottom of the window);
- we open computer namewhere the folder was shared. As you can see, in the screenshot below - it is shared, you can go into it and start copying (reading) any files.

Check / folder is shared / now everyone can copy files from it
Printer sharing (shared network printer)
1) The first thing to do is open:
control panel / hardware and sound / devices and printers.
3) Then open the tab "Access" and check the box "Sharing this Printer" ... Save the settings (see screen below).
Actually, now the printer is shared and it can be used by other PCs / laptops / tablets and other devices in the local network.

How to share a printer
4) To connect a network printer, open conductor , select computer name where the printer is shared. Then you should see it: click on it right mouse button and select the option in the menu connections .
How to connect a network printer
5) Then you can open any document, press Ctrl + P (File / Print), and try to print a friend page.
Note: By default, Windows usually specifies a different printer (not the one you connected over the network). Do not forget to change it when printing.
👉 To help!
Regarding setting up a local network printer - I recommend reading
On this I finish the article.
So, you have finally concluded an agreement with a new provider, and a cable with a plug is brought into your apartment - a real window into the world. All that remains is to connect it to your computer - and the Internet is at your service. However, if it were enough to insert the plug into the jack, you would not need to read this article.
Let's consider how to connect the Internet to a computer via a cable, in the simplest case. Let's say you have only one computer, and you will use it as a router (if you suddenly need a tablet). Or (as an option) you are going afterwards, so turn off the router to facilitate remote access.
Let's say you have a network card on your computer (it doesn't matter if it is separate or built into the motherboard), and you just connected an Ethernet cable to its input. We assume that you are using the most current Windows 10. Although correct settings Windows 8 / 8.1 or even 7, these instructions will also work: the principle is the same.
Of course, you can always call a foreman to do all the necessary work for you. But specialists are not always free. In addition, on your own, you will not only save money on the call, but also learn how to set up the Internet on your computer via a cable. In our world, such knowledge can come in handy at any time.
Dynamics vs. Statics
Now check with the provider which connection he offers on your tariff plan: dynamic or static.
With dynamic connection your IP address may change depending on the settings of the provider (and if you intend to subsequently connect to your workplace remotely, this may interfere with you). But manipulations with entering parameters are reduced to a minimum: the provider sets the IP address, subnet mask and default gateway independently. In this case, it is enough to insert the cable into the computer and that's it, Internet access will appear.
Static connection provides a static IP address assigned to your computer (or router, if you choose to connect through one). In this case, you will have to manually register the IP address itself, the subnet mask and the default gateway in the connection settings. Usually, all these incomprehensible numbers and letters fit into the access agreement or an appendix to it. If necessary, you can clarify them in the technical support service, giving your details.
In some cases, access also requires a login and a password (do not confuse Internet access as such with access to a personal account on the provider's website - for personal account data is required).
How the connection is made
Let's consider the procedure in stages.
- Plug the Ethernet cable into your apartment into the corresponding port on your computer. Even if you have never done this before, you will not be able to confuse this type of connector and plug with something.

- Right click on the "Start" button and find the section "Control Panel - Network and Internet - Network and Sharing Center". In the left column, select the "Change adapter settings" tab. A list of your adapters will appear in the main window (more precisely, in our case, one adapter "Local Area Connection"). Apply the crown trick again "right click" and select "Properties".
- The small pop-up window contains a whole column of different rows with properties. Select the line "IP version 4 (TCP / IPv4)" in them. While it is highlighted, click the Properties button below the combo box.

Now our instruction is branching out. Have you checked with your provider what IP is provided to you? If not, check right now.
- If it is dynamic, then trust the automatic selection in the IP address and DNS server settings.
- If it is static, then you have to enter the values \u200b\u200bmanually. As a rule, you need to specify “IP address”, “Subnet mask”, “Default gateway” and “DNS server”. When you have finished entering data, click OK to save your selection.
Important points:
- If a modem is required for connection, enter its default address as the IP address; usually 192.168.1.1. If the modem has a different IP (which is rare), it is indicated on the bottom of the modem itself or in its instructions.
- Usually the ISP provides the DNS server details, but sometimes this is omitted. Then you can use the universal ones:
1) Public DNS from Google: 8.8.8.8 or 8.8.4.4 - a universal solution, usually suitable for all computers
2) OpenDNS - 208.67.220.220 and 208.67.222.222
3) Yandex DNS with its own antivirus filter - 77.88.88.88 or 77.88.8.2 - if you trust Yandex's antivirus policy (although sometimes it may find it unreliable and quite a decent site)
4) Yandex DNS with a filter for pornography and other obscene content - 77.88.8.7 or 77.88.8.3 - although depending on what you actually need from the Internet, hehe.
- We repeat: if remote access is important to you, make sure that the provider supports that your IP will not change.
If your ISP offers L2TP access, this may require some additional steps on your part. Usually, the provider provides instructions for setting up such a specific type of connection, but from our side it also does not hurt to duplicate.

So, to set up L2TP, you need:
- Go to the already known to us section "Network and Sharing Center" and choose to create a new connection
- Unlike the previous options, here you should go to the "Connection to the workplace"
- When the system prompts you to create a new connection, select this item
- Select "Use my connection"
- Enter the server address provided by the provider. The immediate connection option should not be selected. The name you appoint is the one you like.
- In the next window, enter the username and password provided to you. Do not forget to tick the box "Remember password"
- Connect now when the system prompts you
- Return to "Adapter Properties" (as discussed above) and select the "Security" section
- Select “L2TP IPsec VPN” from the drop-down options for “VPN type”. Below is the line "Data encryption", here you need to select "Optional",
- Under the line "VPN type" click the "Advanced options"
- Enter this key in the "Key" field. You should have it from your provider.
- Everything, you can click "OK" with peace of mind and use the connection.
This guide works for Windows 7 and later.
Why all these complications? - you ask. This solution has advantages: for you - increased connection security (compared to a regular LAN), for the provider - simplification of the billing system.
PPPoE setup
Before setting up the Internet on your computer, check with your provider for the type of access that it offers. PPPoE access requires not only correct settings, but also authorization using a username and password. You will need this method of connection if you do not use a modem or router, but insert the cable from the provider directly into the connector on the computer, without intermediaries.
To do this, you again go to the "Network Control Center" and select there, create a new connection with it.
In the launched wizard, you select the first item - "Internet connection" - and click "Next". Then in the window that appears, you must select "High Speed \u200b\u200b(with PPPoE)".
The final step remains. In the final window, you need to come up with a name for the connection and enter the login and password issued by the provider. If your computer is used by more than one person (for example, family members), each with their own account, and you want to give them all access, then check the box "Allow others to use this connection accounts».
Now make sure your internet connection is working. And if so, hello world!
Setting up a local home network can be divided into several steps:
1 We register the network settings on all computers / laptops / TVs on the home network (this step is used if there is no router in your local network).
2 Checking the name of computers and the workgroup specified in the properties of computers.
3 Turn on Windows Firewall.
4 Checking network operation.
We manually register the network settings on all home network devices (for networks that do not have a router / router)
We go to the Control Panel (" Start- Control Panel") And select" Network and Sharing Center».
After that we press " Change adapter settings». 
In the network connections window, select the connection of interest to us and click on it with the right mouse button, select “ Properties", In the connection properties window select" Internet Protocol Version 4 (TCP / IPv4)"And press the active button" Properties". In the Internet Protocol Version 4 (TCP / IPv4) Properties window, write the IP address 192.168.1.1
(on the other machines we prescribe 192.168.1.2
, 192.168.1.3
etc.) All computers must have a subnet mask 255.255.255.0
... The gateway must not coincide with the IP address of the computer, in the gateway write the IP of another computer on the network (if you do not have a gateway specified, you cannot specify the network, by default you will have it - Public, this will be discussed below). 
The first time you connect to a network, you must select a network location. This choice affects the firewall settings and security settings for the type of network to which you are connecting. If your computer connects to multiple networks (for example, your home network, your local coffee shop, or your work network), choosing a network location will ensure that the computer is secured to the right level. 
There are four types of network locations.
home network to work on home networks or networks whose users and devices are known and trusted. Computers on a home network can belong to a home group. For home networks, network discovery is turned on so that the rest of the computers and devices connected to the network can be used and also allows other users to access the computer from the network.
Working network for networking a small office or other workplace. Network Discovery, which ensures that the rest of the computers and devices on the network can be used and also allows other users to access the computer from the network, is enabled by default, but you cannot create or join a homegroup.
Public network for networks in public places (such as cafes and airports). This network location is configured to make the computer "invisible" to other users and increase its protection against malware. software from the Internet. Homegroup is not available on public networks and network discovery is disabled. This option should also be selected if you are using a direct Internet connection without a router or a mobile broadband connection.
Domain used for domain networks, such as those used in workplaces in organizations. This type of network location is controlled by the network administrator and cannot be selected or changed.
In practice, I would recommend for a home network to choose Working networkbecause unlike Home network, you do not need to enter a password to share resources. Of course, you should not choose a public network for a local network at home, I generally keep quiet about the domain, because in this case you need to install, configure a domain controller - for a home network - it's not worth it.
Checking the name of computers and workgroup.
It is necessary to check that all devices on the home network belong to the same workgroup and have different names. To do this, go to " Start-Panel control System
". A similar procedure must be performed on all computers / laptops in the network.  In the Computer name, domain name and workgroup settings field, look at the specified computer name and workgroup name.

Checking the operation of the Windows Firewall service.
The next step is to check if the Windows Firewall service is enabled. To do this, go to " Start- Control Panel- Administrative Tools» 
In the window that opens, click " Computer management». 
Then go “ Services and Applications - Services", Find a service there Windows firewall and see that it would be enabled, if it is disabled, you need to start it and check that the Startup type would be set to “ Automatically", To do this, double-click on this service and in the window that opens, look, and if necessary, correct the Startup type. 
Checking network operation.
The last step is to check the operation of the home network, for this we run the command line on one of the computers. Click " Start"Write in the search bar cmd and press the " Enter». 
Will open command line, in it you must enter the command ping and the ip address of another computer on the home network, press the " Enter». 
If done successfully, you should have no packet loss.
At this point, the setup of the home network can be considered completed, the next step can be configured network printer or do shared folders (network folders) , this will be discussed in the following articles.


