The official page of Google Adsense in Russian. Google Adsense - registration, login, receipt and installation of ad units code, as well as withdrawal of money from Google Adsense Google adsense login
Hello dear friends. Today will be the first article dedicated to monetizing a website using Google Adsense contextual advertising. In this article, we will analyze the process of registering with Adsense, creating and setting up ad units and installing an ad code on the site.
It's not a secret for anyone that every website owner can make money on his own resource. There are many ways, one of which is contextual advertising. Perhaps everyone dreams of such passive income. The main thing is to develop your site and think first of all about the benefits for visitors, and the more visitors there will be on your site, the higher your income from contextual advertising.
So, Google AdSense offers to make money on its own sites, YouTube channels and AdMob mobile applications. Moreover, unlike other ad networks, Adsense does not have an entrance threshold for traffic to your site. You can start making money on the site from the first day of its existence. Of course, if your site is made for people and does not contain prohibited content (terror, calls to violence, copyright infringement, etc.).
Sign up for Google Adsense
In general, as such, registration in Adsense is not needed, since Google allows you to use a single account for all of its services. It is enough to create a mailbox on Gmail once and then use this mailbox (as a login) and a password to enter any Google service.
I'm sure you already have a Google account. If not, then in my article about there is a detailed account registration scheme.
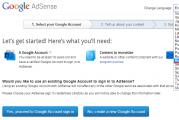
Apply can be on the main page Google adsense... To do this, follow the link and click on the button « Getstartednow ".
Don't worry that everything is in English. In the next step, you will have the option to choose your language.

Here, at this step, you will be prompted to log into the system under your single account or register a new one. Since we already have an account, click on the button "Yes, sign in to your Google account".

By clicking on the button, you will be prompted to enter the password for your account (this is the password for the mailbox on Gmail). Please enter your password.

Next, in the second step, you need to specify the url of your site and select the main language. Even if you have several sites, now you indicate one of them. The rest can be added after confirming your application. Language, you also choose the main language, even if you have translated versions as well.
Read the rules and click on the button "Proceed".

The next step is to fill in your contact information. The data that you can select from the drop-down list will be in Russian. But the fields that you will fill in yourself (name and surname, address) must be entered only in Latin letters. Fill in everything correctly, as in the future a PIN code will be sent to this address, which is required to confirm the address, etc.
As soon as the data is filled in - click on the button "Apply".

Now it remains to wait. Your site has been sent for moderation. In about a couple of days you will receive an email confirming the application and your further actions. By the way, the letter came to me the very next day.

Creating an Adsense ad unit
Having received the letter, you need to proceed to the next step - creating an ad unit. Until you create this block and post it on the site, your account will not be verified.
To do this, you need to go to the Google Adsense account, you can do this by clicking on the button "Begin" in a letter or by link http://www.google.com/adsense/.
By going to the account, you will automatically be taken to the section "My announcements"... Where, to create a new ad you need to click on the button "New ad unit".

First, you need to assign a name to the ad unit, select the size and define the type. The name can be assigned by the size of the block or by the place where it will be located. This will make it easier to analyze in the future. The block size is perhaps the only correct one - adaptive. Since if you are your site for mobile users, then the ads should also harmoniously fit into the design. Next to the block sizes, which are adapted for mobile devices, there is a phone icon. Select only such blocks, their size will adapt itself depending on the size of the parent container.
For ad type, select "Text and Display Ads", since the system's help itself indicates that this type is the most profitable.

For text ads, you can customize the style so that these ads fit neatly with your website design. To do this, you can choose one of the proposed options, you can copy it and edit or create your own style.
All necessary settings are available in the sub-item.

The next important point is setting up client channels. That will allow you to group ad units by size, title, location on the page. Best of all, by specifying a customer channel as the ad placement, advertisers can target your site's ad units. Which contributes to the increase in CPC.
To configure, click on the tab - "Create a new customer channel".

After that, you need to fill in several fields and mark the checkbox in paragraph "Targeting".

And the final step in setting up an ad unit is setting up a fallback ad. By default, this is an empty area. But you can make a one-color fill or connect a graphic splash from the site. For example, a banner. Just make sure it matches the ad unit size.
And after you deal with this item, click on the button "Save and Retrieve Code".


Note: By default, all ad serving categories on your site are enabled. But, you can make the necessary changes in the section "Allow / block ads".
Inserting Adsense ad code into WordPress sitebars and articles
So, open the WordPress admin panel - "Appearance" – "Widgets"- widget type "Text" and place the ad code in it.


And to your mailbox, you will receive an email confirming the full activation of your Google Adsense account.

From now on, your site will display ads from the Google ad network.
To do this, in the theme function file, at the very end, before closing ?> paste this code:
Function block1 () (return " Adsense Promotional Code";) add_shortcode (" adsense1 "," block1 ");
If you intend to insert several ad units in the article, then paste this code into the file again and change adsense1 and block1 on adsense2 and block2.
In the article itself, in the place where you want to display the ad block, paste this code:
And soon I will prepare an article on the methods on the site and manual and automatic methods. Believe me, it makes life a lot easier.
I also advise you to watch the video version of the article.
Well, friends, that's all for me today. Give it a try, sign up and monetize your sites. If you have any questions, ask them in the comments, I will be glad to help. I wish you all good luck and see you in new articles and video tutorials.
P.S. By the way, you can also install the Adsense mobile app on your smartphone and you will always have all the statistics at your fingertips.

And in conclusion, I want to congratulate all of you, friends, on Victory Day! War is grief. And the day of its end is truly the holidays! My grandparents went through the entire war. Grandma is still alive, she is already 93 years old. The horror that they had to endure and millions of people will never be forgotten. It is hard for her to look at what is happening in the world, how angry people have become. They forgot what our ancestors fought for.
I wish you and your families good health, a peaceful sky over your head! And so that the mistakes of the past are never repeated again. That there was no war!
Site. Galiulin Ruslan is in touch. Today I want to tell you about contextual advertising from Google and some of the nuances of working with it. Like many bloggers, I decided to write the problems I encountered and talk about my earnings.
Every day, the Runet is replenished with new web pages of various directions. However, many site owners simply do not know how to organize earnings with their help, and only fill their own resources with context for their satisfaction. In reality, there are many ways to monetize a site from participating in and to placing blocks of paid advertising. One interesting resource that deserves attention and allows you to make real money is Google Adsense.
Here are my earnings only on Edsense for November 2016 on the 22nd of the month (I made a screen during lunchtime -))).

What is Google Adsense for?
An American search engine has created this tool for displaying paid ads on partner sites, whose owners earn from visitors clicking on it. For this, web developers during the site layout or its further optimization provide for the arrangement of special blocks. They display ads in graphic or text form. Also, a Google search bar can be installed on a web resource to find content both directly on the site and on external search results. With a similar click on ad blocks, the Google partner will also receive a reward.
How to log in to Google Adsense in Russian
When you go to the Adsense start page, all information is presented in English. A large number of people do not speak this language perfectly, therefore they believe that they will not understand the registration and close the resource. But you just have to scroll down the page and select the "Russian-Russia" setting in the drop-down menu. All text and buttons for registration will be immediately translated into their native language.

Another available option is to click the Sign Up Now button on the start page, and in the URL that appears, replace the en setting with ru. You can also choose a language from the drop-down menu.
The procedure for connecting your site to Adsense
To become a partner of Google and display its ads on your web resource, you need to click on the "Register" button. Next, you will be offered to fill out a form where you should indicate your email on the Gmail resource, information about the site (domain and language of content). After saving the entered data, a message will be displayed that within 7 days they will check and report the connection result. In most cases, this takes about 2 hours. To activate, you will need to get it to receive payments in the future.

You should apply for a partnership after the site has already been fully launched and filled with content. Otherwise, Google will refuse to connect. Resources that contain exclusively images, videos or Flash-animation are not allowed for partnership.
If your website is not yet finalized, but you still want to register and explore the possibilities of Adsense, a suitable option is to create a blog on the Blogger service. It is interesting in that it is completely free for users and allows you to connect Google ads without working with HTML codes. Another option to register is to connect your YouTube channel.
Effective ad units for websites and blogs
To place an ad unit on a web resource, you need to create an HTML code in your account. After that, make a Google Adsense login in Russian, which will allow all further actions to be made intuitive in your personal account. First you need to click on the "Ad units" tab, then activate the "New ad unit" button. Next, you need to make several settings:
- Enter a name. With its help, you can always find a block and track its effectiveness.
- Determine the size. Google Adsense itself recommends the formats that give the best results. You can also choose other standard formats or customize the banner to your size. To do this, open the "Shown" submenu.

- Choose a type and style. There are several options for serving ads: image, text, and mixed. Google recommends stopping at the latter, since in this case there will be a greater amount of coverage, and, accordingly, earnings. You can choose a standard style for the block or edit the template for your web resource.

- The last 2 settings "Client Channels" and fallback ads are optional.
After clicking the "Save and Get Code" button, the html code appears. It is copied and pasted at the location on the site where you want to place the ad unit. Also, you can subtract with the help of this advertisement.
Bloggers, whose web resources are made on the engines WordPress, Joomla and others, can use special plugins. In this case, you will not have to deal with html-codes, but it will be enough to connect ad units to certain modules. But I do not particularly use these plugins and insert blocks from my personal account.
ADVICE: Test different options for placing blocks both in the text and under the headings. Use different block sizes, as the effect can differ several times on different topics.
Don't forget to like and subscribe to blog updates. All the best -))).
Respectfully yours, Galiulin Ruslan.
”, Today I'll take a moment to describe how to add Google Adsense ads to your blog. Why this service was invented, and we have already discussed how to make money on it. Today we will analyze how registration in Google Adsense goes, the main options of the service and types of ads. Consider the options for adding Adsense to your WordPress site using a special plugin and by manually pasting the code.
How do I sign up for Adsense?
When you go to google.com/adsense, you will see a page in English. To go to the registration form in Russian, you need to click " Sign in»And select your account (e-mail gmail.com) in Google, or create one.
After that, in the pop-up window, select "sign up for an AdSense account today"

Then, select the language " Russian"And proceed to registration.

Using the created Google account, go to the " Describe your content". Here you will need to specify the url of your blog and the language of its content. It's also important to pay attention to the Adsense program policies. Failure to comply with these rules in the future may lead to the exclusion of the site from the program. For example, you cannot click on advertisements on your site yourself. More detailed Adsense rules can be found here.
The next step is to fill in the contact information.

To create an Adsense account, you need to provide valid information in the Latin alphabet. This will determine whether you can subsequently receive the money earned.
Within a week after After you have completed the registration procedure, you should receive a confirmation in the mail that your site has been accepted into the program.
Google Adsense: How To Set Up? Creation of an ad unit
Once your blog has been moderated, you can log into your Adsense account. The home page will show statistics of your earnings, views, clicks, etc.


Here you can specify the name of the block, its size, type of ad, create a client channel.

You enter the name for your convenience. Ad sizes vary. Based on Google recommendations, horizontal boxes work better: large rectangle (336 x 280), medium rectangle (300 x 250), full size banner (728 x 90), and wide skyscraper (160 x 600). But depending on the design and structure of your site, you can select formats that are convenient for you, and then track statistics on them. Ad type, when analyzing reviews about GoogleAdsense, it is better to choose "Text and Graphic", this will increase your income. Another useful feature is customer channels. It allows you to group ad units according to different criteria: by location, size, page subject. Thus, you can track the effectiveness of channels (in the "Reports" section), as well as enable targeting for them. Those. You will be able to provide the advertiser with the ability to select the placement that you created using the custom channel.
In addition to the column "Client channels" when creating a new ad unit, this section is also placed in a separate tab. Those. you can customize it after you have created an ad group. To enable targeting, you need to check the corresponding box.

You can also apply appearance settings to text ads.

Here you choose either ready-made templates (as shown in the picture), or you can create your own style by changing the color of the text, frame, background, etc.

Plugin for WordPress Adsense
There are a lot of plugins for working with Adsense. I'll tell you about the plugin that seems to me the most convenient. This is Easy Adsense. It is convenient, first of all, because it is translated into Russian. Plus, it will allow you to place ads anywhere on your blog. The plugin for Adsense is installed through the installer, or by adding it to the wp-plugins folder. Next, activate it in the plugins section on your website. After that, select the placement of the ad unit that you created in Adsense. In the appropriate field for it, paste the code you received.

However, installing a plugin isn't the only way to add code to your site. Despite the convenience, plugins load the engine, and if you can do without additional load, why not?
Inserting AdSense code without a plugin
Its code will look like this:
| 1 2 3 4 5 | function context_reklama () (return "Google Adsense code";) add_shortcode ("adsense", "context_reklama"); |
function context_reklama () (return "Google Adsense code";) add_shortcode ("adsense", "context_reklama");
In this case, "context_reklama" is the name of the function for your convenience, "Google Adsense code" is the code you received in Adsense, "adsense" is a short code that you can insert anywhere on the page to display an advertising message.
Insert the generated code after the tag
Add adsense code after h1-h6 headers
« Ad unit code"- the code you received in Adsense. This feature allows ad units to appear after every h2 tag. However, keep in mind that Google Adsense has a limit on the number of ad units. There should be no more than three of them.
Add adsense code after
Add adsense ad unit in the middle of a WordPress post
This code will determine the middle of your article, find the end of the nearest paragraph
And will insert a block after it:
Don't show on homepage
For more information on Google Adsense, check out the Adsense Help Center. There you can find guidelines on how to sign up for Google Adsense and get started with the service, as well as many answers on how to work with the program.
If suddenly you decide not only to make money on contextual advertising, but also to promote something with its help, I can recommend a convenient service. Here you can advertise directly in Yandex.Direct and Google Adwords. By the way, all operations are automated, so save a lot of time and devote it entirely to monetizing your blog.
I hope today's article will make it easier for you to work with Google Adsense and allow you to effectively place contextual advertising on your blog. See you!
Greetings! Dear Coolinet readers. Today in this article, we will talk about another option for passive earnings on your website. Namely, about earnings in ( Google Adsense). We will figure out in detail how register in this system, how to get and place the code of ad units that will be broadcast on our resource. We'll see how much you can earn per day, how much is published per month. How much will the site earn with traffic? 800 — 1000 unique visitors. And of course we will withdraw the earned money.
Small introduction
Many webmasters, when thinking about monetizing their site or blog, start with Google Adsense, and not with the Yandex Advertising Network (YAN). There are objective reasons for this. In general, getting approval from Google for placing their advertising materials is much easier than in Yandex. By and large, even a very "young" resource can apply for approval and acceptance of a site in Google Adsense. However, you need to understand that although Yandex's site requirements are more stringent, Google can also refuse, the basic wording is not enough.
Yandex has basic requirements for moderation: traffic from 500 unique visitors per day for several months. And also hosting the site on. The site hosted on various - narod, ucoz, holm, chat and the like in YAN, unfortunately, will not be accepted. By the way, this is one of the main disadvantages of free hosting, you can read in more detail in this article -. Well, and accordingly, the site should not contain materials prohibited by the law of the Russian Federation. Also, the site should have easy navigation, not contain a lot of ads, and so on. We will definitely talk about all the nuances of working in PCA in more detail in a separate article.
The site on the pages of which you are now - COOL inet, was first accepted into the Yandex Advertising Network, and quickly and the first time. Which I am of course very glad! Then I already submitted an application to Google Adsense. Nevertheless, I will start with Google, simply because most of the site owners begin to receive their first profit from it.
Sign up for Google Adsense
So, now that we are familiar with this system a little, we can proceed to registration. To get started, go to this page https://www.google.ru/intl/ru/adsense/start/. Here we will see a cheerful housewife, businesswoman and teacher. Everyone is poking their fingers somewhere, everyone except the housewife - she cuts the cheese. In short, people with all their looks show that absolutely anyone can make money on advertising, and without straining at all! Excellent, so we can make money and we will check ...
Stage 1
Fill in the field password thereby confirming your rights to your Google account. If you do not have such an account yet, you will have to register it.
After that, fill in all the fields as shown in the screenshots below.
Now we need to link our site with Google Adsense, for this we need to embed the code (screen below). We copy it.
And we add to our site if you have a site made on WordPress, it is very easy to do this. Go to the tab appearance then choose heading.
Now we find the tag at the top and paste our copied code from Google Adsense into it.
After placing the code in your account, we confirm this. And now we just have to wait for the approval of our site from Google. If the resource meets the requirements of Google Adsense, then with a positive decision, such a letter will be sent to the mail.
Fine! Let's rejoice together with the black boy and the popcorn fireworks and move on to the next stage.
Hosting the Google Adsense code
Stage 2
We are interested in the tab my announcements ... By and large, in this section, we just need to customize the appearance and arrangement of blocks on the site. do as you think it will be more suitable for your resource, later these settings can be changed. For my site, I was the only one who did not include the ability to display an ad unit on a mobile device in full screen.
Screenshots of my settings are below.
After all the manipulations, press to get the code ... Now the generated code.
 Google Adsense generated code for the site
 We place it in the same place (instead of), also in front of .
If you have any problems installing the code, Google has tips and detailed instructions.
In about 10 minutes, the ad units will start streaming on your site. Moreover, Google selects ads that are similar to the subject matter of your content. And also tries to broadcast the most profitable advertising for the owner of the resource. Let's now see what I got and how it looks on the COOLinet website. Screenshots below.
In my opinion, it looks very laconic.
All statistics in real time, on Google ad revenue. available in your personal account.
 Google Adsense revenue statistics
 Further in this article I will lay out reports on how much money can be made on advertising from Google. Also, let's compare these indicators with Yandex advertising revenue. An article about how to get into YAN the first time and about making money on it will soon be written. Therefore, in order not to miss new materials, click on the green bell in the lower right corner of the screen.
Last Updated 2017-11-12
How Much Can You Make With Google Adsense?
Almost a month has passed and now, it's time to talk about the most interesting thing - making money with Google Adsense.
At the time of this writing, the COO Linet website traffic ranges from 850 to 1000 with a few unique visitors per day. with such indicators, the site can earn about:
- Estimated Income - $ 41.55
Below are more detailed indicators from statistics for the period from 10/11/2017 to 11/11/2017.
- Pageviews - 35,897
- Impressions - 70 666
- Clicks - 181
- Revenue per thousand page impressions - $ 1.16
- Revenue per thousand impressions - $ 0.59
- Impressions in the visible part of the screen - 27.17%
Below are some screenshots.

 Google Adsense income calculation
 Updated 02.13.2018
For several months now, ad units from Google Adsense have been disabled. Now the site contains only advertising from Yandex on which earnings go. I will write in more detail about making money with Yandex on my website in a separate article.
The reason why I gave up, at least for now, from Google Adsense is very simple. The thing is that you could get the money you earned by displaying ad units on the website, you need to confirm your persona using the code that Google employees send you by mail. There is no code as you understand. Although I have already requested to be sent again. The site writes that the entire procedure with sending the code takes about two weeks. It's been four months!
Plus another such moment. While this is indirectly related to the topic in the article, Google nevertheless also disabled monetization on one of my YouTube channels. Who did not know YouTube, this is also one of the services of the Google corporation. Why is that? I haven’t figured it out yet. And to be honest, there is no desire. it is not related to ban or copyright infringement. Something there, in my opinion, this is due to the new requirements for the channel. In general, the money earned also hung up. Something with Google for now, everything comes out clumsily, unlike Yandex.
Video How to earn on Google Adsense $ 14 per day from scratch. How do I make money on Google Adsense
To be continued …
Hello dear readers of the blog site. In today's article on the topic (remember that the best option would be to legalize your business through), we will talk about the contextual advertising system from Google.
For beginner webmasters earnings on Adsense has one indisputable advantage over making money on Yandex contextual advertising - you do not need to have 500 unique visitors per day in order to be accepted into this system (in the Yandex advertising network, this is the main condition for joining).
It is this limitation that is a stumbling block for those who wish. The context system from Google in this regard is more democratic and in it almost any site can earn on displaying contextual advertising, even those located on.
True, Google is very sensitive to and quite often bans accounts where sites with plagiarism of one kind or another have been added (even a description of the possibilities of plagiarism is prohibited - for example, I was warned a couple of times, after which I had to remove several articles from the site). Read very carefully Google Adsense ad guidelines or watch an old but useful webinar "How to place ads without breaking" (created and).
Registering and creating an account with Google Adsense
It is noteworthy that if you have already registered your main site in the contextual advertising system from Google (and it has passed moderation), then on the rest of your sites you can place Adsense advertisements without prior moderation. This is very convenient and greatly simplifies the process, and also makes it possible for young sites to earn money (practically without traffic).
But for all its democratic character, Adsense is very serious about cheating and fake clicks(an action performed by a person or a program that imitates a real visitor's click on a contextual advertisement). The punishment will be very harsh and immediate. If you notice that your STR has grown sharply and there are suspicions of clicks, then use the Contact Form for Invalid Clicks to avoid problems.
To get started and make money on this contextual advertising, you will need registration in the Google Adsense system... You can create your account by going to Google.com/AdSense and clicking on the "Register" button (now their home page is typical):

You will be greeted by the registration wizard, which will suggest at the first step, if there is one (left blue button at the bottom of the screenshot):

If you do not have an account in this search engine, you will have to create one. How exactly this is done, I have already described in some detail in the article about, so it will be unnecessary to repeat it. We will assume that you already have an account and you will only need to enter it by clicking the appropriate button.
After successfully logging into your Google account, you will be redirected to second step of registering with adsense, where you will need to enter the URL address of your main site (if it is not there, that is) and indicate its language:

At the third step of the registration wizard in Adsense, you will need to carefully fill in all the proposed fields:

Personal data (full name, city and address) previously had to be entered in Latin letters (read about, and also about using for these purposes), but as now - I don't know for sure. And, of course, they must correspond to reality, otherwise you will not be able to receive the money you earned (cash a check, although now there are alternative options for receiving money - Rapida and bank transfer).
After that, you specified during registration the site will be sent for moderation and in about a couple of days you will receive a letter (by e-mail), which will say that your project has passed moderation and you are accepted into the Google contextual advertising system.
Creating and configuring ads in Google Adsense

Is it booming to increase the number of ads on the page, or let it remain as it is?
If you want to do without plugins and not to lose in functionality, then I dare to suggest several solutions I use (not quite mine, but borrowed).
I probably won't open America by saying that WordPress is a wonderful engine developed by professionals in their field. Thanks to the wonderful thing, it is quite easy to find the file that would allow you to insert the Google Adsense block in the right place in the template. I myself in WordPress When inserting Adsense's code, I prefer to do without plugins, because they unnecessarily load an engine that is already quite heavy for hosting (although, of course, I can't do it at all).
- Want to insert ads inside articles? No problem. Short codes will help you. To do this, go to the folder with the theme files (by, of course), which is now used on your blog (/ wp-content / themes / Folder_name_with_your_theme_design), find the file there, and if it is not there, then create it.
True, I did all this a year and a half ago, but I hope that nothing has changed since then.

This is exactly the version of the code I used (the blocks of the most suitable sizes will be shown on different devices). True, I inserted the code through funcsion.php and at first forgot to remove all the spaces in the code, which led to some distortions. But you won't repeat mine?
Setting up payments and withdrawing money from Google Adsense
In short, in addition to receiving a check from Google, now Russians have the opportunity to receive cash through Rapida (it allows, for example, to receive money in the mail, transfer their hard-earned money to the system, to a bank or card account, etc. using own service.
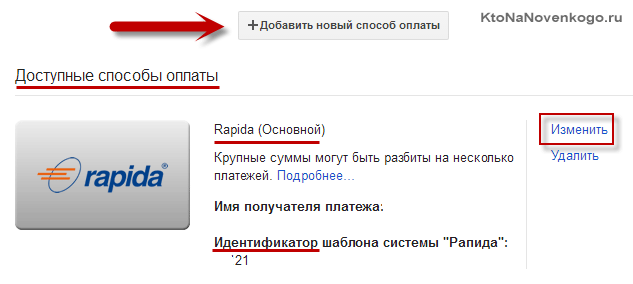
In the settings of your Google Adsense account ("gear" - "Payments" - "Payment settings") you can choose one of three types of payments (for Russia) by clicking on the "add payment method" button:

In the opened window three ways will be offered for Russians withdrawal of funds earned in Adsense by overwork -, account or Rapid:

When the amount of money you earned in the context of money will exceed $ 10, in your account you will see a notification that you will need to confirm the address specified during registration (I do not have more recent screenshots, unfortunately, but the essence of this does not change).

This is done using PIN code input (pin) which will be mailed to you. When you enter your PIN code, you will be able to receive your first payment from Google Adsense:

Quite often the problem arises with the fact that Pin code does not come to the address specified during registration. Google's help in this regard says that if you asked for a PIN code three times and a month has passed since the last request, then a link to a form will appear on the main page of Adsense where you can upload, for example, a scan of your passport to confirm your address.
Withdrawal of earned funds through Rapida Online
It is clear that withdrawal through Rapida will be much more preferable, because further money can be sent to real life manually or automatically in dozens of different ways. In theory, in this case, you have several ways withdrawing money from Google Adsense to Rapida Online:
In any of the cases described above, your money will have to get into rapid online. A few years ago, AdSense made changes to the rules for withdrawing funds through Rapida, which you can read more about.
Previously, you could simply register with Rapida Online and receive funds from Google by mail (not email, of course). Now must be identified in Rapid(show them your passport in their office or choose one of the impersonal methods), as well as create a template for withdrawal, the ID of which will then need to be entered in the payment settings in Adsense.
Now let's see how you can create a template in Rapid, for example, to automatically redirect money from Adsense to your wallet with Webmoney. To do this, you will need to go to the "Payment" - "Payment systems" tabs and select the desired payee:

In Rapida Online, there are certain commission that the payment system may charge you. In the case of a withdrawal to a WebMoney wallet, it will be 1.4 percent of the transfer amount:
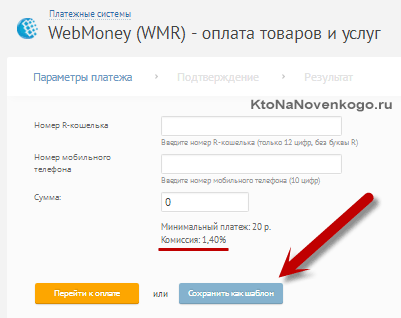
Next, indicate your username (cell number), the number of the ruble purse in WebMoney and the maximum amount to be withdrawn (15,000). After you click on the button "Save as Template", an SMS with a code (session PIN) will be sent to your cell phone, which will need to be entered in the next step of creating a template in Rapida.
Well, at the last step, you will be asked to come up with a name for the template (no more than 8 Latin numbers and letters, and you cannot start the name with a number) and a description (you can also in Russian).
After you click "Save Template", it will be saved to the database and available from the "Templates" menu item. After reviewing the data for this template, you will see its unique number, which you will need to link it to your Google Adsense account:

That's all, it will only be left now to score this number in the Adsense account and save the changes made. As a result, you will receive the next payment through Rapida.
Recently, I have been withdrawing from Rapida directly to the current account of an individual entrepreneur (I set up a payment template for free details in Rapida) and the commission is charged less (only 0.9 percent). True, the last few payments in Rapid got stuck pretty stubbornly and had to be pushed through by polite communication with the technical support of the service. Before that, everything generally worked like a clock. By the way, this thread can be useful in this regard, where you can get a lot of useful information.