A single wifi network of several routers. A proven option for combining routers
Almost everyone thinks about wireless technologies when they talk about the Internet today. They can be found in every home, apartment, company and in many other public places. An indispensable part of this technology is a universal device called a router.
But despite the many advantages, many users more and more often ask one question: "Is it possible to organize a router connection through another router?" There are many reasons for this, the main one of which is the decrease in the wifi signal passing through the walls. The problem is familiar to the owner of multi-room apartments, houses where one router is not able to provide all rooms with Internet.
The second reason may be savings. For example, two neighbors decide to connect one apartment to the Internet service, and the other is connected in series using a router.
The third option exists when the old router does not have rich functionality and cannot be configured to the options offered by modern routers (working with disks, ftp server, print server, etc.).
There are two ways that combine two devices into one network
In both cases, the main condition is only a correctly configured first device, in which the provider's cable is connected. The second device, depending on the connection, will need to be configured. So, what are the ways to combine two devices:
- Using a wireless network.
- UTP twisted pair cable connection.
All of them are quite simple and do not require any special knowledge. This article will tell you in detail about each method and will help guide even inexperienced users in the actions.
Combining two routers into one network using UTP
This method has two options for implementation. If the first one does not work for some unknown reason, you can always try to configure the second method.
The first way
The provider's cable is plugged into the WAN port (as a rule, the blue or green connector on the back of the router), and the connecting wire is plugged into the LAN of the first device and the WAN of the second device.
With such a connection, as a rule, the first router must be correctly configured to operate the ISP's Internet and DHCP must be enabled on its LAN ports. Typically, this setting is located in the "Network Connections" item LAN (local connection). For example, on TP-Link devices, this configuration can be viewed in the "Network" - LAN section.
The second apparatus is configured for a Bridge connection. For this, in the WAN section, select the Dynamic IP connection type. Further, if necessary, configure the wireless network similarly to the first device or create a new one with a different name (SSID) and password. Then the settings are saved and the router is rebooted if necessary. All these manipulations will allow you to receive the Internet through a cable connected to another router.
Second way. With this connection, the devices are connected by being included in the LAN - LAN.
This will combine two devices into one segment of the home network. Both routers will issue IP addresses from the common network when the equipment is connected. The only difference can be in the names of their wifi connections. 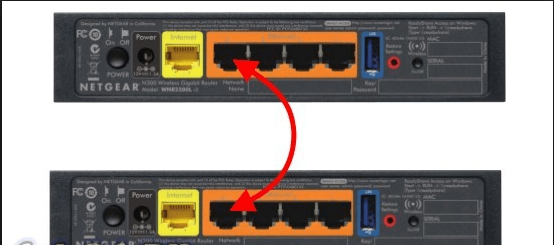
First, you need to properly configure the hardware. The first step on the second router is to disable the DHCP service. You should also check if they have the same IP address. In the case of identical device models, this is quite possible. If necessary, change to the last numbers such as 253 or 254. You can also change the subnet. For example, if the first router has the address 192.168.1.1, then the second can be made 192.168.2.1, specifying the first router as the gateway and setting the network mask to 23 (255.255.254.0). If you do not change the IP on both devices, an address conflict may occur. This will lead to the fact that the Internet will not work not only on the second device, but also on the first one.
Connecting two routers to one network using wifi
 It is also possible to combine two devices into one whole, thereby expanding the coverage area of \u200b\u200bthe Internet through a wireless wifi connection. This is the best and less costly way. To implement it, you just need to have two routers that support the wifi relay function or WDS technology. Usually modern vehicles have all this on board. But for reliability, you can view the user manual or directly view this information in the router settings.
The idea is that one device is configured to distribute the Internet, and the second simply acts as a repeater (repeater). All these technologies are aimed at expanding the wifi wireless network by connecting all access points or routers into one common network structure. The undoubted advantage of such a connection is the implementation of this method without using cable connections, which makes this method attractive for places where wiring is a big problem.
With such a connection, the main requirement must be fulfilled. All points or routers must operate on the same radio frequency (2.4 or 5 GHz), have the same encryption method and password to connect to the network. In general, the structure should be such the first router is configured for the Internet provider and distributes it along the chain further. The second, third and so on work as a repeater.
Below in the article, we will consider setting up popular models of routers using WDS technology and as a simple repeater. They all have the same operating principle and configuration. The only difference is in the location of the settings in the menu and additional functions.
Asus router as a repeater
Setting up an Asus router as a repeater is simple and does not take much time. First, you need to connect to the device and go to its configuration in the web interface. To do this, you need to open any browser and enter 192.168.1.1 in the address bar. If the page does not open, you need to refer to the manual or reset all settings to factory settings and repeat the procedure.
If the connection is successful, the user will see a window where he will need to enter his username and password. Then the main menu will open, where you need to go to the "Administration" tab and select the "Operation mode" item. Here you can see the options for how the router works with a wifi network (Wireless router, access point, repeater). Select the required item (repeater mode) and press the "Save" button. Then the device will reboot. 
Then you need to tell the router which wireless wifi network should be relayed. To do this, we again connect to the router and go to the web interface. Here we find and click on the "Quick Internet Setup" button. After that, a window should open where a list of available wifi wireless networks in the area will be presented. Choose the one you need, enter the password and click the "Connect" button. If everything is entered correctly, then the router will connect to the network and will relay the Internet of the first device via wifi, thereby expanding the signal coverage area. 
TP-Link router enabling WDS technology
To connect a TP-Link router to another device via a wifi wireless network using WDS technology, you need to enter the settings menu in the device's web interface. To do this, enter the IP of the router indicated in the manual or on the sticker on the back of the device in the address bar of the browser. After that, after a few seconds, a window should appear where you must specify the login information. As a rule, by default Admin is a username and password (if this data has not been changed earlier).
After that, the user will see the main menu window, where it is necessary to select the "Wireless Settings" item and the "Wireless Settings" sub-item on the left side. Here, you will need to select the "Enable WDS technology" section. After these manipulations, more settings will become available for the user below, where they should click on the "Search" button. 
After a few seconds, the system will display a table with all available networks to which you can connect. The list will contain information about the network name, signal level, channel number, etc. After selecting the required network, press the Connect button. 
Then the user will have to enter the password and click the "Save" button. After rebooting, the router will connect to the first point and start working together.
D-Link router as a repeater
For D-Link device models, connection is also done in a few simple steps. The first step is to get into the device's web interface. To do this, enter the IP of the device in the address bar of the browser. Then, in the authorization window, enter the login data (by default, the login is Admin, the password is left blank). In the menu that appears, they find the line "Advanced settings" (in older versions this item sounds like "configure manually"). 
Next, select the item wireless wifi networks. Then follows the stage of selecting the operating mode of the device. To change it, you need to go to the "Client" section and check the box next to the "Enable" item. 
After that, the user will be presented with a list of all available networks for connection. Having chosen the necessary one, enter the password if required by the system. 
After fulfilling all the conditions, the router will require you to press the "Save" button and will automatically reboot. When all operations are complete, the router will act as a wireless repeater.
Since there is really no way to imagine your life without wireless Internet, many users want to take it to various non-standard places. After all, it would be nice if Wi-Fi was distributed both in the garage and on the street, and so on. Performing some difficult and unusual work, you don't have to run into the house if you suddenly forget some important point. You can organize such a convenient system with the help of another router and cable. But how do you create this network? And how do you set it up? Now we will find out.
Below we will consider two ways to connect a Wi-Fi router using a network cable.
Required materials for connection
A prerequisite is the presence of a modem or router, which is already configured and working normally.
Just as mentioned above, you need a compressed network cable and another device that will distribute wi-fi.
Do not apply any settings to the first device. For now, you can not touch it at all, let it work as it works.
But the second device would not hurt to reset the settings, which can be done by pressing a special button on it.
Please note that you do not need to take devices from two identical companies. You can choose any combination of different manufacturers without any impact on the Internet.
Connecting parts
You need to connect the devices correctly.
One part of the cable must be inserted into the yellow (LAN) connector of the first instrument.
The second part is in the WAN connector, which is colored blue.
Look closely at the devices. The corresponding indicators should have lit up on them.
Setting up devices.
In fact, no global settings are needed on the second device. You just need to check the "Obtaining an IP address" item. It should come out automatically. This can be done by visiting the settings of the router.
You should have the item spelled out in the same way as in the screenshot.
If everything is configured correctly, then below you can see your IP address and other detailed information.
Optionally, you can set up a username and password for your network.
Second way.
This method assumes that you only connect the network cable to the LAN connectors of both devices. That is, they will be on the same network segment. If possible, of course, it is better to use the first option, since this method is a little incorrect, and you will have to play a little with the setting.
Configuring Devices
After connecting your devices with a cable, you should make the correct settings.
First, on the second device, disable the DHCP server in the corresponding menu item of your router.
Then in the menu item "Local network" view the IP address. If it matches the same address on the first device, then you must change it manually. It is best to fix the end of the range. For example, in my case, you can assign the 253rd address.
It should be noted that it is still better to configure the IP addresses before connecting the devices with a cable, since a conflict may arise already at this point.
After all the settings, do not forget to save all the changes you made.
Thus, you can connect two Wi-Fi routers with a network cable in several movements. Thanks to this, the Internet will be available even in the garage or in the courtyard of a private house.
If you are the happy owner of a router, then you are not alien to a situation in which the signal from Wi-Fi categorically does not cover the entire required residential area. In this case, you were probably advised to use special repeaters that would increase the signal coverage area.
However, you have also probably heard that the Wi-Fi signal zone can be expanded by connecting two routers into one network. Indeed, you can connect two routers, and this can be done relatively simply. This can be done in two ways:
- Create a bridge between two routers using WDS technology.
- Connect two routers with a network cable.
In this article, we'll cover both of these methods. It must be said right away that a local network between two routers is much easier to implement using a cable than trying to configure a WDS bridge between them. However, more on that later.
How to connect two routers using a cable?
So first, let's take a look at the most basic method of connecting two routers to each other to expand your Wi-Fi coverage. What do you need for this:
- Main and secondary router.
- Network cable for connecting routers.
That, in fact, is all. And you can even use routers from different companies - it doesn't really matter. Plus, you will have to configure only one of the routers - an additional one, which will just act as a so-called repeater or signal repeater.
Since you want to know how to combine two routers, it is not difficult to guess that you already have one router, moreover, configured and fully working. In this position, he must remain. We will not touch its settings when connecting to another router. You will have to dig a little in the settings only for an additional router.
So let's get started. To connect two routers using a network cable, you will need to do the following:
- Place two routers next to you to expand your Wi-Fi coverage.
- Take a network cable and plug one end into one of the four LAN ports on your main router.
- Connect the other end to WAN port additional router, which will act as a repeater.
- Throw main router to the power and turn it on if it was not already turned on. Do the same for second router.
- If you did everything right, then on main router a special indicator will light up, which will indicate the connection via the LAN port. On the additional router, respectively, the indicator about connection to the WAN port will light up.
You have connected two routers into one network. You can already put additional router to the place you want. This completes the first stage. Let's move on to the second one, which involves setting additional router.
So, first you need to go to the web interface repeater router... Open a browser on any device that will be connected to the repeater's network and enter its IP address in the address bar. Not sure what IP address your second router has?
Usually, such information should be indicated on the device body (on its back, next to the cable connectors) or on the box from it. If the IP address is not on the router's case, and there has been no trace of the box for a long time, then you will have to go into the Internet jungle to the manufacturer's website and look for the answer there.
However, for most routers, logging into the web interface with settings is performed via the IP address 192.168.1.1. If you still could not find the information you need, then you can use this address.
As soon as you enter the web interface additional router, you will need to go to the tab in which there will be a choice of the type of network connection. You need to select the network connection type DHCP or Dynamic IP(this is a mandatory item!).
Once DHCP is selected, save the settings and close the web interface. Below the selection of the connection type, information about the IP address, subnet mask and default gateway will appear. If this data appeared, then your work on connecting the two routers is complete. Close the web interface with settings and use the Wi-Fi signal coverage area from your main router, which should now be successfully expanded with an additional repeater router.
Ok, we have fully answered the question of how to connect two routers into one network using a network cable. The advantage of this method is that you will not experience any significant loss in signal transmission. The downside, of course, is that you have to deal with the network cable, which can be a headache at times. The next method of conducting a network between two routers eliminates this problem, but it is already more difficult to perform it - establishing a bridge between two routers. Let's talk about it now.
How do I set up a WDS bridge between two routers?

Now let's move on to something more complex, but in some way more convenient method to connect two routers together to expand the coverage area of \u200b\u200ba Wi-Fi signal - a WDS bridge. To begin with, perhaps we need to briefly indicate what this technology is.
WNS Is a network technology that allows the user to link several routers into one network, and do this without the involvement of inconvenient cables, i.e. it is completely wireless.
Setting up a wireless bridge between two routers is a little more difficult. If, when using wires, you did not have to adjust anything in the settings of the routers, then this time you will have to tinker a lot.
We will show an example on the brand of the most popular routers among users - Tp-Link. You can use two different routers when creating a WDS bridge between them, since in this case the likelihood of various problems and inconveniences is practically zero. But you can use two different routers as well, as long as they both support wireless connections with other routers.
So let's start looking at what you need to do in order to establish a WDS bridge between two routers. In this manual, we will also divide two routers into main and additional, which will act as a signal repeater.
First you need to do a little tweak the main router. Go to its settings by going to the required IP address to enter the web interface. Go to the tab Wireless network(or something like that).
In this tab, you need to set a specific channel for the router, which will also be used as an additional one. You can select any channel that is not yet occupied. For example, let it be third channel... Remember your choice. After setting the channel you need, save the selected settings.
Ok, so far we've figured out the main router. Now let's move on to the additional repeater router. To configure it, it will also have to be connected to the computer, like the main router. Go to the settings of the additional router using its IP address.
Go to the tab called WPS and disable this feature. As soon as you disable it, a small link will appear in front of you, clicking on which will reboot your additional router.
Once the repeater router is rebooted, go to the tab Netand then in under the tab LAN. Our attention should be on the field IP address... You will probably have a standard 192.168.1.1 ... You need to replace the last digit at the end, for example 192.168.1.2. Save your changes as soon as you're done setting up the IP address. After changing the IP address, the additional router will need to reboot.
Let's continue to configure it. Next, you need to go to the tab Wireless network... You need to specify name for your wireless network, which the router repeater will broadcast. In the same place you need to set the desired region... And most importantly - exhibiting channel... Have you forgotten which channel you set up for the main router? Expose channel three.
Being all in this tab, activate the option to activate WDS bridgeby checking the box opposite it. Then click on the button Search, which will start the process of searching for routers available to establish a bridge. Find your main router in the list and click on the link To plug.
Next, another window will appear in front of you, in which you need to set encryption typeused for the main router (remember it during setup). Also you need to specify password from the main router in the same window. Once done press Save.
That, in fact, is all that you had to do in order to establish a so-called bridge between two routers. We remind you that this guide can also be applied to routers from other manufacturers.
Found a typo? Select the text and press Ctrl + Enter
Hello dear readers! I then remembered that somehow I was asked in the comments about how to connect two routers via a network cable and make it so that the Internet is transmitted from the first router via the cable to the second router. And that, in turn, will distribute the Internet via Wi-Fi.
The author of the comment seemed to need to stretch a cable from the house to the garage and install a router in the garage that will distribute the Internet over a wireless network. The main device seemed to be an ADSL modem without a Wi-Fi module, but with a LAN connector to which you can connect a router.
Of course, if both devices have a Wi-Fi wireless module, then you can. But, when configuring routers in bridge mode (especially from different manufacturers), there may be a lot of problems, or nothing at all.
So, we have a main device on which the Internet is already configured and everything is working. It can be a router, a modem, etc. We need to connect another router (via LAN) to this, the main one.
On the first device, we do not touch anything and do not go into the settings. The main thing is that the main router would distribute IP automatically (DHCP was enabled), which it most likely does. That would be clear to you, I have the main Asus.
On the device that we want to connect (mine is TP-Link), I advise you to do a factory reset. This is necessary in order to delete all settings that may have already been made to it. They can prevent us from customizing our scheme. You can read about how to do this in the article.
We need a crimped network cable. I wrote about how such a cable is crimped in the article. If you are not sure what you will make it, or you just do not want to do it, then go to any (well, almost any) computer store and ask to crimp the length of the network cable you need. First, take measurements of the distance between the devices that we will connect.
Everything is ready, let's get started :).
We connect devices
We connect one end of the cable to the main router (from which we will take the Internet)... We connect in LAN connector, it yellow .
We connect the second connector to the second device in WAN connector, it blue.
The LAN connection indicator on the first device should light up (computer icon, usually one of four)... And on the second router, the WAN connection indicator should light up. Like this:
Have you connected? Fine!
Configuring routers
As I wrote above, there is no need to configure the main device. (but if our scheme does not work, then you can check the settings).
There is almost nothing to configure on the second device. Just check that the settings were set to receive IP automatically. On TP-Link it is done like this:
Go to the router settings and go to the tab Network – WAN.
Check what would be opposite WAN Connection Type was found Dynamic IP... If not, install.
If you did everything correctly, information should appear opposite the IP Address, Subnet Mask and Default Gateway. (like mine in the screenshot below)... This means that the connection to the main router is established and everything should work.
Do not forget to also make settings for the wireless network on the tab Wireless and in the tab Wireless Security.
If you have other devices, then there is nothing to worry about. We do everything the same, there may only be differences in the control panel.
All questions in the comments, or on the forum. Bye everyone!
Often a problem arises: how to properly connect a network router to another regular home router? Suppose a neighbor who has a router gets the Internet, and the user decides to split all traffic and monthly fees with him in half. In fact, the user's router must be configured for the simplest connection option - "DHCP", you just need to take into account one "subtle point". In the example, we will connect the D link router to another, abstract router, and consider how to configure it. Let's get started.
If there are two different routers, then each of them will have a DHCP server enabled by default. Devices in the local network - receive IP addresses from the server. So, we will connect the routers according to the "cascade" scheme, but if the main IP address of the two routers is the same, by default, nothing will work.
How to fix the problem mentioned here is what we must consider. "Router 2" is configured in two steps (and, on the first, its WAN port must be free). Not in all cases it is necessary to tune this way, but a similar method always brings positive results.
Sequence of preliminary actions
Connecting a computer to a router
For example, we will take a 100-megabit D Link dir 655 router as "Router 2". The rear panel of the device is shown in the figure, here the Ethernet ports are installed, including four "LAN":

Using a patch cord from the router kit, they connect any LAN port to the computer's network card connector (power is not needed now). The PC NIC is then configured like this:

Finally, they turn on the router, restart the computer.
It is important to know: if the router was purchased after its configuration, you need to perform a "master reset". For what, turning on the power - wait 1 minute and press the reset button, holding it down for 15 seconds (no more than 20). In half a minute - the device is ready for configuration (you can restart the PC immediately after pressing reset).
Opening the settings interface
For the dir 655 router, the address of the web interface looks like this: 192.168.0.1. In any browser, you need to open this address, and when asked for a login with a password, set “Admin” in the login field and click “Log In”:

Going to the start tab, you need to select the line "NETWORK SETTINGS" in the left column:

Now we will consider what needs to be changed on this tab.
Device setup
Changing the parameters of the local network
We will only change one parameter - this is the starting IP address of the local network. The NETWORK SETTINGS tab looks pretty impressive, however, we are only interested in one digital field:

Instead of 192.168 ... you need to do 192.169 ..., and then click "Save Settings". After waiting a little, we will see a tab with a single button - "Continue", which must also be pressed. After that, you can immediately send the PC to reboot. When the computer and router are loaded, you can try to open the interface at a new address (we have 192.169.0.1).
Setting up a WAN connection
How to connect a D Link router (or any other) according to the "cascade" scheme, we considered above. The cable that goes "from the neighbor" is connected to the WAN port.
If you manage to enter the web interface, you must do the following:
- Power off the router completely
- Install Ethernet cable to WAN connector
- Power on the router
- And, most likely, send the PC to reboot
After connecting the router and booting the PC, open the web interface in the browser. Go to the "INTERNET" tab:

Here you need to set the connection type: "Dynamic IP (DHCP)". You don't need to configure anything else. Click "Save Settings". It is not recommended to uncheck the Use Unicasting checkbox.
The connection should work in a minute. Actually, the setup is now complete. There is another option for connection and further configuration (when the router becomes a switch equipped with an "access point").
And now - we wish you successful setup!
Another connection option
Router - you can make a switch to connect it to a cable with the Internet through the LAN port, not the WAN. Such a device, if it has a Wi-Fi module, is switched to the "access point" mode.
Nevertheless, we give an example of setting for this case (as a "test subject", again "D-Link dir 655" is used).
A small video review of DLINK:


