Photoshop erase unnecessary. How to remove unnecessary items in Photoshop? Tips & Tricks
Good day to all, my dear friends. I am with you again, Dmitry Kostin. I remembered here many moments when you are photographed, and some extra person or some object that is inappropriate in the photo gets into the frame. Sound familiar? You only notice it already when there is no possibility to take another picture. Leave it as it is? No way!
Excess items can be thrown out of the photo, and no one will notice the difference. Do you want to know how to remove in Photoshop unnecessary object from any photo? Then read on.
Content-Aware Filling
As you can see, the cat has disappeared, but you do not have the cut out area as it usually happens. The void was filled with adjacent pixels, which, according to the program itself, most likely could be in this place.

I had a small "joint". when I removed the cat, in the area where the tail should be, a piece from the handle appeared (apparently a clothes dryer). But it is removed in exactly the same way. And now you have a clean blanket without belly.
Likewise, I decided to remove the textbook from the desk. Agree that it's very simple? But that's not all.
Stamp tool
Sometimes the first method may not be quite suitable for the purposes we need. But it doesn't matter. Photoshop almost always has several solutions for a specific task. And this case is no exception.

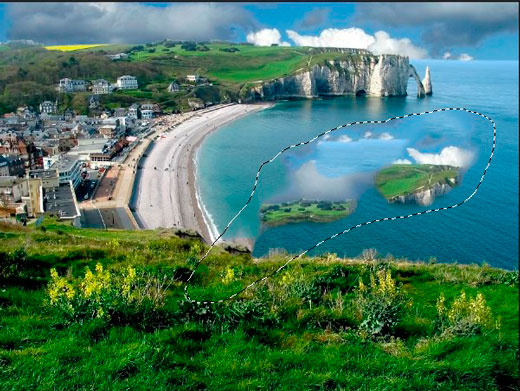
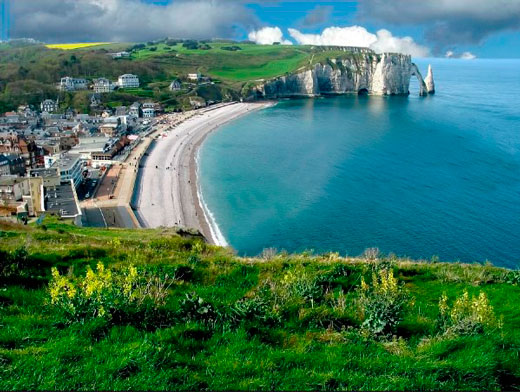
Let's take a picture of a beautiful coastal view. A beautiful view, but as you can see impudent birds flew past and got into the frame. I got it nicely, but let's say it's not needed there.
Then we roll up our sleeves, take the lasso and do all the operations from the first paragraph. Let's see what we've got. Somehow not very good, right?
The tool "Stamp" will help us with this. This tool is somewhat similar to Healing Brushwhich we used, but there are differences. With the restoration brush, we took the donor area and painted over the unnecessary detail with it in such a way that then the colors that correspond to this area were superimposed. When stamped, nothing like that happens.

If it is somehow difficult for you to understand this process in a text version, then I made a separate video tutorial especially for you. Happy viewing.
It turned out quite a good picture, as if it were. You can combine several methods to achieve the desired result.
Do you have photos where you can remove anything unnecessary? If so, then it's time to get rid of it. Well, if you want to explore all the possibilities of Photoshop in a short time, then I recommend that you look excellent video course... All information in it is presented amazingly and is designed for any level of user.
Well, that's all for me. I hope you enjoyed my tutorial today. Do not forget to subscribe to blog articles updates, then you will be the first to know about interesting articles and other interesting information. Check out other blog articles as well. I am sure that you will find something interesting for yourself. Well, I say goodbye to you. Bye Bye!
Best regards, Dmitry Kostin
Legends and unnecessary text can greatly spoil the impression of the picture. Quite often, you need to remove the inscription in Photoshop from the picture, from billboards or from clothes so that it does not distract the viewer's attention.
It is worth making a small reservation here - you do not need to remove watermarks and copyright lines from other people's photos. By doing this, you are violating copyright law. If you really want to use someone else's photo, look for photos licensed under CC0 license or contact the author and ask permission.
Let's first figure out how to cut out a lettering in Photoshop. This method is suitable if the inscription is on a sufficiently uniform background without pronounced details, object boundaries and color transitions.
Let's consider an example of how to erase an inscription in Photoshop without damaging the background (we added it on purpose).
Choosing a tool Lasso Tool / "Tool" Lasso "" and circle the inscription with the mouse.

A line of alternating white and black stripes appears around the word, sometimes referred to as "running ants."

After that, right-click on the selected area and select the menu item Fill / "Fill".

In the dialog box that appears in the Contents parameter, set the value Content-Aware / "Content-Aware"... This setting instructs the program to automatically fill in the selection based on what is shown next to the photo. In the case of homogeneous surfaces or some kind of texture, the result is high quality.

After that, click in the dialog box on the button Ok and we see that our text has disappeared, and Photoshop has "completed" the area as close as possible to the environment.

This simple and quick way allows you to remove text in Photoshop from a picture when it is written on uniform surfaces.
For more complex situations, a method based on using Clone Stamp Tool / "Healing Brush Tool".
Let's look at how to remove the inscription in Photoshop in the picture using the example of the photo below.

If you use the previous method, you will not be able to accurately restore the structure of the tree branches. You can, of course, single out one letter at a time, but even here it is not a fact that a decent result will be obtained.
Therefore, we choose the tool Spot Healing Brush Tool / "Tool" Spot Healing Brush "".

In the upper toolbar, set the tool size and be sure to specify that the parameter Type set to Content Aware... The meaning of this parameter is similar to that described in the previous method - Photoshop will try to restore the affected area, taking into account the structure of the image.
The size should be chosen depending on the size of the inscription, its font and letter thickness, as well as the size of the image itself. The best result can be achieved if the tool thickness is approximately equal to the font line width.
After deciding on the size of the tool, draw it along the contour of the letters by pressing the left mouse button. The affected area will be highlighted in gray. As soon as you release the mouse button, Photoshop will replace the caption with background and image elements. This allows you to retouch in small steps. For example, you can delete one letter at a time and control the result.

We continue to “circle” the letters until the entire inscription is removed from the photo.
These two methods, based on the principles of filling with the background in mind, allow you to very neatly, without traces, remove the inscription on the picture in Photoshop. The choice of a specific method and parameters of the working tool depends on the original image and the size of the inscription.
How to remove an extra object from a photo in Photoshop?Today we will talk about such an action in the Photoshop program as removing unnecessary objects or elements of an object. The need for such an operation, although it does not arise so often, but nevertheless, this operation is very necessary, because in this way you can save a good photo.
The traditional way to remove objects is the Clone Stamp tool. We will also tell about him. And at the beginning I would like to tell you about one fresh trick - this is deletion using the Fill with regard to content tool. We will show this first. Then we will also get acquainted with the following necessary techniques:
Content-Aware Fill is a reasonably quick removal of objects that are simple enough - more straightforward. For example, let's take a photo of the street from which you want to remove the post.
Load the photo, duplicate the layer for work. Next, select the Lasso tool, namely the rectangular one. We outline the pillar with it, leaving a little background around the edges.
In the window that opens, in the top line, select "Content-based". Often, this feature is already installed by default. Then you don't have to choose anything.
Leave everything else unchanged and click "OK". We get the result - the pillar has disappeared. The wires remained. A miracle happened :) :)
Here is such a simple, fast operation. But, let's go ahead and see how you can remove unnecessary elements on the face.
Removing an extra object from the face in the photo
Sometimes, when making portraits, it suddenly turns out that unnecessary objects are very well visible on the face. Most often it is acne. Depending on the number of acne, their location and shape, you can act in different ways. For example, we have such a portrait.
We upload the photo, enlarge it to the desired and convenient size and proceed to deleting it. The first option that can be used for small objects is a brush. But first, select the eyedropper from the toolbar and click it on a healthy area of \u200b\u200bthe skin. In doing so, notice that the foreground color has changed to the selected one.
Now you can start painting. Select the Brush tool, set the size close to the size of the object and click on the pimple until it is painted over.
As you can see, the pimple has disappeared. Delete the rest in the same way. If somewhere there is a sharp border between the place of the distant object and the original skin, you can use the Blur tool and correct it.
Also, with this tool, you can try and blur the object, provided that it does not sharply differ from the background. Here is the result of using these two tools. Quite an effective result, now you know how you can save a good photo.
As you can see, large objects are removed. The same can be done using the above-described "Content-Aware Fill" function. With the help of "Lasso" select the object, go to edit-fill. In the window that appears, select "Based on the content" and click ok. The result is the same.
How to remove an extra object from a face in Photoshop without losing the background?
In this example, we will consider not completely removing from the face, but from the portrait. We will remove the bow on the head. But, for complex objects on the face, you can use the same method. So, load the photo of the girl with the bow and duplicate the layer.
We need to remove the bow. Let's use the Content-Aware Fill method. Use the lasso tool to select the bow.
Now go to the Edit-Fill menu. By the way, you can make it easier. Click on the selected object with the right mouse button and select the same item in the menu that opens.
In the window that opens, select based on the content and click "OK". However, the bow was not cut correctly.
This problem is solved with the help of another tool - "Stamp". Find it on the toolbar. The icon looks like a stamp.
Next, press the "Alt" key and, while holding it, select the area with the stamp tool, which will replace the unsuccessfully deleted area. Naturally, we choose where the hair is well defined. Here is an example of the result of the first section, where the bow did not move away quite correctly.
Remove all other invalid areas in the same way. At the same time, do not forget to periodically change the cloning location by pressing the "Alt" button. This is due to the fact that moving around the shaded place, the area from which the copying example is taken, the same moves and can get to the color that you do not need. Here is the finished result of removing the bow from the girl's head.
As you can see, not a trace remained of the bow. The background is preserved, the photo looks natural.
Remove unnecessary things from a photo using the Clone Stamp tool
The stamp is also a very unique tool, like the fill discussed earlier. Let's see some more features of this tool. Let's say you need to remove an item from a picture like this:
Load it into the program, make a duplicate of the layer. Removing the haystack. Notice that the stack is in three different parts of the drawing. In the field and against the background of the forest and sky. Accordingly, we will remove according to these parts.
We start with the sky background. Select the stamp, hold down the "alt" button and click on a part of the sky background.
Because the haystack does not lie against the background of clouds. And more on the dark part, then select it. Let go of the "alt" button and draw a round stamp cursor over the top of the stack. Periodically, if necessary, again select a part of the sky for cloning. As a result, we get:
We clean up to the edge of the forest. Now we turn to the forest part of the haystack. Similarly, click with the "Alt" button held down on the forest and clean further. Result:
It remains to remove part of the haystack located in the field. It's a little easier here. There are many field textures, select any place and clean it. As a result, we get the finished image without a haystack.
As you can see, everything is very simple. Good luck with this great program.


Adobe Photoshop is one of the most popular programs for image editing, object creation and photo retouching. The ability to use the functions of this graphical environment allows you to correctly apply necessary tools editing to any situation. How to clean extra items in "Photoshop" and edit the whole image. It is useful even for those people who are far from the sphere of design, advertising and other similar professions. Probably, many have faced such a problem as unnecessary details in the photo. How to remove unnecessary items? There are several different tools in Photoshop that will help you deal with this problem.
Removing unnecessary items with Photoshop
How to remove unnecessary items in Photoshop? Superfluous objects can be of various geometric shapes, as well as have any location relative to all other objects. Considering all these factors, the user needs to decide which tool to choose in specific case... There are completely primitive tools that are trimming along the edges, and there are more sophisticated tools that allow you to remove complex graphic objects.
Frame tool
Excess items in "Photoshop" are removed both directly (cropping) and with the help of auxiliary elements. The easiest to use tool that helps you remove objects by shifting the graphic frames of an image is "Frame". Most often used when an unnecessary object is at the edge. It should be understood that along with unnecessary items, those that were also on the sides of the document will be removed. If the user nevertheless decides to use the "Frame", then you need to know that it can be of different shapes. Some instrument types differ in their interaction functions.
- First of all, the user must have the application launched and the original image open.
- The Quick Access Toolbar contains a cell in which the bordering tools are combined. We choose standard tool "Frame".
- A grid will appear in the working environment, consisting of two vertical and horizontal stripes, which mutually intersect each other. This is done in order for the user to appreciate the orientation of objects in the image (some may appreciate the effect of the "golden ratio"). The mesh can be moved in different directions, narrowed and expanded. In our case, it is necessary to narrow the frames to the desired size so that the extra object is removed outside the grid.
Pen tool
An extremely useful item that is used by all those users who are fluent in the program. Before removing unnecessary items in Photoshop, you need to familiarize yourself with the tool. Pen creates a work path that you can reformat to fit the selection and then work with it. The contour can be created for an object of any complexity - this is the main advantage of this tool.

- Before removing an extra item in Photoshop, you need to open the application and the document with the image.
- The Pen tool is in the main panel where all the other tools are.
- To start creating a path, you must first put the first anchor point on the "object-image" interface, through which you will then need to close the working path.
- The following anchor points must be placed along the contour of the object, which will be subsequently deleted. If part of the contour needs to be made in the form of a curve, then additional anchor points come to the rescue, which create the radius of curvature of the line. You can adjust them by holding down the left mouse button.
- The contour must be brought up to the very first point to create a closed perimeter.
- With the right mouse button we call context menuwhere the user needs to select the "Generate Selected Area" item.
- The region you just created must be deleted using the Delete key.

Selection tools
Besides the listed instruments, there are those that select an area using the cursor, some of them work on the principle of selecting adjacent areas and colors. Before removing unnecessary objects in Photoshop by means of preliminary selection, you need to decide on a specific case.

- Rectangular and oval area. In our case, the tool is no different from the "Frame".
- Fast selection and magic wand. It is based on the method of highlighting those areas that are close in color to the main area. It is used for processing text, small details.
The highlighted area is the area bounded by the marching ants. Created using various tools, most often from the group "Selection".
Such areas are convenient to use when selectively editing image fragments, they can be filled with color or gradient, copied or cut to a new layer, and also deleted. It is about deleting the selected area that we will talk about today.
A selection can be deleted in several ways.
Method 1: the DELETE key
This option is extremely simple: create a selection of the desired shape,

Push DELETEby deleting the area inside the selection.

The method, for all its simplicity, is not always convenient and useful, since this action can be canceled only in the palette "History"along with all subsequent ones. For reliability, it makes sense to use the following technique.
Method 2: fill the mask
Working with a mask means that we can remove an unnecessary area without damaging the original image.

When working with a mask, there is another option for deleting a fragment. In this case, you do not need to invert the selection.

As a result, the rectangle will be deleted.

Method 3: cut to a new layer
This method can be used in the event that the cut fragment is useful to us in the future.
1. Create a selection, then click PKM and click on the item "Cut to New Layer".

2. Click on the eye icon next to the cutout layer. Done, the area has been deleted.

These are the three easy ways deleting the selected area in Photoshop. By applying different options in different situations, you will be able to work as efficiently as possible in the program and achieve acceptable results faster.


