How to install a mod on a different version of minecraft. Minecraft how to install mods
Good day, dear visitors of the site. You have already learned how to play minecraft and now you want to learn how to install modifications on it. Therefore, in this article I will tell you how to install mods on minecraft using programs ModLoader and Minecraft forge.
But first, we will figure out what a mod is and why it is needed for the game. Fashion- these are additions to the game that are made by the players themselves, mods change, complement and improve the game. Therefore, it is much more interesting to play with them and the game itself will never get bored, because each mod brings something new to the world of minecraft. For example, you can add cars, planes, new mobs, biomes, worlds, weapons, tools, armor and many other things that diversify the already interesting world of minecraft.
Where can I get these mods? You ask. The answer is very simple. On my site you can download any different version.
Well, now let's proceed to the very description of the correct installation of mods on the game. First you need to install these ModLoader and MC Forge mods. You cannot do without them, 95% of all mods require the installation of these add-ons, which are needed to install and robots of mods.
On my website, you can find instructions for installing it in the description for each mod. Because the installation of mods is not the same, but is individual.
And so we will continue. If the description for the mod says that you need Forge to install, then download and install it. With its help, it is easiest to install mods on the game.
Let's analyze further installation with forge everything in order:
1) To do this, you must first install this software;
2) Then download the mod;
3) Now you need to find the directory with the minecraft game itself:
- For Windows XP - "C: / Documents and Settings / * Your profile name * / Application Data / .minecraft /"
- For Windows 7, Vista - "C: / Users / * Your profile name * / AppData / Roaming / .minecraft /"
4) We find in the folder with the game called minecraft another folder mods, it appears after installing forge
5) Transfer the archive with the downloaded mod or jar file to the mods folder
6) Start the game and MC Forge will install the mod on the game by itself.
Installation with this program differs in that it is automatic and easier.
But if the description for your favorite mod says that you need ModLoader then let's get acquainted with installing mods using Modloder:
1) From the beginning, download and install ModLoader itself.
2) Now you need to find the folder again and play minecraft:
For Windows 7, Vista - "C: / Users / * Your profile name * / AppData / Roaming / .minecraft / bin"
For Windows XP - "C: / Documents and Settings / * Your profile name * / Application Data / .minecraft / bin"
3) Go to the bin folder where you will find a file called minecraft.jar. In it you will install your mods.
4) Open minecraft.jar using WinRaR or 7zip programs (this can be done by right-clicking on the file and selecting the "open with" function)
5) Next, open the archive with the mod and transfer its contents with the replacement of files to the middle of the minecraft.jar file
6) After these manipulations, delete the META-INF folder from minecraft.jar. This is necessary in order for the mod to work normally.
All now, if you did everything right, I can congratulate you, you installed your first mod! Then you can simply remember this information and install them yourself or save this page so you always know how to install mods.
If something is not clear, you can watch the video:
Video how to install the mod on Minecraft version 1.15, 1.14.4, 1.13.2, 1.12.2, 1.11.2, 1.10.2, 1.9.4, 1.8.9, 1.7.10 and 1.5.2 from our visitor:
But I think that everything is concrete and well described in the article! I really hope that I helped you solve the issue of installing mods. I wish you a pleasant and interesting game! Keep on visiting my site I work for You!
This page was created for those site visitors who do not know how to install a mod for their favorite game. If you downloaded some mod from the site, you will need the WinRAR file archiver (if you do not have it installed, you will need to install it). Be sure to read the description of the mods carefully!
How do I install mods for Skyrim / Oblivion?
The installation for these two games is no different, below will be the installation instructions.
- unpack the archive with the mod;
- place the mod files in the directory with the Skyrim / Data game (Oblivion / Data), confirming the file replacements;
- go to Skyrim Launcher (Oblivion Launcher) and connect in it esp file for mod;
To install retextures, you need to copy the Textures, Meshes folders from the archive to Skyrim / Data (Oblivion / Data), confirming the replacement.
When downloading a particular mod, be sure to read its description, as it may contain additional installation instructions. Sometimes you need to install SKSE, SkyUI, etc. Also pay attention to compatibility and non-compatibility with other modifications. Remember that if installed correctly, you can get exactly the mod that you wanted to see in the game!
How to install mods for GTA 5?
Please note that if you have the .NET Framework version 4.0 or higher or Visual C ++ 2013 for a 64-bit system installed, then the mods may not work (not always so, but sometimes it happens).
The installation is quite simple and does not take a lot of time to understand it. For a successful installation, you just need to carefully read the description. Mods for GTA 5 are divided into regular and script, their installation is different.
Installing common mods on PC:
- to install the program Script Hook V(you need to unpack the archive with the program to the root directory of the game);
- place the mod files with the .asi and .ini extensions in the game directory;
- installation is complete, you can turn on the game and play.
Installing scripted mods based on .Net:
- install the Script Hook V program;
- download and install ScriptHookV .NET;
- place the mod files with the .ll, .cs, .vb extension in the scripts folder;
- you can start the game and play.
If you want to delete a mod, you just need to get rid of it in the root folder of the game.
How do I install add-ons for World of Tanks?
Installing mods: copy the mod files to the game directory, confirming the replacement. (for example World of Tanks / res_mods / patch version * /. This instruction only applies to single mods, installation for packs / compilations is done using the installation file, which you need to run and follow the instructions.
* - the version of the game, for example 0.9.10, 0.9.11, etc.
Installation of scopes: place the gui and scripts folders from the archive into the directory with the game (as a rule, the path is indicated in the description of the sight, be sure to read it!).
Setting penetration zones: copy the vehicles folder from the archive to the directory with the game, if you see confirmation of the replacement, click Yes, for all.
If you do not understand how to install this or that mod or some other questions, ask them in the comments, we will try to answer them.
I think that many of you do not know how to install the mod you like, now an instruction is provided for you.
Installing mods:
Windows 7, Vista - C: / Users / "User name" /AppData/Roaming/.minecraft/bin
Windows XP - C: / Documents and Settings / "User name" / Application Data / .minecraft / bin
"User name" - the name of your profile on the computer.
ModLoader and AudioMod are required for the mods to work correctly.
Download ModLoader, AudioMod. They are installed as usual mods, you see the instructions above.
At the moment, all of the above programs are version 1.1
You can find other versions here and here.
1. Follow this path to make a backup copy of minecraft.jar
2. Open the minecraft.jar archiver, which is located in the game directory, in the bin folder
4. And drag with the mouse all the files from the archive with the mod to the minecraft.jar archive
6. Done
Do not use texture packs when you want to play with the mod, otherwise the things that the mod adds will simply not be visible.
THIS IS A GENERAL INSTRUCTION FOR INSTALLING MODES !!! There are more complex mods that require separate installation instructions.
An example of such an instruction:
1. Go to the game directory, to the bin folder, and make a backup copy of minecraft.jar
2. Open the minecraft.jar archiver
3. Open the archive with your mod.
4. If there is a folder called "resources", we throw the contents of this folder into the "resources" folder, which is located in the game directory.
5. Drag and drop with the mouse all the files from the archive with the mod to the minecraft.jar archive (except for the "resources" folder)
5. Delete the META-INF folder in minecraft.jar, otherwise the game will not start, if it is not there, rejoice, you do not need to delete it.
6. Done
Server installation
1. Using the archiver, copy the files from the plugin folder (which is in the mod's archive) to minecraft_server.jar
2. Done
If you have any other questions about mod installation, you can contact ROBOCOP user.
Here's another video to help you understand how to install mods.
Http://youtu.be/2_LUeIVsVbI
Information!
1. Carefully look at the version of the mods, if it is, for example, for the game version 1.4, and you have a game version 1.5 or one with the necessary programs of the above other version, in comparison with the mod or game, you will just have a black screen after them installation.
Remember, everything should be under the same version of the game.
2. Some mods may not work if you have previously installed other mods. It is recommended to install the new mod on a clean version of the game.
3. If you failed to install the mod, then read carefully the Readme.txt file in the mod folder, if it is there, most likely to install this mod some non-standard actions are required, a detailed description of which is in this file.
4. It is impossible to use non-standard packs with textures when the mods are enabled, since you will not see new items in the game, you can only use special packs of textures that support the installation of some, usually the most popular, mods.
5. The most important of these three programs is ModLoader, in 90% of cases only one mod is enough to install a mod, some mods may even conflict with the GUI Api, you don't have to install it.
6. If you failed to install the mod or have any other problems, see the comments to this mod, they often give good advice.
7. If you do not have a mod that adds new blocks or items, try the following:
Find the mod file with extension .props or .properties or something similar.
Find the line / lines where the item / block ID is written
Change the ID to any other (for example: 12256)
Save changes
It may not always work, but it worked with the "Kaevator - Timber Framing" mod! (this solution was provided by user Vlad693)
8. If you do not understand anything, there is a way to install mods using the program, how it works is written here.
The article is taken from open source. If you are against posting an article, contact the site administrator.
Every real minecrafter has put mods at least once, because they can add absolutely anything, the main thing is to choose the most interesting one. But the problem is that not everyone knows how to install them. Therefore, this guide appeared:!
The guide will be for Minecraft version 1.5.2 and higher (1.6. *, 1.7. *, 1.8. * 1.9. * And so on), because before it was a little different.
1) Download and install TLauncher if you are using something else. It is much better, you can read about the features on our website on the launcher page, for installing mods it is good because Forge (if you do not know what it is, it will be described later in the article) can be installed in one click.
2) Select the mod you want to install, we have a directory: Minecraft Mods. We remember for which version of the game it was developed, we will use Plants Vs Zombies: Minecraft Warfare 1.7.10 as an example, that is, version 1.7.10.
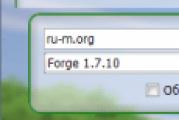
3) We go into the launcher, and select the version of Forge (This is an intermediate mod that processes all the others) for the version for which you selected the mod (In our case, Forge 1.7.10) and click "Install", then wait for the installation to complete and the first launch.


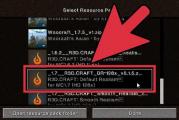
5) Find the folder " mods"(It will appear by itself, if it is not there, then you have not installed, but you can try to create it manually if you are sure that it is installed) and copy the mod file there, it will have the extension .jar or .zip (It may be packed in .rar , so you need to unpack it and transfer the file with the desired extension to the folder).

6) Run the required one from the launcher again. To make sure that the mod works fine, in the main menu, press the mods button and see the new mod there:

Done, now you can play with the new mod! We hope you understand now how to install a mod in Minecraft!
Sometimes Minecraft players get bored with the simple, familiar version. They want to add more variety to the game and go in search of new adventures. Mods (from the word "modification") allow you to supplement the game, add new elements in the graphics, increase the possibilities and expand the game world. For example, with their help, you can achieve the immortality of the protagonist, supply with new equipment and weapons. You can replace the textures of trees, houses and other structures that are boring for a long time playing with more interesting ones. For all this, fashion was invented. But many people ask the question: on Minecraft? "In this article you can find the most detailed answer to your question.
Important information
Before you should check their version, also check the version of the game itself. If the type of mod and game are different, then both elements will not work correctly. You should also find out what programs are required to install modifications. As a rule, these are Forge or ModLoader developments.
The first way is through Forge. First you need to download this program, it should be noted that it must correspond to the version of the game.
After that, you must open the minecraft.jar file (you can do this with any archiver). This document is stored in hidden folders with the game, which can be found by doing the following on a PC: open Windows 7 - C: / User / "Username" / AppData / Roaming / .minecraft / bin "Username" is the folder of your computer profile.
When you find the Minecraft.jar file, you need to open the archive with the Forge program and transfer all its contents to the Minecraft.jar file. After these two steps are completed, start the Minecraft game. In the meantime, Forge should scan the files for the given application and then create a Mods folder.

The next way to install a mod on Minecraft is through ModLoader.
First of all, download the latest version of the program from the official website. If you download the old type of this software, then the mod may not install or work incorrectly. Then open the Minecraft.jar file using the archiver. It is stored in and if its location cannot be found, then the path to the file will be described below:
Windows 7 - C: / User / "Username" / AppData / Roaming / .minecraft / bin "Username" is your computer profile folder.
The second step is to open the ModLoader archive and move all files to Minecaft.jar. And to install the mod you need, you need to move the folder with it to the Minecraft.jar file. After that, just go to the game and enjoy it.
Mods that do not need to install additional programs
There are add-ons that do not require Forge and ModLoader to be installed. To run them, you just need to open the Minecraft.jar file and move the mod folder to this file.

Read this information beforehand. Be extremely careful when downloading various modifiers, because instead of add-ons, you can download a virus. Always save information only from verified sites.
If you install a large number of modifications, they may be incompatible and conflict. In such a case, just delete some mods. Therefore, after installing this system, make a Minecraft backup. If the version of the mod and the client is different, then you should not install it, since they will not interact with each other. That's all, now you know how to install the mod on Minecraft.