Home servers dlna. Allshare PC Official Media Server
DLNA media server opens up wide possibilities for broadcasting video and other media files from one device to another via WiFi. Since this technology is cross-platform, it can be used to transfer pictures from a laptop or PC to Windows to a TV or Android set-top box. The previous article aroused such interest among readers that I decided to develop this topic and talk in more detail about the capabilities of the UPnP home media server on Windows, as well as how to organize work with the Home Media Server and SmartShare programs.
What are DLNA and UPnP?
The Integrated Digital Networking Network (DLNA) Consortium is a group of companies that have joined together to create a common, open standard for connecting devices. All devices that have DLNA support can automatically, while in the same network, be configured to receive from each other and view content.
What types of devices are DLNA capable?
DLNA-compatible devices are TVs that mobile phones, PCs and laptops, music players, game consoles such as Sony PlayStation 3, home media players, personal computers, Android phones, Blu-ray players, tablets, wireless printers, camcorders, flat screen TVs, routers and HiFi systems. First of all, make sure your device has this support. All DLNA certified devices carry a logo or sticker that indicates that the product has passed DLNA compliance testing and is able to connect to other certified devices. Further, the device should have a description of the type of digital content supported (for example, audio, video, photos), as well as the type of destination (for example, server, printer, player, etc.). More detailed description accepted designations at the end of the article.
The Digital Living Network Alliance currently includes most of the major players in the market, such as Intel, HP, Motorola, HTC, Microsoft, Samsung, LG and Panasonic. These companies create products that interact successfully with each other. Only Apple remained on the sidelines, which developed its own standard - AirPlay. So if you have a device from the Apple family, you won't be able to include it in your media network consisting of devices from other manufacturers.
How to use DLNA Media Server on Windows?
DLNA devices are designed to be interconnected. Each device is assigned its own class depending on its purpose. For example, any storage device belongs to the Digital Media Server class. These are mobile phones that store photos, music and videos in their memory. Any device capable of receiving and playing digital content from another DLNA device will be a Digital Media Player. This is your TV that can play videos, music and photos from other devices.
In order to create a home media server and start using it, you need at least one DLNA server to store content (for example, a laptop or mobile phone) and one DLNA device to play it, such as a TV.
DLNA devices connect and communicate with each other through a configured home network. The scheme of this network may be similar to the device of your home Internet network. In fact, the router is the central point of communication on the network and is used to connect devices to each other.
Here's a quick list of what you'll need:
- dLNA TV
- at least one DLNA digital media server such as a file server, laptop or phone
- router
- one of three for connecting the receiver to the transmitter: Powerline adapters (for distributing the Internet over the mains), Ethernet cables, or a wireless adapter to connect to your network.

Setting up a DLNA home media server on a Windows computer or laptop?
We have come close to the topic of setting up a home media server via DLNA. First of all, you need to connect a laptop and a TV that supports this technology (for example, Samsung with Smart TV) to the router. There are several ways to accomplish this. This is discussed in detail in, but they are briefly listed below. You decide which one to choose depending on how far the router is from your TV and other connected DLNA devices.
- Ethernet cable
If the router is close to the TV, an Ethernet cable is the easiest way to connect them.
Simply plug one end of the cable into the TV's Ethernet port and the other into the router port. - Wireless bridge
If you have a wireless router or your TV is remote enough, consider installing a wireless bridge to connect your TV to the router. The wireless bridge connects to the TV via the Ethernet port and to the router wirelessly. Or, if your TV supports WiFi via a built-in or external adapter, then connect it to the router directly. - Power supply, no cables required
A plug-in network is a great way to set up a network for your entire home. Installation using an electrical home network is simple and safe. Since the existing wiring is used, cables are no longer required for intra-DLNA connections. Almost all manufacturers of network equipment produce adapters for connecting to a wall outlet. They are called Powerline devices. Next, you just connect the plug of the router, TV and other devices to the power outlet as usual, but now all your devices will form a DLNA network
Some wireless routers, such as those from Buffalo Technology, are DLNA certified and specially designed for DLNA home networks.

Before you can transfer files from your computer, you need to install the appropriate software on it. Options include Windows Media Player 11 or 12 (included in the new version of Windows 7) or VAIO Media Server (for Sony TV), AllShare for Samsung, LG Smart Share, Home Media Server, etc. After installing the software, you can select files to transfer on TV - photos, videos, music files, etc. How the transfer takes place depends on the software used, but as a rule, it comes down to specifying a playlist, library or files, or adding them to the appropriate folders.

Let's now take a look at the most popular programs that allow you to transfer files from your computer to other devices.
Windows Media Player
To set up Windows Media Player to transfer files from laptop to TV, follow these steps:

SAMSUNG Allshare Software
You can download it here. More advanced compared to the previous program, but again only for Samsung. It is based on the * DLNA standard, and can be used to share multimedia content not only on the TV, but also on many other * DLNA-compliant devices: computers, tablets, camcorders, digital cameras, mobile phones, etc.
The order of work is as follows:

Now, for a better understanding, watch a video demonstrating how to work with these programs from Samsung.
Home Media Server - Home Media Server
This is another cool free program for organizing a full-featured media server from your computer, from which files can be broadcast to other devices on the local network - not only a TV, but also a tablet with Android OS, for example. Its plus is that it is suitable for any TV with support for network connections, for example, the same inexpensive LG. You can download the latest version.
Let's take a closer look at how to use the Home Media Server. After installing it, you will be asked several times to set the basic parameters - here we click “Cancel” everywhere, but we do nothing, since we will set everything up later.
We get to the main window of the program.

In addition to viewing files, this program also allows you to broadcast streaming from the Internet to your TV. But let's talk about this separately.
Hopefully, now all blog readers understand what a DLNA media server is (not to be confused with) and how to connect various devices to it. Well, after a careful study of all this information and competent implementation, you can build something like this:

By the way, the phone can also act as a server - but more on that in a separate article about. You will learn about the same by the link.
There are plenty of other delicacies for a snack - the most popular questions with answers, a glossary of terms and visual DLNA videos. And do not forget to subscribe to the blog news through the form below the article so as not to miss the next article in the DLNA series. It will focus on the Xbox Media Center Universal Cross-Platform Media Server (XBMC).
DLNA Server Setup FAQ
Are all TVs DLNA certified?
No, not all TVs support DLNA. To make sure yours is DLNA capable, look for the appropriate logo on it.
What should I do if my router is far away from the TV?
If your router is far from TV A and other devices, there are two options.
- DLNA: connect via wireless bridge or electric cable. This way you can connect your TV and devices to the router.
- DLNA wirelessly. This article provides detailed installation steps.
Is it possible to connect other devices to DLNA server via WiFi?
Some DLNA devices have built-in WiFi function. The way to connect via WiFi will depend on the device itself. You may need to activate WiFi or Network Sharing in order to connect to the router (and DLNA network).
My TV won't connect to the media server. What should I do?
- Check the cable and connections between the TV and the router, and between the DLNA devices and the router.
- Check your network setting on your TV. Details about connecting TV to the network are described in a separate article, the link to which I gave above.
What devices are DLNA capable?
There are a number of DLNA enabled devices. Check out the Integrated Digital Networking (DLNA) Consortium website
Some devices cannot be seen by my BRAVIA TV. What should I do?
If your BRAVIA TV cannot find content on another device, the following may be the case:
- Your TV or other DLNA device is not connected to the network.
- The problem is with the router or network.
- The other device does not have DLNA support or is not a Digital Media Server, in other words does not have the memory to store files.
- Your PC or laptop does not have the appropriate DLNA server software installed.
- Depending on your network settings, your laptop may need to disable the firewall function. You must be aware of the risks associated with this action. They are entirely your personal responsibility. If you are unsure how to proceed, seek professional help.
Which is the best way to set up your network - wired or wireless?
It all depends on the distance of the network components and on how desirable the presence of visible cables in the house is. A wired network, however, may perform slightly better than a wireless one. A few more tips:
- Try to avoid complicated network setup schemes with multiple subnets and hubs as this can affect the performance of your DLNA network.
- If you want to be able to stream HD video files, we recommend using a network with a speed of at least 200 Mbps for more stable performance.
- When choosing an Ethernet cable, choose Cat5e over Cat 5 as this will allow your network to run faster.
Can I rotate images when the TV is connected to a PC?
No, you cannot rotate images on the screen. You must rotate the image on your laptop or other device before it appears on the TV screen.
Photos are distorted on the TV screen. Why?
When a photo is enlarged, the image quality may deteriorate. For optimal quality, display photos at their native resolution, even if they do not fill the entire screen.
Are my photos not filling the entire TV screen?
Images may not fill the entire screen. It depends on their resolution and format. For optimum image quality, do not change their native resolution.
What file types are supported by DLNA devices
It depends on the device itself. Check the DLNA Certification for your device
or check out the DLNA website. Depending on the network device, some files may be converted before
transmission. Below is a list of files that are generally supported by DLNA devices:
- Images: JPEG, BMP, PNG, GIF, TIFF
- Audio: MP3, WAVE, AAC, AC-3, Ogg Vorbis, LPCM, AMR, WMA *
- Video: AVI, FLV, MPEG2-PS, MPEG4, H.264 SD, WMV, WMA
Can I store files on my TV?
No, your BRAVIA TV is a DLNA media player. This means that it is capable of finding and playing files from DLNA media servers that contain content. Your DLNA-compatible BRAVIA TV delivers an amazing audiovisual experience for watching movies and listening to music. In every sense, TV is the best DLNA media player.
Do I need to install additional software on my PC or laptop to transfer files? Where can I find this software?
Yes, in order for your PC or laptop to transfer files within the DLNA network, software installation is required. In some cases, such as Windows Media Player 11, the required software is already installed. Below are the programs that allow file sharing within the DLNA network, which you can download for free:
Is it possible to access iTunes or share and play DRM files on the network?
No, although it may also depend on the codecs supported by different devices.
Why aren't the names of files and folders with my photos displayed?
Some folders or files may not appear on the TV screen if certain characters are used in their names. Try changing the name and broadcasting them to the TV again. Please note that on many models, only the Latin alphabet is supported in the names of files and folders with photos.
My DLNA server device is listed on the TV screen, but no files are available. Why?
The connection between the DLNA device and the router may have been lost. Check cables and connections. To check if the connection between the DLNA device and the TV is working, you can also run the Auto Diagnostic Check, which is different for each model.
Sometimes the video quality when streaming wirelessly is quite poor. Why?
The quality of the wireless network connection may vary depending on the distance between the bridge and the router, any interference in the room, and the quality of the wireless router itself. For better image quality, use a wireless router that supports 5 GHz video streaming and place the router as close to the wireless bridge as possible.
DLNA Conventions
By using DLNA connections, you can design a link between any devices that work with this standard, each of which can act in different roles. A number of terms are used for their precise designations, which are described below.
The first group of device connections that are mainly used at home is called HND (Home Network Devices)

| DMS (Digital Media Server) is a media server. These are the devices that are the source, that is, which contain the files that we want to view on another device. This can be a computer with the special software listed above installed, a NAS device that has DLNA support. |

| DMP (Digital Media Player) is a media player or DLNA client. These are the devices that receive content from the media server and can either play it or transfer it to another device, acting as a media renderer. These are TVs, game consoles, independent monitors, home theaters, etc. |
| DMR (Digital Media Renderer) is a media renderer. A device capable of playing content received through a media controller, which in turn transmits it from the media server. Usually, they can do the same as listed above in media players. |
| DMC (Digital Media Controller) is a media controller. Allows you to find files on the media server and transfer it for playback on the media renderer. These are tablets, smartphones, digital cameras with support for WiFi connections. |
| DMPr (Digital Media Printer - devices that provide a print service for the rest - these are printers. Media players (DMP) and media controllers (DMC) are capable of transmitting printed information to them. |
Another group of devices - MHD (Mobile Handheld Devices) - are portable devices capable of transmitting and receiving content - mobile phones, tablets, smartphones, camcorders, cameras.

| M-DMS (Mobile Digital Media Server) - mobile media servers. Gadgets that are able to distribute the stored content to mobile players (M-DMP), media renderers (DMR) and printers (DMPr). these can be mobile phones or portable media players. |
| M-DMP (Mobile Digital Media Player) is a mobile media player capable of playing video from servers - stationary and mobile (DMS and M-DMS). This role is played by telephones, PDAs, | |
| M-DMU (Mobile Digital Media Uploader) - portable gadgets capable of uploading files to servers. For example, digital cameras, cameras or telephones. |

| M-DMD (Mobile Digital Media Downloader) - portable devices that can find and download media content from DMS and M-DMS servers (mobile phones and media players) |
| M-DMC (Mobile Digital Media Controller) are portable media controllers that have the ability to find content on media servers and broadcast it to DMR media renters - phones and PDAs. |
- DLNA - what is it and who needs it
- Windows media server dlna,
- A short overview of dlna server programs
- Home media server is the best among equals, or a user's headache
- Server side setup
- Alternative and development
DLNA (Digital Living Network Alliance) - a set of technologies for real-time display of various kinds of media content by devices united in one local network. Initially, several companies (Sony, Intel, Microsoft, Samsung Nokia, Matsushita, Philips, Hewlett-Packard) developed this standard, and also united into a group to create devices compatible with this technology. At the moment, there are more than 200 manufacturers producing compatible equipment.
home media server setup
In simple terms, this is a stationary computer, laptop, tablet, smartphone, TV and other "smart" equipment for viewing photos and video files, listening to musical compositions. Media content becomes common for each device on the local network. All gadgets must be on the same IP network and connect to each other either wired (Ethernet) or wireless (Wi-Fi).

How to set up dlna
All devices with dlna support are conventionally divided into two types: servers and media players. The former mainly store and provide others with access to content. The latter, for the most part, only reproduce the files the user needs. For example: a personal computer contains photographs, it can store and play them both on its monitor and on the screen of a networked TV, tablet, or phone.
The division is conditional because now a lot of mobile electronics can both store and display content. For example, smartphones with special software installed may well play the role of a server.
This technology is very useful for users with a large number of "smart" devices at home, as it allows you to store multimedia content in one place, and not in the memory of each device. A very relevant "trick" for significantly deprived of memory mobile devices.
Windows and dlna
In the operating system from Microsoft, this technology appeared starting with version 7. However, it is hidden so deep that it was rather difficult for an ordinary user to find it and configure it. In Windows 8, it became possible to use for playing video files on devices connected to the local network.
This is done by right-clicking on the file and selecting the Send to ... item from the menu.

But before that, you still need to configure your home media server. In the "Control Panel" we find the item "Home Group", in the window that appears, select "Create a home group". Next, we will be prompted to choose which type of file is accessible for the homegroup.

In the next window, we need the item "Allow all devices on this network, such as TV and game consoles, to play shared content", after clicking on which you will need to come up with a name for the media server and enter it in the proposed window.
This completes the setup and you can already play the allowed files with dlna devices on your computer. To do this, each of them has certain points (AllShare, SmartShare ...).
A description of how to use them is included in the instructions for use.
It is easy to use the software built into the system and it consumes less hardware resources. However, there is a high probability that the format of various media files may not be understood by the player, since Windows transfers them as they are. Third party programs have been created to solve this problem.
Overview of dlna server programs
Of the many dlna media server programs, several stand out. They are all free, but provide additional features for a fee. All the rest are either highly specialized, or simply provide information transfer in the local network and are an add-on to the Windows server. The following programs create a home non-Windows dlna server.
Codi - a project that grew out of XMBS. Thanks to its cross-platform functionality, it works on Windows, IOS, Linux, Android.

It is a huge "media combine" that can find on the network, recode, download, play a huge number of formats. For this, we greatly appreciate the users of TV set-top boxes.
A very bulky home media server is initially difficult to configure, it has a minimum number of add-ons. Different items are downloaded and installed for different functions. In this regard, it is rather difficult to set up, but it has great support and Russian-speaking too.
Plex Is another multi-platform home media server. It has high-quality localization and a huge number of features. But in this regard, it consumes a lot of system resources and is usually used for individual devices used as multimedia set-top boxes.

HMS - a program with a huge number of functions, absolutely free. The main difference is the on-the-fly file transcoding for playback even on older devices. It works only in the Windows environment, consumes significantly less resources, and therefore can be installed on a regular home computer. We will consider setting up this program below.
HMS server part (home media server)
The program interface is simple and setting up the first launch takes place in a few clicks. Before setting up the TV, first click the "Settings" icon, on the "Media resources" tab, add folders that can be viewed by connected devices. Adding is done by clicking on the "+" on the right side. For each folder, you can select the type of files that further helps when searching for them. \u003d\u003e

On the next tab "Devices" we add devices that are allowed to access files. It is very convenient to select the type of gadget from a variety of presets at the top of the window. It includes a large number of game consoles, TVs from different manufacturers, smartphones and routers. As a result, the settings will change for each selected device. If you check the box Add devices automatically, the program will automatically detect the type of device and adapt to it.
In the "Server" tab, we only need to enter a name for the created server. The rest can be left blank, unless of course there are several networks and connections at home.
The item "Transcoder" allows you to set up data transcoding so that any connected device would play data, regardless of whether it supports them or not. The configured HMS processes the file in real time into a format supported by the TV.
The rest of the tabs will allow you to fine-tune the program, which most users will not need at the initial stage. Therefore, we close the settings and click the "Run" button at the top of the window. After that, the media server will start scanning the folders open for access and create lists of files that the connected dlna device will see.
In the main window of the program, you can also select the resource we need and, through the menu, by the right button, transfer it to the player on the network. It is very convenient and you do not need to search for data by the dlna device itself.
The program has great user support. The official forum thoroughly understands the problems in the operation of software with various devices, which helps to configure any technique.
Configuring a client device
The process of setting up equipment for playing multimedia files is different for each device and is usually indicated in the instructions for use. The same point on any device is the choice of the server, the name of which we came up with when setting up. And a request to connect to the network, a positive answer to which needs to be done only once, in the future the server will be considered allowed.
Alternative
Recently, there has been a rapid development of cloud technologies. There are more and more devices that have access to the Internet. And storing data on physical media is no longer so relevant. Of course, a collection of films of several hundred copies can hardly fit into any cloud service. And to increase the amount of allocated space you will have to pay. This requires an unlimited Internet channel with high speed.

Media resources are stored in the "cloud", and access to it is provided to any device connected to the account. The plus is that there is no need for the dlna server side as a separate device. Simply put, you don't need a constantly working hard drive with a lot of files. Access to files is not only within the radius of the home local network, but also throughout the territory where there is access to the Internet.
With the development of Internet technologies, the home dlna server, dlna gives way to "cloud" data storage, leaving the former the opportunity for the time being to exist in apartments that do not seek modern user technologies.
Before starting the story about setting up the program "Home media server", I would like to clarify that this program will help solve the issue "How to watch movies, listen to music from a PC on a TV with DLNA technology"... This includes Samsung's AllShare technology. Download program "Home media server" you can follow this link.
Supported HMS operating systems:
- Windows 95, 98, ME, 2000, XP, 2003, Vista, 7;
- UNIX-like systems using Wine;
- MAC OS using WineBottler, CrossOver Mac.
Adding directories of media resources to the Home Media Server program
- button "Settings" - section "Media resources" - page "Directory List" — Add
- drag (and release) the required directories from Windows Explorer (and release) into the main form of the program (can be used with the standard file search in Windows).
To access the server through a browser, you must enable the mode Web, set the constant server port in the section Settings - Server - "Port" field (value from 1024 to 65535). Accessing the server from the browser:
http: // Server IP: The specified server port.
Server IP address can be found in the section Settings - Server - List of allowed network connections - Search.
Launching the Home Media Server program
Pay attention to all messages that may appear from firewall programs when you first start the server.
Click the button "Launch" in the button bar of the main program window. If the server starts successfully, the button "Launch" will become unavailable, but buttons will become available "Stop" and "Restart", there will be lines in the message log
"Server start".
What to do in case of errors when starting the home server
- check the list of available network connections in the program settings (section Server - List of allowed network connections - Search). If the list of allowed network connections is not empty, then compare it with the list of available network connections by clicking "Search".
- check the settings of the firewall program used, the Home Media Server (UPnP) program must be allowed network activity, for stricter rules, UDP port 1900 must be open for incoming and outgoing packets, the server TCP port specified in the program settings must be available for incoming connections.
You can create a list of allowed network connections from the list of available network connections, mark the network connection for inclusion in the list in the first column. If for the media server in the program settings (section "Server" -field "Port") is set to a constant port number, then the availability of the media server can be checked from the browser at http: // Server IP: The specified server port... If so, the media server welcome page will open. If the section Program settings - Device , web mode is on, the top level of the media resource base will open.
Auto start home media server
- Enabling automatic server start when the program starts: Settings button - "Advanced" section - "Server autostart at program start".
- Autostart of the program when the user enters windows system: Settings button - section "Advanced" - "Startup program at the start of a Windows session".
- Installing the server as a Windows service: Settings button - Advanced section - Installing Windows Home Media Server (UPnP) service.
Options for connecting media devices to the server
You can familiarize yourself with the options for crimping network cables. To avoid misunderstandings, a TV is also meant by a media device.
- Computer - Media device... A crossover cable must be used for the connection.
- Computer - Switch - Media device
- Computer - Router (router) - Media device... Straight-through cables must be used to connect devices.
- Computer - Wi-Fi router - Media device. For more information on the wireless connection method, see the article .
The operation and settings of the media server do not depend on the connection option. When using a router, enable the mode of automatic assignment of IP addresses to devices, for details on configuring a router (router), read the article. When using 1 and 2 connection options, IP addresses are assigned manually, the addresses must be different in the last part of the IP address, the subnet mask is 255.255.255.0, the default gateway is the IP address of the computer, if necessary, you can specify the address of the DNS servers. Example: computer address is 192.168.1.4, media device address is 192.168.1.5.
Search for a server in a media device
The search for a server with shared folders is performed according to the user manual of the media device. If you have any questions, refer back to the above-mentioned Allshare and Smart TV articles.
If the server is not found, but all connections are made correctly, then in the program settings (Server section) check that the list of allowed client devices is empty or the device's IP address is in the list of allowed. When using a firewall program, check the rules for accessing the module's network hms.exe (if the server is running as a Windows service, then for the hmssvc.exe module), if possible, put the firewall in learning mode, restart the Home Media Server (UPnP) program. If you are using other media servers, then it is better to turn them off during the setup phase.
If the server is found, but there is no way to open it in the media device
The Home Media Server (UPnP) settings that may help resolve this issue are section Device: mode "DLNA 1.0", "DLNA 1.5", "Authorization service", "Russian names of the main folders", in the Server section set the constant server port (from 1024 to 65535).
Navigating files on a media device (TV, media player)
If the device supports the Russian language, then in the program settings (section Device) you can enable the mode “Russian names of main folders”, this affects the names of the main folders of the media resource base. If the Russian language is not supported by the media device, select Transliteration for the encoding of Russian names, the “Russian names of the main folders” mode is enabled / disabled at the user's request (if disabled, then the English names of the main folders of media resources will be displayed).
The folder names can be changed in the main form of the program by the right mouse button - the item “Change name”.
Excess folders of media resources can be deleted in the main form of the program by right-clicking the "Delete folder" item, or the "Exclude empty folders when transferring information to UPnP devices" mode can be enabled in the Device section.
Slow navigation through the media resource base can be associated with the peculiarities of the media device, the inclusion of the "Exclude empty folders when transferring information to UPnP devices" mode, the presence of slow removable media in the system, frequent changes in media resource directories, and the "Automatic scanning directories when they change while the server is running ”. The mode "Exclude empty folders when transferring information to UPnP devices" can be disabled, the "Removable media" folder can be deleted in all sections of media resources (Movies, Music, Photos).
Navigation through the catalogs of media resources in the structure of their storage on the disk can be performed through the folder "Watch Folders" (Russian is off), "Catalogs of media resources" (Russian is on).
If some media resources are not visible on the media device, but are present in the main form of the program, then this may be due to the mime type transmitted by the server for this media resource. The mime-type can be changed in the program settings - the Settings button - the "Media resources" section - "File types" - the choice of the file extension - the Change button.
Watching movies from the server
The server can transfer movies to the media device in their original form or through transcoding (converting the movie into a format supported by the media device). The movie is automatically transcoded if the file extension is not in the list of supported ones or the transcoding profile is selected for the movie. Configuring movie file extensions supported by media device: button "Settings" - section "Device" — "Built-in file support" — "Films"... The list of file extensions is formed according to the user manual of the media device or information on the website of the manufacturer of the media device. If the movie is played in its original form, then the choice of the audio track and the subtitles included in the movie file is possible only if the media device supports this choice. When you select a movie through the Transcoding folder, you can select the audio track, internal and external subtitles, audio delay, transcoding profile for converting the movie.
Transcoding profile - a script (macro) that generates parameters for calling the transcoding program or performs transcoding using DirectShow. Editing transcoding profiles: button "Settings" - section - button "Profiles".
The used transcoding profile can be selected:
- for all films: Settings button - "Transcoder" section - "Transcoded file parameters" - Films - "Transcoding profile"
- for movie files of a certain type (extension) - Settings button - "Media resources" - "File types" button - file extension selection - Change button - "Transcoding profile"
- for a specific movie: in the list of movies in the main form of the program by the right mouse button - “Transcoding Profile” or through the navigation of the media device, if the movie is selected through the Transcoding folder in the Settings folder, generated by the server for each movie.
When playing movies, media devices usually stretch the video to full screen, therefore, in order to maintain the aspect ratio of the movie frame, the server generates parameters to complement the original frame size with color to the frame size specified in the setting. The setting of the transcoded frame size and the color of the padding are set in the program settings - the Settings button - the "Transcoder" section - the "Codecs, frame" page - "Frame size". Color padding is not supported by all transcoder programs, so if you select a transcoding profile other than the main ones, it may not be available.
Causes of errors when playing movies from a home media server:
- the original movie file is selected, in which the format, encoding of video or audio track is not supported by the media device, a possible solution to the problem is to select a movie through the Transcoding folder
- a movie is selected through the Transcoding folder, in which the encoding of the video or audio track is not supported by the transcoder program, a possible solution to the problem is to select a different transcoding profile for the movie; problems with the audio track can also be solved by setting the number of channels in the program settings (section Transcoder - page "Codecs, frame") - 2
- media device or server unavailable: restart media device or server.
Reasons for stopping / slowing down content playback:
- the termination of viewing may occur due to insufficient disk space used to store temporary files; exceeding the file size supported by the device; exceeding the maximum size of the transcoded file specified in the program settings (section Transcoder - "Parameters of the transcoded file" - Maximum size).
- the transcoding speed of the movie is not enough for viewing, you can check this in the main form of the program: perform a test transcoding by PCM in the list of movies - The transcoding speed (fps parameter) must be higher than the frame rate of the movie. If the "Transcoding panel display" mode is enabled in the program settings (Transcoder section), then the transcoding speed can be viewed in it after selecting a movie on the media device. You can also turn on the transcoding speed indicator (section Transcoder - "Subtitles, speed indicator"), if the transcoding speed is less than the value specified in the program settings, the current transcoding speed will be displayed on the frame of the movie at the location specified by the user.
Solutions to the above problems:
- select a transcoding profile for viewing with a smaller frame size, video quality
- if the encoding of the video track is supported by the media device, but the movie file format is not supported, then you can select a transcoding profile that converts the movie file format and leaves the video track unchanged (“Movies - TsMuxer” transcoding profiles - formation of m2ts files, “Movies - WMF "- formation of wmv-files). For the "Movies - TsMuxer" transcoding profile, you must additionally download the TsMuxer transcoder program from the home page (in the Transcoding profiles setting)
- stop watching a movie on a media device to form a transcoded movie file sufficient for viewing
- specify a drive for storing temporary transcoding files that is different from the one used by the system to store the paging file
- optimize the system as a whole - check disk fragmentation, the list of startup programs, etc.
Settings of the Home Media Server program on the example of my TV model SONY Bravia KDL-46XBR9
Install, run the Home Media Server program on your PC, go to Settings by clicking on the corresponding button.

On the right is the "Add" button for disks / directories with media content. In this case, you can choose which of these files will be scanned when the program starts. Scanning is necessary if you have changed the contents of this directory and there have been changes. A green circle notifies that the type of these files is being scanned.
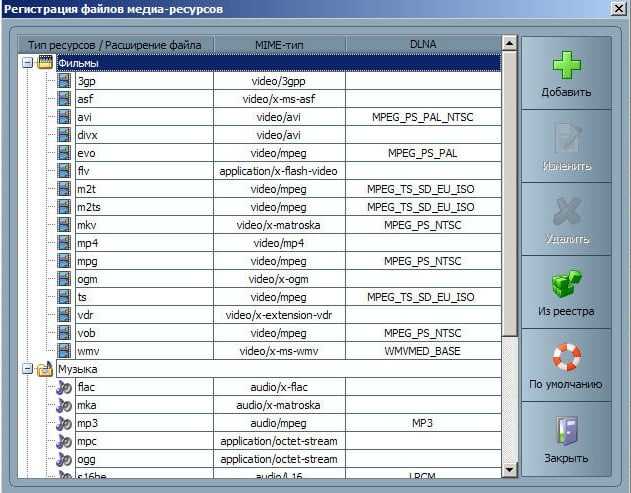
Now it's worth paying attention to the File Types button on the right pane. Some TV models cannot play PAL video files, you need to add NTSC for the content to be recognized. (for example, MPEG-PS_PAL_NTSC for * avi).

For the * mkv container, select the Transcoding Profile - Core AVC. In DLNA, enter the line MPEG-PS_PAL or MPEG-PS_NTSC, depending on your TV.
Now let's look at the left panel "Categories" - "Device". Here you will need to select the type and resolution of your TV. DLNA1 and DLNA1.5 is the old and new version, you will learn about the supported DLNA version of your TV from the manual or on the official website. Also here you can configure Web access to the server. Let's move on to the next category on the left pane of the Server settings section.

Add your TV to client devices (look in the menu, TV network settings for static IP). When you click on the lifebuoy icon, the program will automatically determine the name of your computer and add it to the Server - Name line. Use the Search button to identify devices connected by DLNA technology on the network. Make sure the TV is turned on and connected to a wired or wireless network. After scanning the network, the program will add the found network clients (PC and TV). Click on TV and go to client settings.

By clicking on the Settings button, you will be taken to the individual settings of the device. Set the settings we talked about above.
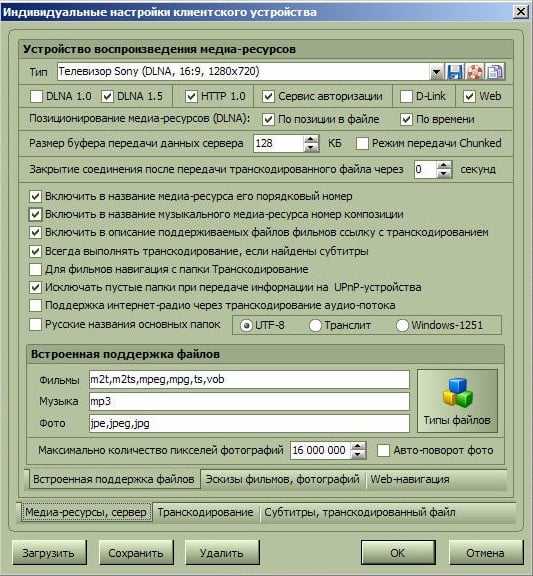
When you click the "File Types" button, you will be taken to the file registration settings, where you can make the necessary changes.
Return to the main settings window and go from the left panel to the "Transcoder" category.

Set the settings according to the image and go to the bottom tab "Codecs, Frame".

Draw your attention parameter section "Sound - Original soundtrack if compression is the same"... Unchecking this checkbox will help avoid losing the Russian track when playing video. Remember that before transcoding each file can be viewed and modified if necessary.
The next tab we will look at is "Subtitles".

In this window you can customize the subtitle display style to your taste and other parameters necessary for their correct display. Let's take a look at the last category of the left panel "Advanced".

Check the checkbox Installing Windows Home Media Server (UPnP) Service... Thus, the program will automatically load when the computer is turned on as a service, I wrote about this in the Automatic server start section.
It's no secret that over time we accumulate a lot of all kinds of films, photographs and the like, and this is all usually stored on a computer.
But it would not be bad to watch a movie that you just downloaded from the network on a large TV, and not on a PC screen, but for this you need to transfer this movie to a USB flash drive, or burn it to disk.
In a word, a lot of unnecessary movement. But there are solutions, this is a multimedia server.
Don't be alarmed, this is not exactly a separate computer with hard drives. This is a program that performs strictly assigned tasks.
Let's take a look at several programs that can provide access to media content from other devices or programs.
Let's start with the theoretical basics of what DLNA and Smart Share are.
DLNA (in its own words) is a technology that allows devices that are connected to the same network and support DLNA technology to exchange media content (video, photo, music).
Now, almost all devices support DLNA technology: computers, TVs, smartphones, game consoles, etc.
Smart Share Is a proprietary application (technology) by LG. If I can say so, then this is a kind of shell for working with DLNA.
Other TV manufacturers call these programs differently. Samsung has AllShare. SONY - VAIO Media Server.
And so, without a doubt, you can watch photos, films, etc. on TV that are on your computer or even smartphone.
But from the beginning you need to set up DLNA (Smart Share) between PC and TV. (TV must be able to connect to the network)
What does it mean?
This means that both the TV and the computer must be connected to the same It does not matter how they are connected. (via Wi-Fi or cable)
And so you have a router, but there is no Wi-Fi in the TV. We can simply lay a network cable from the router to the TV.
Our router must be connected to the Internet and configured. Also, we need a network cable. We connect one end of the cable to the router, into the yellow connector.
On the TV, connect the other end of the cable to the network connector.
 And you can debug the router itself from the knowledge gained in this article:
Next, we need to configure the distribution of files from the computer so that the TV can play videos from the necessary folders, or display photos. We just need to open access for this. This can be done even with the standard Windows Media Player.
But there is a very good and absolutely free program “ Home media server (UPnP, DLNA, HTTP)», Which is an excellent analogue of Smart Share from LG, or for example AllShare from Samsung.
And so, friends, a media server for a computer that will pump your TV and make it much more functional.
Home Media Server
 Home media server (UPnP, DLNA, HTTP) is a program that provides media resources (photos, audio and video files) of your computer to other UPnP (DLNA) devices on your home network.
For example, TVs Philips, Sony, Samsung, LG, Toshiba, game consoles Sony Playstation 3, XBOX 360, media players WD TV Live, Popcorn Hour, Dune, Boxee Box, IconBit, ASUS O! Play, iPad / iPhone / iPod, mobile and PDA devices.
The program includes various transcoders of audio and video files that allow converting media resources into a format supported by the playback device.
It is also possible to convert the frame format of video files to the display format of the playback device (the color of the padding is set by the user), the choice of an audio track, subtitles. You can choose transcoding from any minute.
The program includes transcoding profiles for VLC Media Player, you can redirect streams of Internet radio, Internet TV from your computer to your media devices.
The program supports Digital TV (C, S, T), you can redirect digital TV streams from your computer to your media devices.
The program supports control of DMR (Digital Media Renderer) devices, you can use the Play To function for an individual device and a group of devices.
This is a whole combine, the functionality of which knows no boundaries.
The only drawback will be the terrible interface of the program, but since it is needed to play movies on TV, this will not be a big problem. The program is absolutely free and only available in the Windows version.
First, we need to download and install the program itself. I recommend downloading from the official website: https://www.homemediaserver.ru/index.htm... There is always a new version!
After installation, launch the program with a shortcut on the desktop. Let's go to the program settings. We will not do anything special there. We will simply indicate local drives, flash drives, external hard drives, or folders, the contents of which we want to see on the TV.
For example, you can only open a few folders with movies, photos and music.
 A window with settings will open. In the first category, Media Resources, we need to specify which disks or folders we want to see on the TV. By default, standard folders with photos, videos and music are open there.
The program tries to sort everything. And in order not to get confused in all these folders on the TV, I advise you to open shared access to local drives. This means that you can open any file on the TV that is stored on these local drives (drives C, D, E, etc.).
You can also specify individual folders, or for example an external hard drive. To do this, click on the Add button on the right, and select the desired folder, USB flash drive, or hard drive in the explorer. These are the basic settings, click on the Ok button, and agree to scan media resources.
Further, you can already start the DLNA server itself. To do this, just click on the "Start" button. Now, just turn on your TV. If everything is connected correctly, then it should appear in the "Home Media Server (UPnP, DLNA, HTTP)" program.
To do this, go to the Playback Devices (DMR) tab, and on the right, click the Update button.
VIDEO:
So Plex .
The most popular and, perhaps, rather convenient option. Having started the server on a computer, you can control it from a browser, set up a media library, add subtitles, and more.
Plex downloads all information about the movie automatically and does it perfectly in most cases. The TV sees the Plex server without any problems and plays everything perfectly.
The downside of Plex and other similar programs is that the TV does not see the subtitles embedded in the movie, but for me it doesn't really matter to you.
Plex is free, but additional features require a subscription.
https://plex.tv/
PS3 Media Server.
The PS3 Media Server was originally distributed as an add-on to the PlayStation 3, allowing the console to play movies on a TV.
Then the program began to live a separate life. Like previous alternatives, it supports DLNA playback and does not require any setup hassle.
http://www.ps3mediaserver.org/
Serviio is far from the most popular multimedia server. The app is free, but for $ 25 you can buy the PRO version, which allows you to access your content from any network, not just your home network.
And this allows you to play content from the WEB (this function is given as an introduction and in the free version). Serviio has applications for Android, however they act as a secondary control panel for the server side on the computer.
http://www.serviio.org/
Kodi or (XBMC)
XBMC was created to bring video playback functionality to the Xbox. Then the project spun off and now Kodi is one of the most popular media centers, supporting almost all platforms due to open source.
Kodi has iOS and Android apps that let you use your smartphone as a remote control. The service lives on donations and is completely free.
http://kodi.tv/
Good luck Friends!
Today you will learn how to properly connect a TV to a computer and all the possibilities of such a connection, as well as how to organize viewing your media library on Smart TV and other devices that support a home DLNA server.
What is DLNA?
The Integrated Digital Networking Network (DLNA) Consortium is a group of companies that have come together to create a generally accepted open standard for connecting devices so that all DLNA-enabled clients can automatically view media content from each other while on the same network.
What devices support DLNA?
DLNA technology is compatible with any device:
- smart TVs;
- smartphones and tablets;
- PCs and laptops;
- media players and Blu-ray players;
- game consoles;
- home media servers (NAS);
- wireless printers;
- photo and video cameras;
- audio system.
All DLNA-enabled devices have a corresponding logo or sticker indicating the type of digital content supported (for example, audio, video, photos), as well as the purpose: server, printer, player, etc. Most devices from major manufacturers such as Intel, HP, Motorola, HTC, Microsoft, Samsung, Sony, LG, Panasonic, etc. have DLNA support. Apple has developed its own standard - AirPlay. If you have a device from Apple, then using it in your media network consisting of clients from other manufacturers is not possible.
How does DLNA network work?
As you already understood, DLNA devices are designed for interconnection: creating a multimedia network among themselves. Each device is assigned its own type depending on its purpose. For example, any storage device: a smartphone, media player, TV or PC, can belong to both the Digital Media Server and Digital Media Player types, because they are able to both receive and play digital content from another DLNA device.
How to create a DLNA network?
A wireless router (or wi-fi router) is the centerpiece of a network and is used to connect devices to each other on a shared home wireless network.
Equipment for building a home network with DLNA
You will need:
- dLNA TV;
- dLNA digital media server (such as a file server, PC, laptop or media player with HDD);
- wi-fi router.
I will talk about building a DLNA network not only with a wireless connection, you can also use a wired method of connecting devices, instead of a wi-fi router, use a regular router (switch) to connect a file source (home server - DLNA server) with a display device (DLNA customer). You can also use (to distribute the Internet through the power grid), in addition to this, you will need Ethernet cables to connect devices to your network.
How to set up a DLNA home media server?

1 Connecting a TV with DLNA support to a wi-fi router (for example, Samsung with Smart TV).
Option 1 - wired connection... Connect with an Ethernet cable to the router. It is enough to connect one end of the cable to the LAN port of the TV, and the other to a free port of the router (or switch, depending on the structure of your network).
Option 2 - wireless connection... If you are using a wi-fi router (wireless router), then it is enough to connect the TV to an existing wireless network via a built-in or external (USB) wi-fi adapter directly to the router. If the TV is far from the router, then you can install a wireless bridge (use the router in Bridge mode or buy) to connect the TV to the router. I also recommend reading the article about. The wireless bridge is connected to the TV via the LAN port, and to the router via a wi-fi access point.
Option 3 - Connect with Powerline Adapters... This type of connection uses a power grid without Ethernet cabling. This method will help you set up your home network using your existing electrical wiring and you will no longer need cables to connect DLNA clients. Powerline adapters are produced by almost all manufacturers of network equipment: TP-Link, Netgear, D-Link, etc. They are called Powerline devices. Next, you just connect the plug of the router, TV and other devices to the power outlet as usual, but now all your devices will form a DLNA network.
2 Adding Other DLNA Compatible Devices to Your Home Network

Now you can connect DLNA servers (devices from which you want to play files on your smart TV) to the router - PC, laptop, phone or media player. All servers will be displayed on the smart TV since they are on the same network and content that is stored on their media can be played. Exist different ways settings for various types of devices on the DLNA network.
DLNA PCs and Laptops
Connect your computer or laptop to your router or router using any of the above options. The most important point in setting up DLNA on a PC or laptop: the need to install the appropriate program - a media center (media shell). The most popular of them (for each program there is a link with information about it and settings):
- Serviio
It is possible not to install media center applications to create a DLNA server, but to use Windows Media Player 11 or 12. To use them as a DLNA server, you must allow access to files on your laptop or PC: open Windows Media Player, go to Options menu, then click the Sharing tab windows files Media and activate media sharing.
 Kodi media center interface window
 You can select a media shell to use as a DLNA server from the list above. After installing the program you like to create a media center (DLNA server), you should configure it and select files (photo, video, music files) for transmission to a TV or other display device.
DLNA mobile devices
3 DLNA setup on TV
After you have connected all DLNA devices, turn on the TV and go to the home screen of your Smart TV (for example samsung TV). Search for and launch the AllShare app to find music, photos and videos stored on DLNA devices on your network.
If you have a Sony TV (pre-2015 model), then you need to turn it on, press the "Home" button and turn on the "Media Player". After you select the type of content: music, photos or videos, you can see the DLNA servers on your home network.
4 Using DLNA on Android OS

To watch videos from a computer on smartphones and tablets with the Android operating system, you must install special application... There are quite a few such applications, I can recommend MediaHouse or Bubble UPnP, which can be downloaded for free on Google Play.
After you install the application, you need to take a few simple steps:
- select the source - your computer or other device with DLNA support and installed, from which you will watch the video;
- choose a receiver, that is, your Android device;
- select a video from the list of available files.
In addition to universal apps, mobile device manufacturers offer their own DLNA-enabled software. Samsung has AllShare, LG has SmartShare, etc.
Using DLNA-enabled apps on Android devices requires no configuration. It is enough to launch a DLNA server (for example, Kodi on a computer), and it will immediately appear in the list of available connections in the application on a smartphone or tablet. Select your computer from the list, click “Browse” and select the required folder. Do not forget that your smartphone can also act as a DLNA server.


