Install the windows 7 operating system from a USB flash drive. How to install windows from a USB stick? Step-by-step instruction
Hello. Probably, it is worth starting with the fact that not all computers have a CD-Rom, or there is not always an installation disk with Windows on which you can write an image (it has already been disassembled earlier). In this case, you can install Windows 7 from a USB flash drive.
The main difference there will be 2 steps! The first is the preparation of such a bootable USB flash drive and the second is the change in the boot sequence in the bios (i.e., include the check for USB boot records in the queue).
So, let's begin…
1. Creating a bootable USB flash drive with Windows 7
There are several ways to create a bootable USB flash drive. Now we will consider one of the simplest and fastest. To do this, you need such a wonderful program as UltraISO (link to the official site) and an image with Windows. UltraISO supports a large number of images, allows them to be recorded on various media. We are now interested in recording an image from Windows OS to a USB flash drive.
By the way! You can make such an image yourself from a real disk with an OS. You can download it on the Internet, from some torrent (however, beware of pirated copies or all kinds of assemblies). In any case, you should have such an image before this operation!
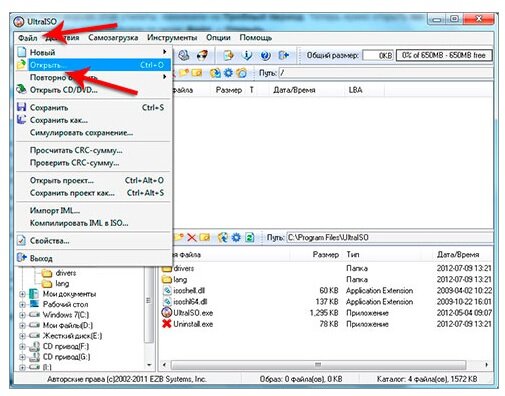
We open the image with the system in the UltraISO program
After successfully opening the image with Windows 7 OS, you should click on ""
Selecting a flash drive and parameters
Be extremely careful as if you have 2 flash drives inserted and you indicate the wrong one ... During recording, all data from the flash drive will be deleted! However, the program itself warns us about this (it's just that the version of the program may not be in Russian, so it's better to warn about this small subtlety).

A warning.
After you click on the "record" button you just have to wait. Recording takes on average min. 10-15 on average in terms of PC capabilities.

Recording process.
After a while, the program will create a bootable USB flash drive for you. It's time to move on to the second step ...
2. Inclusion in bios the ability to boot from a USB flash drive
Many people may not need this chapter. But if, when turning on the computer, he does not seem to see the newly created bootable USB flash drive with Windows 7 - it's time to dig into the bios, check if everything is in order.
If you do not have Enabled there, then use the Enter key to enable them! Next, go to the boot section (Boot). Here you can set the boot order (i.e., for example, the PC first checks for bootable CD / DVD discs, then boots from the HDD). We need to add USB to the boot sequence. This is demonstrated in the screenshot below.
The first is a check for booting from a flash drive, if the data on it is not found, a CD / DVD check is in progress - if there is no boot data there, your old system will be booted from the HDD
Important! After all the changes in bios, many people forget to just save their settings. To do this, select the "Save and exit" option in the section (often the F10 key), then agree ("Yes"). The computer will go to reboot, and should start seeing the bootable USB flash drive with the OS.
2.2 Enabling boot from USB on a laptop (for example, Asus Aspire 5552G)
By default, in this laptop model, booting from a USB flash drive is disabled. To turn it on when the laptop boots, press F2, then go to the Boot section in bios, and use the F5 and F6 keys to move the USB CD / DVD higher than the line with booting from the HDD.
By the way, sometimes it doesn't help. Then you need to check all the lines where USB (USB HDD, USB FDD) occurs, transferring them all higher than loading from the HDD.
Boot priority setting
After the changes, press F10 (this is an exit with saving all the settings that were made). Next, reboot the laptop by inserting a bootable USB flash drive in advance and observe the start of the installation of Windows 7 ...
3. Installing Windows 7
In general, the installation itself from a USB flash drive is not much different from an installation from a disk. Differences can only be, for example, in the installation time (sometimes it takes longer to install from the disk) and noise (CD / DVDs make a lot of noise during operation). For a simpler description, we will provide the entire installation with screenshots, which should pop up for you in approximately the same sequence (the differences may be due to the difference in the versions of the assemblies).
Windows setup starts. This is what you should see if you followed the previous steps correctly.
Here you just have to agree with the installation.
Wait patiently while the system checks the files and prepares to copy them to the hard drive
Agree ...
Here we select the installation - option 2.
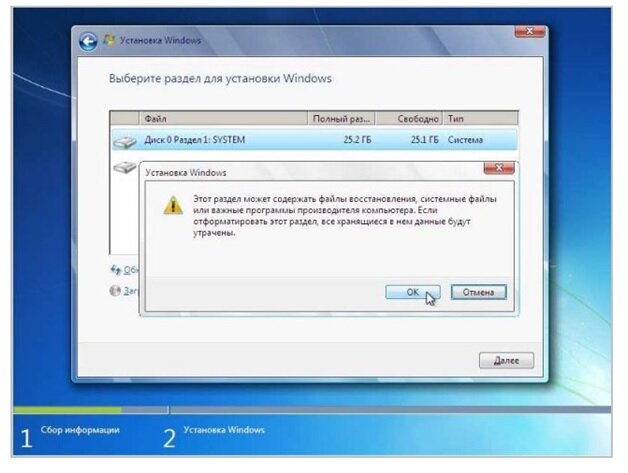
This is an important section! Here we select the drive that will become the system drive. The best thing is, if you have no information on the disk, split it into two parts - one for the system, the other for files. For Windows 7, 30-50GB is recommended. By the way, keep in mind that the partition where the system is installed can be formatted!
We are waiting for the end of the installation process. During this time, the computer may restart itself several times. We just don't touch anything ...
This window signals us about the first start of the system.
Congratulations. The system is installed and you can start working on it!
This completes the installation of Windows 7 from the flash drive. Now you can remove it from the USB port and move on to more enjoyable moments: watching movies, listening to music, playing games, etc.
How to reinstall Windows 7 from a USB stick?


Window OS is the most popular of all personal computer operating systems in the world. Its interface is simple and understandable for all users, while it provides ample opportunities for managing all processes inside the hardware and in programs. Periodically, it becomes necessary to reinstall the operating system. In this article, we will show you how to reinstall Windows 7 from a USB flash drive.
As a rule, OS installation is performed from disk. However, what about those who do not have a disk drive or who have it in an inoperative state? This is where our instructions on how to reinstall windows 7 through a USB flash drive will help.
Preliminary preparation
Before you start reinstalling the OS on your computer, make sure that you have copied and saved all files and folders that matter to you.
Find drivers for all devices connected to your computer in advance. They come with the corresponding devices, but if you have lost them, you can find and download them on the Internet.
We suggest you familiarize yourself with 2 options for recording an OS on a flash drive.
Using special utilities
In the first case, you will need to have directly the USB flash drive itself, which will be used for recording Windows, the operating system distribution kit and a set of auxiliary utilities.
- Copy the Windows 7 .iso image to your computer.
- Run a special utility to read disk images (a program such as Daemon Tools will do).
- Open the file we need with the operating system image in it.
- Go to the Boot menu and select Burn hard disk image there.
- Insert your USB stick and format it.
- After formatting is complete, click the Write button.
- Confirm the action and wait for the process to finish.
No special utilities
With this method, you will not need to install additional programs, only the operating system distribution kit and a USB flash drive.
- Call the Windows command line (Start - In the search box, type "Command line").
- Type "diskpart" and press "Enter".
- Type "list disk" and press "Enter".
- You will see a list of connected storage devices.
- In the list, find the USB flash drive to which you plan to record.
- Enter the command "select * name of the flash drive *" and press "Enter".
- Enter "clean" - "Enter".
- Then type "create partition primary".
- The system will inform you that the specified partition has been successfully created. Now it needs to be broken. To do this, enter "select partition 1" - "activate".
- Format the partition with "format fs = NTFS".
- Finally, enter "assign letter = Z" to assign a specific letter to the USB stick.
- Finally, type "Exit" and press "Enter".
- All you have to do is copy the distribution to a USB flash drive.
Boot initialization
Follow this procedure:
- Turn off the device.
- Insert the flash drive into the USB port and turn on the device.
- When the computer boots up, press a special key (the most common are DEL and ESC) to enter BIOS mode.
- Place the USB flash drive at the first position in the Boot priority order list.
- Save settings and exit BIOS mode.
Otherwise, the process of installing Windows 7 from a USB flash drive is completely the same as installing from a disk.

After finishing the Win7 installation, you will need to install any device drivers that you plan to use. In addition, you will need to install those programs that you usually use in your work.
Interested in installing Windows 7 from a USB flash drive to a laptop? This means that your computer does not have a drive or it is broken.
What to do in a situation where it is not possible to boot from a CD? There is a solution: you can install the operating system from a USB flash drive.
Before starting the description of the process of installing Windows from a Flash card, we will list all the main stages of this process, and then we will consider them in more detail:
- First: preparing the laptop for installing the operating system (in this case, Windows 7)
- Second: flash drive preparation
- Third: setting up UEFI to boot "operating system" from a Flash-card.
- Fourth: installation itself.
Note: UEFI is a replacement for the outdated BIOS.
Preparing a laptop for installing Windows 7
First, you need to transfer all the necessary files and documents from drive C to drive D. Usually they are located in the folders "My Documents" and on the "Desktop".
The installation files for some applications should be found in the Program Files folder.
Alternatively, you can transfer all important information to another flash drive (not the one with which the installation is taking place).
Preparing a flash drive for installing an operating system
First, delete or copy all the necessary information from the flash card, because files and folders will be deleted from it automatically in preparation for installation.
The flash card must be at least 4 GB in size.
Then you will need the Windows 7 installation files and folders, preferably a disk image in iso format, the UltralSO utility for installation (you can download it by typing an identical query in the search).
All is ready? Then let's get started:
Download, install and run the utility. Here's what you'll see:
Click "Trial period". A new window will open in which you need to select "File" - "Open" and point to the image from which the operating system will be installed.


Then insert the USB flash drive into your computer and select the "Format" item. After the process is complete, click "Burn".

The process will end and you will have a flash drive with the Windows 7 operating system dropped onto it. Now you can proceed to another stage, in fact, the installation itself.
Advice: It is not necessary to use the exact utility described in the article. It is just one of many programs, thanks to which you can create an installation flash drive.
Configuring UEFI to boot "operating systems" from a USB flash drive
It will not work just to insert the USB flash drive into the computer, it is necessary that the computer boots from it when it is turned on. How to do it? Using UEFI. It is in every computer.
It contains all the vital settings. One of them is the boot order. We will stop at it.
To enter UEFI, press a specific key on your keyboard when the system boots. (This key is different for many laptops, it is displayed on the screen. Usually it is F2 or Esc).
When you enter, a menu will open to you, you will immediately recognize it by its blue or gray color.

Many do not have time to press the Windows entry key in time and the computer simply boots. In this case, you should reboot and try again.
After entering, you should enter the menu and find in the settings the order of device boot. Here are some screenshots for example:


Use the arrows to select the device to boot first. For newbies, there is a dedicated UEFI navigation help. She is always in a prominent place.
Choose USB-HDD. Then exit UEFI using the Save and Exit button. All changed information will be saved. The computer will automatically restart.
Now we move on to the next step, the very final one.
Installing Windows 7
If you did everything correctly and correctly set the settings in UEFI, then you will see the inscription "Press any key to boot CD or DVD."
Of course, in English, so the screenshot is attached:

Advice: It often happens that there is no inscription. This suggests that you are wrong somewhere. You should go to UEFI again and check if all the boot settings you made from the USB flash drive have been saved. If everything is correct, it means that your flash card is not bootable at all, and for the operation you need to look for another image of the operating system and record it.
It may so happen that the installation image contains, in addition to Windows 7, utilities. In this case, you need to select the item that is suitable for starting the installation.
Good news: almost all of the operations listed below will be performed automatically by the computer.
And all the settings that you don't like can be changed to your taste after the installation is complete.

A window will open in which you need to select which version of Windows 7 you will install. Click on the one for which you have a security key.
It is often glued to the lettering on the bottom of the laptop. The system will ask for it before finishing the installation.
You don't have to enter the key right away. You can do this within a month.

A window with a license will pop up, put a tick on "Agree" and move on.

Then we select the complete installation.

Click "Disk Setup". Usually, beginners have difficulties here, so let's take a closer look at this point.

Disk setup
It happens that on the hard disk, in addition to the standard partitions (C, D, E), there are several more.
This is due to the fact that when restoring the system, it was possible to bring the computer to its standard settings.
Some find hidden size, up to 100 megabytes. The operating system itself is responsible for its creation. The section performs the function of encryption of the system.
The section has a program that can decode it.
But you should get rid of it. Before installing Windows, it is necessary to prepare the hard disk for the operation in advance. This can be done using the Acronis Disk program.
In the window that appears, click "Format".
A warning will pop up that all data will be destroyed, but now it doesn't matter, because we have a backup copy of all data. Click "OK".
When the formatting happens, feel free to click on.

The installation will take some time. After it, a window will pop up, in which the user will be required to enter names: his own and the computer.
Optionally, you can come up with a password. In order not to forget him, you will be asked to come up with a hint for him.

Choose the security mode, date and time.


With the installed network card driver, you should select the type of connection.

You can install the drivers and programs you need
So that after installing Windows at startup, the laptop boots from the hard drive, and not the flash drive, you should return the UEFI settings to their original state.
This completes the installation of Windows 7 on the laptop!
As you can see, there is nothing difficult in installing an operating system from a USB flash drive. The main thing is to carefully follow the listed points, and you will succeed.
One time is enough to memorize the whole process.
The next time you need to install an operating system from a Flash card, you will do it automatically.
Video instruction on how to install WINDOWS 7 from a USB flash drive to a laptop using the example of DELL beech
Installing Windows 7 from a USB flash drive to a laptop: A guide to action
What to do if a DVD-ROM is missing or out of order on the device, and you urgently need to install Windows 7 on it? The best solution would be to use a USB stick. But, to do it in the same way as from the installation disk will not work. Installing Windows 7 from a USB flash drive has its own characteristics. We will consider how to put it below. This information will also be useful to owners of netbooks - these devices simply do not have a floppy drive.
Pre-installation preparation
In order for the necessary information on the computer to be saved in the "C" drive, it must be copied to a USB flash drive (but not to the one with which you will install Windows) or a DVD disc. If you do not plan to format the entire hard drive of a laptop, computer or tablet, then you can simply transfer information from drive "C" to any other drive, for example "D".
Take care of the drivers. If you do not have a disc with drivers for the equipment installed on your PC, then it is better to download them from the Internet in advance. This is done in case if suddenly, for some reason, the version of Windows 7 that you are installing does not have the necessary software or it will not work correctly.
Creating a bootable USB drive
First, you need to create an ISO image of the Windows 7 system. To do this, download a special UltraISO utility from the official website.
Install it, run it. A trial version of the program will be enough to create a bootable USB flash drive.
In the working window of the program, click "File - open":
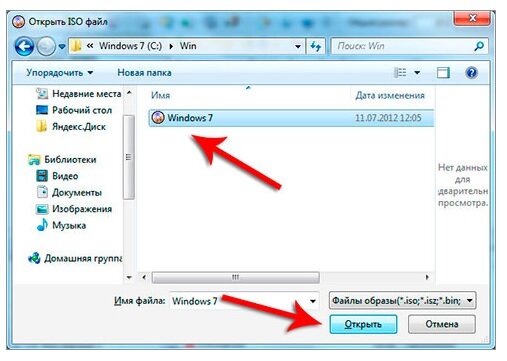
In the window that opens, find a file with an ISO image of Windows 7 on your computer and click the "open" button.
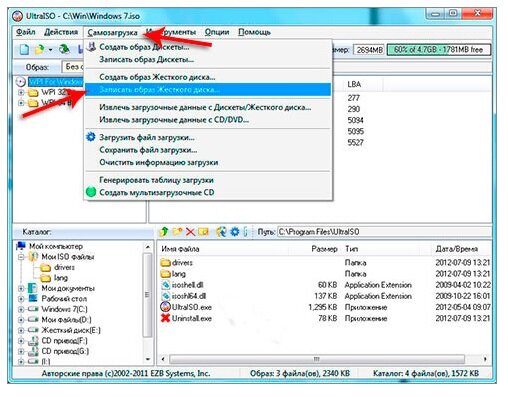
The next step is to find in the "Disk Drive" window the flash drive to which we are going to write the image (the flash drive, of course, must already be inserted into the USB connector). Click on the "Format" button.
Please note that all information that is on the USB drive will be erased, so make sure to save it to another medium or hard drive in advance that is not used in the Windows installation.

We start formatting by choosing the NTFS file system.
Upon completion of the formatting process, the "Write" button will become active in the program window. We press on it.

On the prompts that appear, click the "Yes" button - after all, the information has already been erased from us.

Now you can watch the recording process. At the end, a message will appear stating that the recording is complete.

Making changes to BIOS settings
There is nothing easier than inserting a USB flash drive with a ready-made image of Windows into your computer. But, in order for it to start loading data from this particular medium, you will have to do a number of BIOS manipulations.
In order to get into the BIOS, we restart the computer. At the moment of turning it on (when the sound signal sounds), press the Delete key. This key enters the BIOS on most devices. However, it is possible that on your laptop it will be the Esc key, or F2. Just read the labels at the bottom of the screen when you turn it on - there will be a key for the BIOS call command.
If the key is pressed correctly, you will see one of the variants of the pictures below on the screen.

We find in the BIOS an option that is responsible for the order in which the devices are booted. The name of this option most often contains the word BOOT.

We use the arrow keys to change the order of loading devices on the PC. The first on the list will be your hard drive, but we need our flash drive to be loaded first. We find it in the list and put it in first place.

Please note that your flash drive may have a different name, but you must find it.
Save the changes made with the appropriate key (we can read the key assignment at the bottom of the screen).
If everything is done correctly, the computer will reboot and start working from the bootable USB flash drive.
Installing Windows 7 from a USB flash drive
That you did all the actions of the previous section correctly, you will be notified by the inscription on the black background of the screen: Press any key to boot from CD or DVD. This message prompts you to press any key to start loading the flash drive.
If your Windows 7 installation image does not contain any additional utilities, but only Windows itself, then the installation will begin immediately. If there are additional sections, then first select the desired item in the menu.
When the question arises of choosing a specific operating system, give preference to the one for which you have a key.
Pay attention to the item in the installation process "Selecting a partition for installing Windows". Select the desired section and click the "format" button. During the formatting process, all information from this section will be deleted, including the old version of Windows.
We continue the installation according to the prompts that appear on the monitor screen.
If you follow these instructions, then it is quite possible on your own, without the help of specialists, to install Windows 7 from a USB flash drive to a computer or laptop, even if you have never done this before. Try it, you don't need any special knowledge at all - you will succeed!
If you needed to install Windows 7 from a USB flash drive via BIOS, then our article will be a great helper for you.
Installing a new operating system on a computer is a fairly common problem that can arise due to the slightest malfunction of the system or the actions of an inept PC user.
This issue has also become relevant in connection with the statement by the official representatives of the Windows company about the suspension of technical support for the XP operating system.
Today, almost all users have completely switched to the so-called seven.
Our step-by-step guide will help you quickly and easily bring your computer back to life.
Preparing your computer for reinstalling Windows
Before you start working on new software, you need to properly prepare your PC. First you need to remember what important information is stored on your computer and save it to a portable storage device.
Particular attention should be paid to the local drive C, it is on it that the largest amount of information is stored. Almost all users store their media files (photos, videos) in the "My Documents" folder or directly on the desktop.
These files are often located on the disk along with the already installed OS. You can also use the free space on another local disk to save information.
It is very important to check if there is a driver for the network card on the PC before reinstalling Windows.
If you install a new system via USB, and then it turns out that there are no drivers for the network card in the distribution kit, then you will not be able to configure the drivers and the Internet connection.
For your own confidence, it is better to once again make sure that the drivers are available. Also, be sure to check if you have drivers for your sound card, audio card, video card, etc.
Preparing a flash card for software installation
To install an operating system from a flash drive, we recommend that you adhere to the following rules:
- The minimum size of a flash drive must be 4 GB. This is the amount of space required to store all important components and files;
- Mandatory preparation of the Windows 7 distribution kit for recording and saving its image (* iso format);
- Selection of the program for creating a disk image.
Advice! UltralSO is considered to be one of the best disk imaging utilities. The latest version is on the developer's website
Install and run the utility on the PC, and then select the previously selected disk image in it. Step-by-step instructions for using the program will help you quickly understand all the intricacies.
- Running
2. Now the main working window opens in front of you
3. Go to recording the hard disk image
4. Now you need to connect the flash memory and enable formatting. When the process of formatting the flash drive is over, you can start recording.
5. At the end of the recording, there will be Windows in the space of your flash drive, with which you will reinstall.
Comment! To create a USB flash drive for installing the system through the BIOS, you can use the toolsWindows.
Configuring Bios to work with a bootable USB flash drive
Just connecting the installation flash drive to a PC to install new software is not enough; preliminary configuration of the computer is required so that it starts to boot from it when it is turned on.
All settings are done in BIOS. Any laptop or computer has a BIOS that stores important settings, including, it remembers the order in which devices should be loaded. It is this setting that we now need for further fruitful work.
To start Bios, you need to hold down or press a certain key on the keyboard at the moment the computer is turned on.
You can find out which key we need from the information on the monitor. Typically, these keys are Esc, Delete, F2. If you entered Bios, then one of the following screens will appear in front of you:
If the login attempt is unsuccessful, restart your computer again and try to start BIOS again. To make it easier for you, we have placed a table with the main options for enabling Bios.
Keyboard shortcuts to enterBIOS depending on the manufacturerBIOS
Basic keyboard shortcuts for launchBIOS depending on laptop and computer manufacturers
After you get into BIOS, you need to find the option that is responsible for loading devices. It is usually found in the menu and has the word BOOT in its name. Other options are not excluded, you may even have to look.
Here are some examples:
As a rule, the choice of the main device for loading occurs by pressing the arrows on the keyboard, although sometimes there are other control methods. If you can't figure it out on your own, then refer to the help that glows in the BIOS.
In our case, the USB-HDD acts as the first boot device (there may be another name). After selecting it, you need to exit BIOS with saving all settings using the Save and Exit Setup item.
After this step, the computer should restart and we will move on to the main stage, for which we are here.
Install Windows 7 using a bootable USB flash drive
If everything was correctly recorded on the space of the flash drive, and the correct settings were made in BIOS, then you will see the following message in front of you on the monitor screen, which says that you should press any key to activate the download.
If there is no such inscription, then you will have to check your actions. To do this, go to BIOS and make sure that the boot settings from the USB flash drive have been saved. If there are no errors in BIOS, then most likely you failed to create a bootable USB flash drive and you need to repeat the whole process again.
If there is an inscription, then congratulations, your Windows installation of the new version through the BIOS has begun. Some installation images, in addition to the operating system itself, also contain various additional programs, then you will have to select the desired item from the menu.
It should also be said that some disks perform most of the settings described below by default. This is not worth worrying about, as all settings can be changed after the software installation process is complete.
A welcome screen appears in front of you, on which you select the desired data. After the setting is made, you should click on the "Next" button, and then "Install".
In a new window, the terms of the license agreement appear in front of us, which you, of course, read very carefully, and then agree by ticking in the specially designated window and pressing the "Next" button.
Final stage of installation
In the new window, you will have to choose what type of installation we need. We need a complete type. Then you will have to work a little with the disk, on the space of which the new version of the software will be recorded.
To do this, select the required disk partition in the menu and click on the "Disk settings" button, after which we start formatting.
We have already described how this is done above. Here you just need to change from USB-HDD to the name of your drive. This is a very easy action and shouldn't give you any trouble.
When the reboot is complete, Windows installation will continue.
- We enter names for the computer, laptop and users.
- Setting a password, if necessary.
- Enter the name of the license key, if any (you can skip this step).
- Choice of security settings ("Recommended parameters").
- We set the date and time.
- We carry out the network configuration.
Thanks to these simple steps, you can install Windows 7 through the BIOS using a USB flash drive.