Responsiveness of contact information. Building a better contact page
Good afternoon friends! In this tutorial, I will teach you how to create a WordPress contact form using plugins. A WordPress Contact Form is the perfect solution for anyone looking to keep in touch with their audience or receive email requests for a service. We will learn with you how to make a pop-up form in a modal window. After reading this article, you will be able to embed the form on your sites yourself. So let's go.
Why do you need a WordPress contact form?
You may be surprised by the question why do I need a feedback form on the WordPress site? Why not just add an email address to the site so people just write to me?
This is the most common question from newbies who are afraid to add form code to a site without programming knowledge. Truth be told, you don't need any code at all when creating a WordPress contact form. In this tutorial, we will create a contact form step by step, and even the most complete beginner can do it.
Below are the top 3 reasons why using a form is better than just adding an email address to your website.
- - spambots with enviable regularity snatch through their parsers mail addresses where there is a mention of the mail domain and enter it into their database in order to send you unwanted correspondence later. On the other hand, when using the WordPress feedback form, you get rid of the problem of the dominance of SPAM emails to your mailbox.
- Completeness of information - when they send mail, people don't always send all the information you need. With the help of the contact form, you yourself determine which fields you need to make it easier for users to send you an email (name, email, phone number, comment, and more).
- Save time - WordPress contact form can save you time. In addition to the completeness of the information that you requested from the user and that he will send you, you can also indicate what awaits in the next step, for example "Your application will be reviewed within 24 hours" or Watch the video and many other useful things.
Below is an example of a contact form that we will be creating in this tutorial.

Let's start, gentlemen.
Step 1: Choosing the Best WordPress Contact Form Plugin
At this step, we need to decide on the choice of the appropriate form plugin. There are a great variety of them, both free and paid. In this tutorial I will tell you about different plugins so that you have a wide choice. In the first case, the WPForms plugin will be involved.
Below are the reasons WPForms is the best feedback plugin:
- First, it is the most beginner-friendly plugin. By simply dragging and dropping the blocks you need, you can create a contact form in a few clicks.
- WPForms Lite is completely free.
- When you are ready for more powerful functionality and if it really matters to you, then you can upgrade to the Pro version.
Great, if these reasons were sufficient and I convinced you, then let's move forward.
Step 2: Installing WordPress Contact Form Plugin
For this tutorial we are using the Lite version because it is free and easy to use. You can install it by logging into your blog and going to Plugins - Add New.

In the search bar, type the name of our plugin and click Install now.
After installing the plugin, make sure you activate it. This is shown here:

Step 3: Create a Contact Form in WordPress
So, after successfully completing the plugin activation, it's time to create our feedback form. To do this, in the blog admin panel, click on the WPForms Menu tab and go to Add New.

This will open the Wpforms builder for you, where you can create a WordPress contact feedback form by simply dragging and dropping the blocks you want. There are two pre-built templates available in the free Lite version (blank and simple form). You can use them together to create the one that is right for you. In this example, we have chosen the second option for you, i.e. a simple contact form. Add a name, Email and a text field to it.

You can click on each field to edit it. You can also drag and drop the form fields using the mouse.
If you want to add a new field, just select the one you need from the list on the left and drag it to the work area.

When you're done, just click the Save button.
Step 4: Configuring Notifications and Confirmations
Once you have successfully created a WordPress contact form, it is very important to set up your notification and confirmation forms correctly.
The confirmation form is what your users see when they send you a request from the form. This can be a thank you message or you can redirect them to another dedicated page.
A notification form is the messages you receive when you receive a new application or email from your WordPress site.
You can customize both of these fields by going to Setting inside the WPForms Form Designer Plugin.
We did not set to touch by default and left the Confirmation Form field with the message "Thank you for your contact" as it is. However, you have the right to change it to a different text or redirect the user to a separate page.

The best thing about this plugin is that the default settings are just perfect for newbies. They don't need to figure out what to do or what to change. Everything is very intuitive and simple. When you go to the notification settings, all fields will be dynamically pre-filled.

By default, notifications are sent to the mail that you specified in the settings. If you want to change the destination for sending notifications, you can also easily change it. If you want to specify several mail addresses (separated by commas), then please, hand the cards, as they say 🙂
The Email Subject field will be automatically filled in with your form name. The name field will be taken from the username (your name). When you reply to a letter, it will go to the mail with the name of the user who filled out the contact form.
Step 5: Adding a WordPress Contact Form to the Page
At this step, when you have built and configured the feedback form, you need to create a separate "Contacts" page for it, where you can place it. Either you create a new one, or you edit an existing page where you can add it.
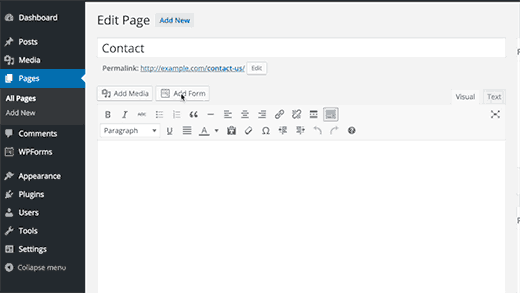
We will use a simple shortcode to insert a form into the page. Just click on the "Add form" button and select the name of your form to insert it into the page.
Fine. Now save the page and open the preview to see the changes.
This is how the form will roughly look on a simple WordPress page:

If you just want to add a form to a page, then congratulations. All steps have been completed successfully. If you want to add it as a widget to your sidebar, continue below.
Step 6: Adding a WordPress Contact Form to the Sidebar
The WPForms plugin comes with a built-in feedback form widget that you can add to your sidebar or any other area on your site (like the footer).
To do this, we need to go to the "Appearance" -\u003e Widgets section. There you will see the pre-installed form plugin widget on the left side. Simply drag and drop to set the display order in the desired area in the sidebar.

The next step is to specify the name of the widget and save. Go to the site and see the result.
This concludes our review of our WPForms contact form plugin. But, especially for you, I have prepared another review of one free plugin, with which we can make a pop-up feedback form and all the same features as in the previous one. It is called Contact Form 7. It is really very powerful and its trump card is that it is completely FREE!
It can also be made responsive, that is, the feedback form will adapt to the screen size of your device.
So, just in case, so you know they are J
How to make a contact feedback form using Contact Form 7
We continue to understand the issue of creating forms for accepting applications from your site. Ahead we have another WordPress contact form plugin called Contact Form 7. Let's install it on our blog and activate it as we can.

It's already installed on my site, not on this blog. The procedure is standard. Now we need to go to the blog admin area and create a new form that will collect us applications and other useful information. Go to the section "Contact Form 7" -\u003e Add new.

Fine! Now let's give it an appropriate name, in my case there are a lot of these contact forms. Let's choose one, for example "Site promotion order form"

I will briefly tell you what we need here. First of all, we need to decide how many form fields we want to make. I must say right away that there is no need to do 100,500 fields and it is pointless, for the simple reason that people will close your site and will not leave a request. They need to make this step easier. That is, if you think about it, then we need from a person that:
- His name to refer to (personal appeal)
- Mail address (feedback, where to send him an offer)
- A phone number to call immediately (if it happens quickly, it will become your client anyway)
- The "Submit" button itself
These are basic data, others you can already find out in the course of correspondence or telephone conversation. Is it logical? I think yes. Let's move on.
Creating Contact Form Fields in the Contact Form 7 Plugin
So, we have decided on the number of fields, now we need to create these fields. The following tabs are available to us:
- Text (Any text field, for example "Name", "Ask a question", or any other name that you will collect through this field)
- Email (there is only one purpose for the user to enter)
- URL (the site address will be entered in this field, other values \u200b\u200bare not acceptable, an error will be generated)
- Tel (a field with a phone number for our contact form on WordPress, numeric values \u200b\u200bare allowed, the text will give an error)
- Number (A numerical range of values, you can apply, for example, to the price: "how much are you willing to pay for the site? From 23,000 to 120,000 rubles")
- Date (We indicate the date, from which to what date. Example: "Booking a car from 13/04/2016 to 25/04/2016")
- Text Area (text area, you can enter text here as a comment)
- Drop-Down Menu (Drop-down list). Implemented on my blog, you can take a look. At the end of each article, I suggest that users create either a simple website or an online store. This is the functionality that this option provides.
- Checkboxes (multiple choice, for example: Website + Logo design + promotion + contextual advertising)
- Radio buttons (Selecting a single item, for example: "You order either contextual advertising or targeted")
- Acceptance (You accept the terms of the agreement, i.e. user information, such as a public offer)
- Quiz (Quiz is a series of short questions, you can also insert it into the contact form).
- reCaptcha (Confirmation that you are not a robot and will not spam.) Good protection against SPAM. Note: this option works if you have connected the Really Simple Captcha plugin.
- File (If you want to allow users to upload a file to you, for example: "Attach the technical specification for the development of the site").
- Submit
So, we have decided on the fields, you also know the meaning of each. Let's get down to building our WordPress contact form.
In the example below, I used 2 fields: Name, Email. Accordingly, you need these tabs:

By clicking on the text tab (Text) we get into the dialog box:

Here we need to click on the checkbox Field Type - Required. Made so that if the user does not enter a name in it, then he will not be able to send you an application, there will be a sending error, that not all fields are filled in correctly.
Then you will see a shortcode for inserting this field and next to it a blue Insert Tag button. This will add one new contact form field.
So that you don't get confused, I highlighted it with style. Code below:
< div class = "col-md-4" > < label class = "sr-only" > Full Name< / label > [text * text - 658 class: form - control placeholder "(! LANG: Your name" ] !}< / div > |
And here is the screen:

We do a similar operation for the "Email" field. We click on the appropriate tab and find ourselves in such a dialog box.

Absolutely no different from the previous one, we just repeat our actions with you. My email field also has a style. Below is the code:
< div class = "col-md-4" > < label class = "sr-only" > Full Email< / label > [email * email - 447 class: form - control placeholder "(! LANG: Your Email" ] !}< / div > |
And here is the screen:

And finally, the "Submit" button. She's all about styles.
< div class = "col-md-4" > [submit class: btn - flat class: col - xs - 12 "Order"]< / div > < / div > |
Important note:Dear friends, in this example I am using responsive styles to create a contact form in WordPress, which means it can accept forms of any screen size.

You will see the button in the upper right corner. You certainly won't miss. 🙂
We have done some of the work, now we move on to the next stage.
Setting up a mailing address for receiving applications
At this step, we need to make some settings so that the letters go exactly to our mailbox. I will explain below how to achieve this.
We need to click on the large "Letter" tab. It will be the second after the Form Template.

The first thing that you will see is your tags that you added, we need to insert them into the body of the letter, it is they who will substitute the data that the user enters from the form. I think I explained it clearly.
Now by fields:
- To (Where the application will be sent, in my case, this is my email address, you can specify several addresses where to send applications)
- From (The From field, that is, the value will be substituted that the request comes from my studio site)
- Subject (Serves to determine from which form the application comes, in our case it is an application from the site promotion form).
- Additional Headers (Additional headers, we do not touch them, they are needed for the correct form submission)
- Message Body (The body of the message, here you indicate from whom the letter came and from which address, for example: "From: Ivan" "Mail address: vasya @ mail. ru »)
- File Attachments (I do not touch the attachments to the file)
Now we need to set up notifications about successful or unsuccessful sending of an email from a WordPress contact form.
These will be messages that will be shown to the user in response to his actions with the form. They are in English by default. I have translated into Russian the most necessary for you. There will be more than enough of them, and if not, then Google translator will help you. So let's get started.

- If the message is successfully sent: “Your message was sent successfully. Thank you."
- When sending a message from the form incorrectly: “Error sending message. Please try again later or contact the site administrator. "
- Fill error: “Fill errors. Please check all fields and submit again. "
- Submitted data is identified as spam: “Error sending message. Please try again later or contact the site administrator. "
- Some conditions must be accepted: "Please accept the conditions to continue."
- Some fields must be filled in: "Please fill in a required field."
- Exceeded the length of characters in the field: "Too much data specified."
- Insufficient length of characters in the field: "There is too little data specified."
- Invalid date format: "The date format is invalid."
- Early date at minimum: "The date is too early."
- Late date at maximum limit: "The date is too late."
- Failed file upload: "Failed to upload file."
- Unauthorized file type: "This file type is not allowed."
- Uploading a file that is too large: "This file is too large."
- File upload failed due to PHP error: “Uploading file failed. An error has occurred. "
- The number format entered by the sender is invalid: "The number format is invalid."
- The number is less than the minimum limit: "This number is too small."
- The number is greater than the maximum limit: "This number is too large."
- The sender did not enter the correct answer to the question: "You have entered an incorrect answer."
- The e-mail address entered by the sender is incorrect: "Invalid e-mail."
- The URL entered by the sender is invalid: "Invalid URL."
- The phone number entered by the sender is incorrect: "Invalid phone number."

Very well. We have finished setting up the form, now we need to insert it into the site. To do this, using the already known technology, go to an existing page or create a new one. In my example, I'll show you an example of an existing form on a WordPress site page.
Since our form collects applications for website promotion, we will go to a similar page.
To insert our contact form, we need to copy the shortcode assigned to it by the plugin. It is available under the name of your form.

Copy and paste into our page, after going to a text editor (not visual). Presented in the screenshot below:

Let's save our page and see what happened in the end in the browser:

Super! Now let's try submitting the form to it without filling out anything. And this is what we will see.

An error occurred while submitting from the form because the user did not enter the required data in the fields. Now let's enter the correct data and see what we get in this case. 
Click submit and this is what our form writes:

Now let's see how our application looks like. They come to my mailbox. Check delivery:
Let's go inside to make sure that the encoding and all data are correct.

Everything is alright. The form is working properly and submitting data. Now we can collect applications that will come to you when you start, if we are talking about regional promotion.
So, we've covered how to create a WordPress contact form on a website page. Now I will tell you how to do pop-up responsive feedback form using our plugin Contact form 7.
Making a pop-up responsive contact feedback form in WordPress
In order for our form to become responsive, that is, "rubber", we need to connect one more plugin, or rather its addition to Contact Form 7 - it is called Bootstrap Contact Form 7. Install and just activate it and that's it - it works. You don't need to make any settings with it. Installed and forgotten.

In the next step, I'll tell you what changes need to be made to make our form pop-up and responsive. I made a similar implementation on the main page of my studio site. To do this, go to the index.php template, which is located in the "Appearance - Editor" section. We will only work with the code, manually.
Our popup form will display in a modal dialog box like this:

To achieve this result, you need the following code, I'll show it in full in the snippet:
To order
< a href = "#" class = "btn btn-primary btn-flat" data - toggle = "modal" data - target = "#modal2" > To order< / a > < ! -- Modal -- > < div class = "modal contact-modal fade" tabindex = "-1" id = "modal2" role = "dialog" aria - labelledby = "myModalLabel" aria - hidden = "true" > < div class = "modal-dialog" > < div class = "modal-content" > < div class = "modal-header" > < button type = "button" class = "close" data - dismiss = "modal" > < span aria - hidden = "true" > & times;< / span > < span class = "sr-only" > Close< / span > < / button > < h4 class = "modal-title black" id = "myModalLabel" > Submit your application< / h4 > < / div > |
Responsive web design is a setup where the server always sends the same HTML code to all devices and CSS is used to alter the rendering of the page on the device. Google "s algorithms should be able to automatically detect this setup if all Googlebot user agents are allowed to crawl the page and its assets (CSS, JavaScript, and images).
Responsive design serves all devices with the same code that adjusts for screen size.
TL; DR
- Use the meta name \u003d "viewport" tag to tell the browser how to adjust the content.
- Check out Web Fundamentals for more documentation.
Using meta name \u003d "viewport"
To signal to browsers that your page adapts to all devices, add a meta tag to the head of the document:
As a general rule, if your site works in a recent browser such as Google Chrome or Apple Mobile Safari, it would work with our algorithms.
Why responsive design
We recommend using responsive web design because it:
- Makes it easier for users to share and link to your content with a single URL.
- Helps Google "s algorithms accurately assign indexing properties to the page rather than needing to signal the existence of corresponding desktop / mobile pages.
- Requires less engineering time to maintain multiple pages for the same content.
- Reduces the possibility of the common mistakes that affect mobile sites.
- Requires no redirection for users to have a device-optimized view, which reduces load time. Also, user agent-based redirection is error-prone and can degrade your site "s user experience (see Pitfalls when detecting user agents for details).
- Saves resources when Googlebot crawls your site. For responsive web design pages, a single Googlebot user agent only needs to crawl your page once, rather than crawling multiple times with different Googlebot user agents to retrieve all versions of the content. This improvement in crawling efficiency can indirectly help Google index more of your site "s content and keep it appropriately fresh.
If you "re interested in responsive web design, start with our blog post on Webmaster Central and visit the Web Fundamentals site.
Important: Be sure not to block the crawling of any page assets (CSS, JavaScript, and images) for any Googlebot using robots.txt or other methods. Being able to fully access these external files helps our algorithms detect your site "s responsive web design configuration and treat it appropriately. Caution: To make sure your implementation is successful, avoid the common mistakes.JavaScript
One part of building mobile-friendly sites that requires careful consideration is the use of JavaScript to alter the rendering and behavior of the site on different devices. Typical uses of JavaScript include deciding which ad or which image resolution variant to show in the page.
This section describes different approaches to using JavaScript and how they relate to Google "s recommendation of using responsive web design.
Common configurations
Three popular implementations of JavaScript for mobile-friendly sites are:
- JavaScript-adaptive: In this configuration, all devices are served the same HTML, CSS, and JavaScript content. When the JavaScript is executed on the device, the rendering or behavior of the site is altered. If a website requires JavaScript, this is Google "s recommended configuration.
- Combined detection: In this implementation, the website uses both JavaScript and server-side detection of device capabilities to serve different content to different devices.
- Dynamically-served JavaScript: In this configuration, all devices are served the same HTML, but the JavaScript is served from a URL that dynamically serves different JavaScript code depending on the device "s user-agent.
Let "s look at each of these configurations in detail.
JavaScript-adaptive
In this configuration, a URL serves the same contents (HTML, CSS, JavaScript, an image) to all devices. Only when the JavaScript is executed on the device is the rendering or behavior of the site altered. This is similar to how responsive web design, using CSS media queries, works.
As an example, a page serves all devices the same HTML that includes a
2. Page header
In the page header
logo ;
button to show / hide the main menu